When running applications such as WordPress on Google Cloud, it’s important to have regular backups of your website – this way, you can quickly restore your website in case of an emergency.
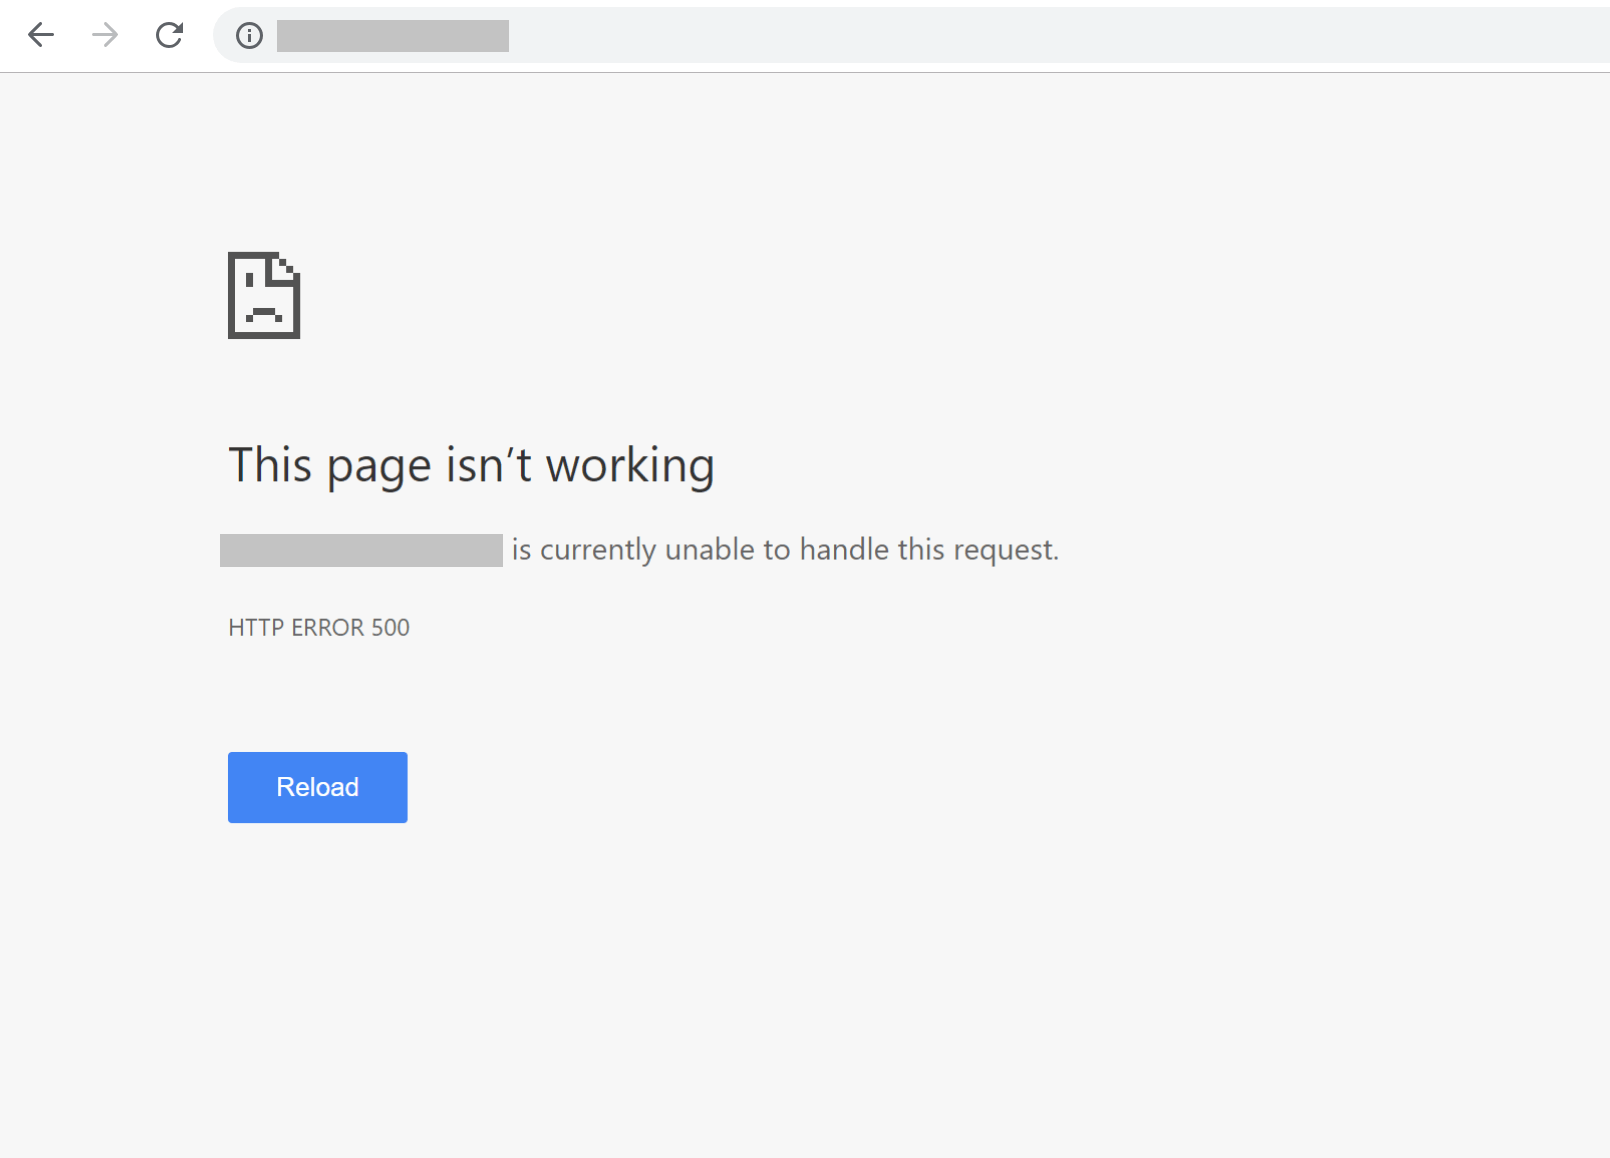
If your website ever goes down on Google Cloud, it’s possible to completely restore it in just a matter of seconds!
In this tutorial, you will learn step-by-step how to backup and restore websites hosted on Google Cloud.
Before getting started with this tutorial, you should have already deployed a website on Google Cloud, and reserved a static IP address for your instance.
Backup a Website
Restore a Website
Backup a Website
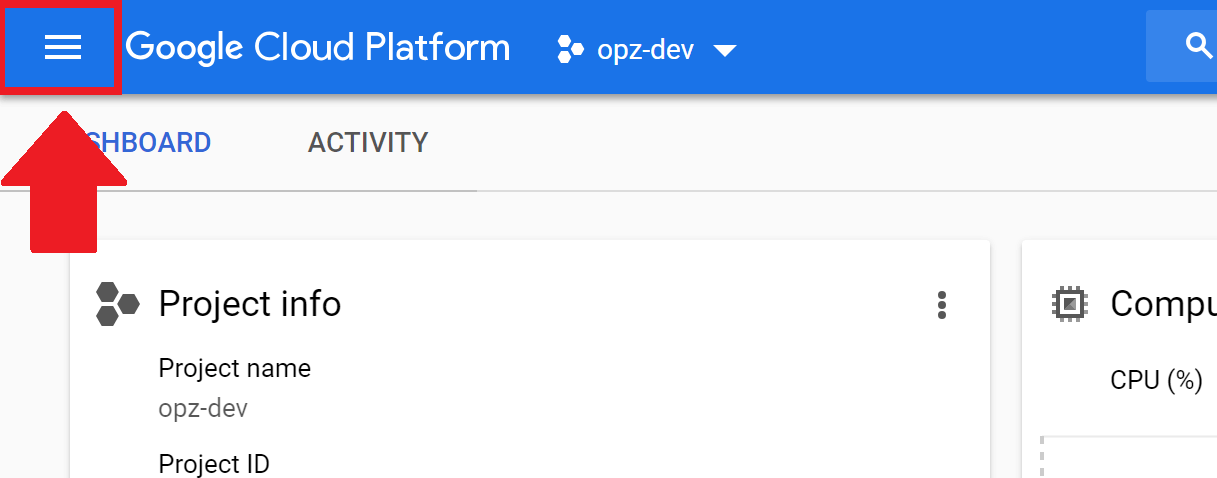
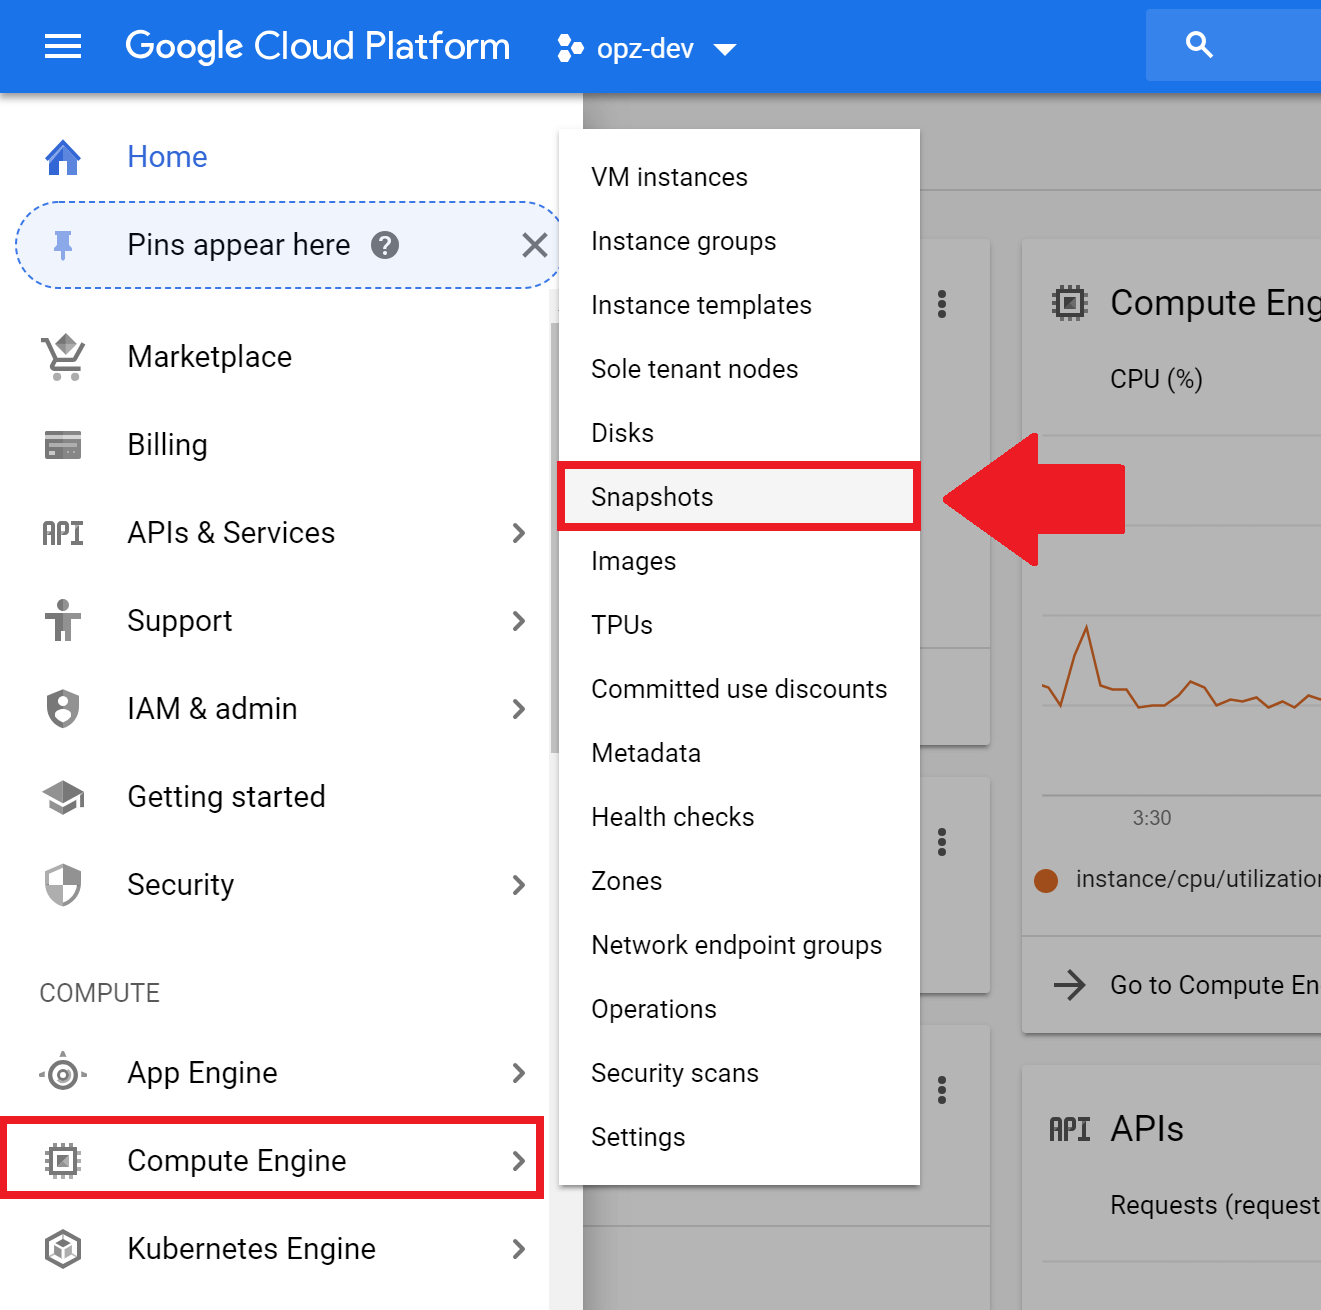
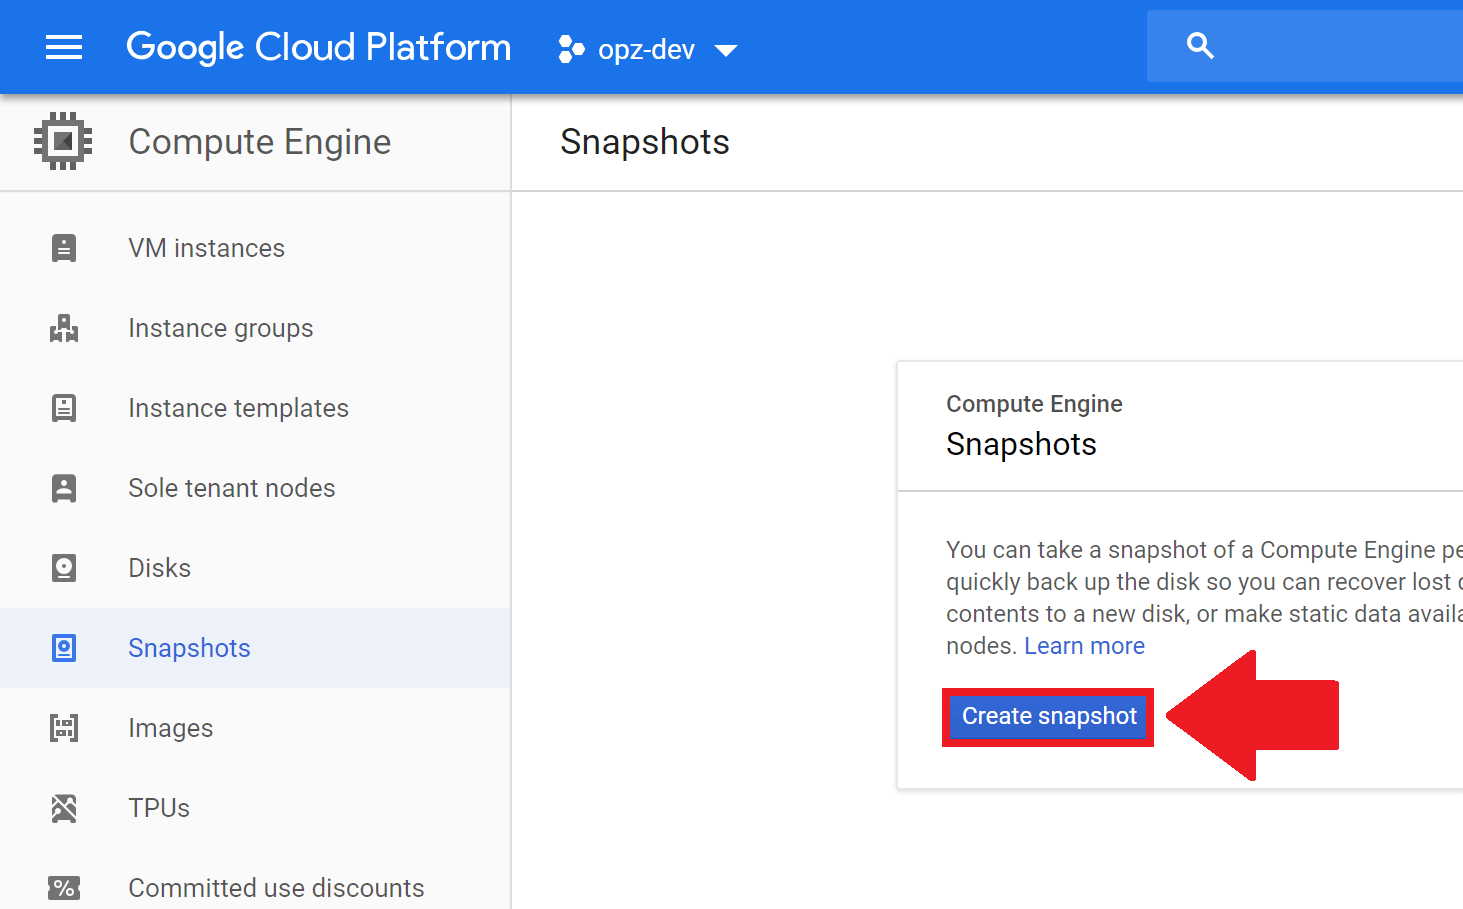
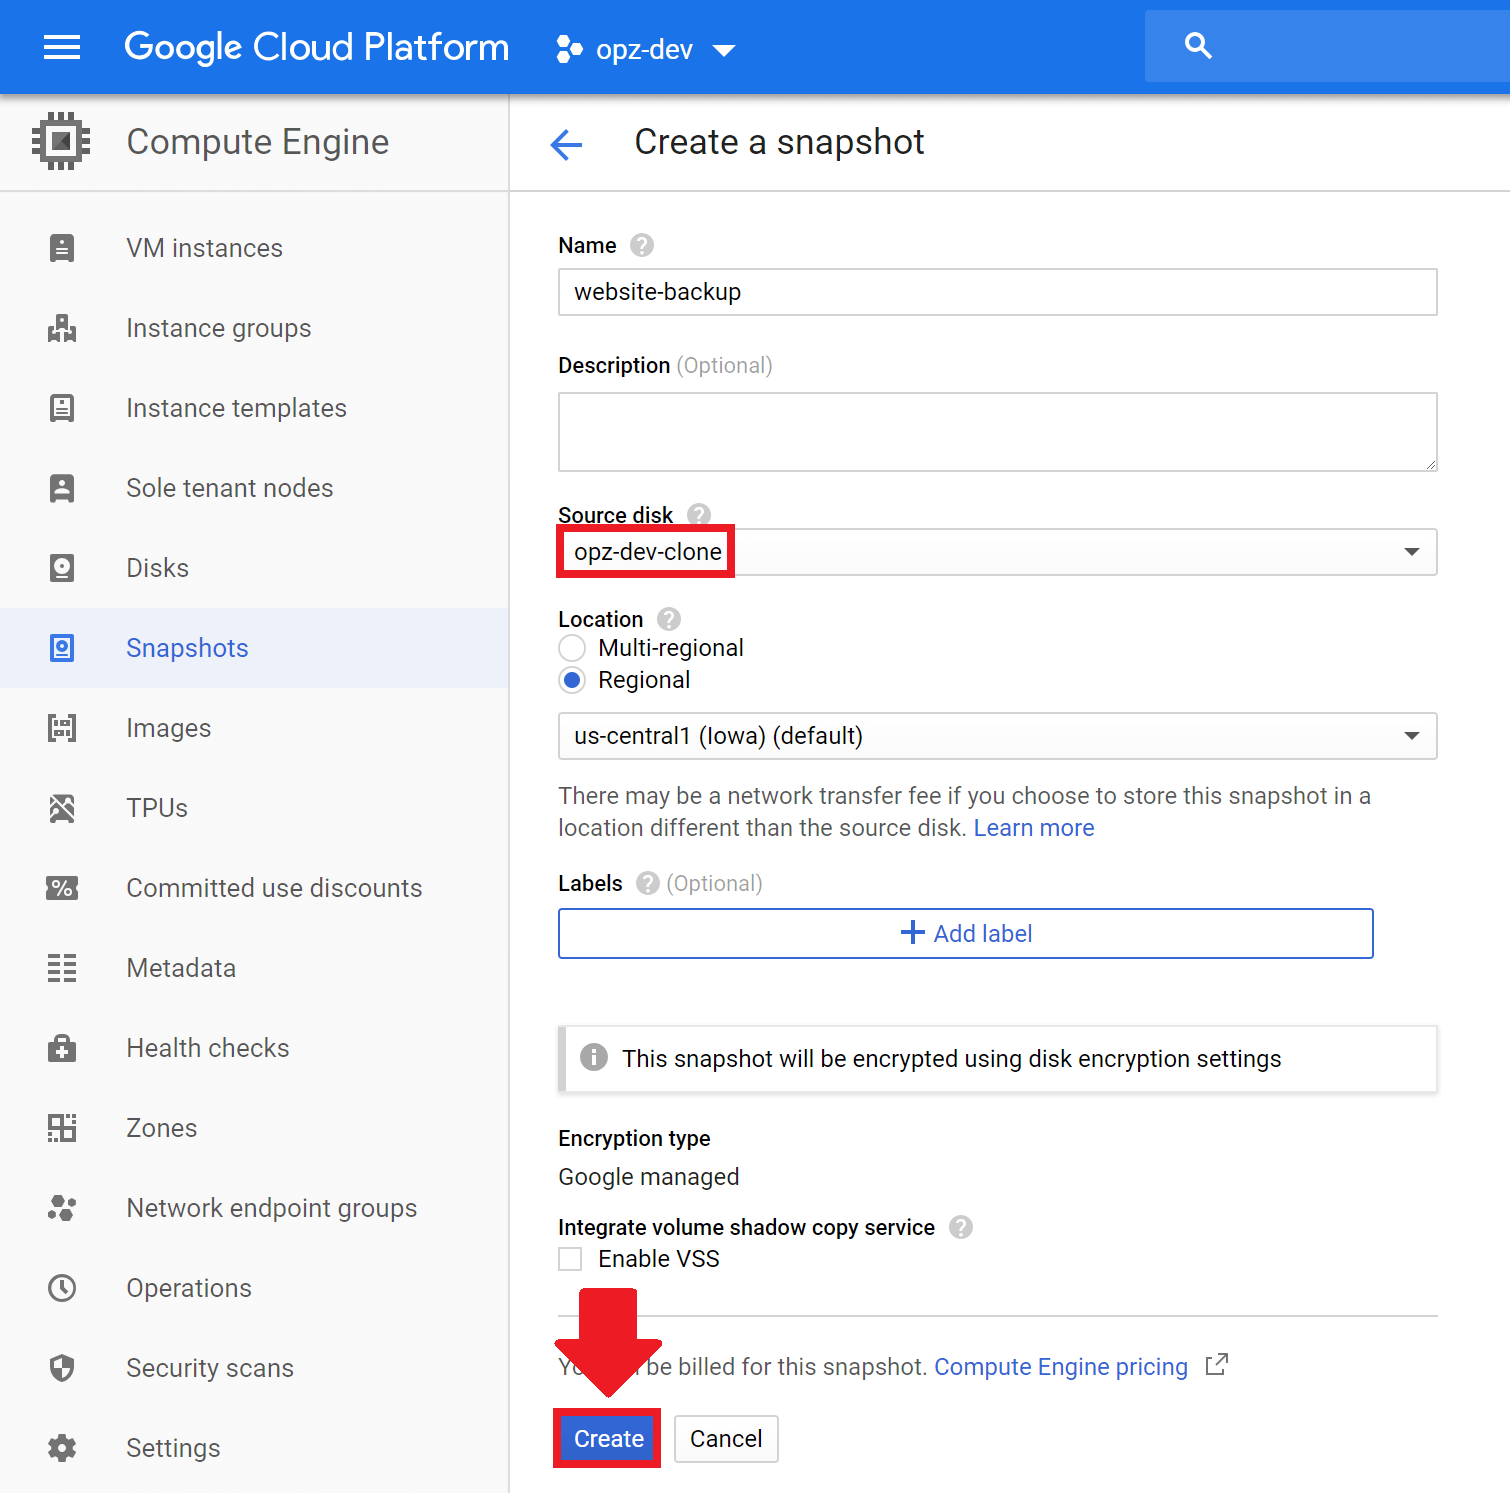
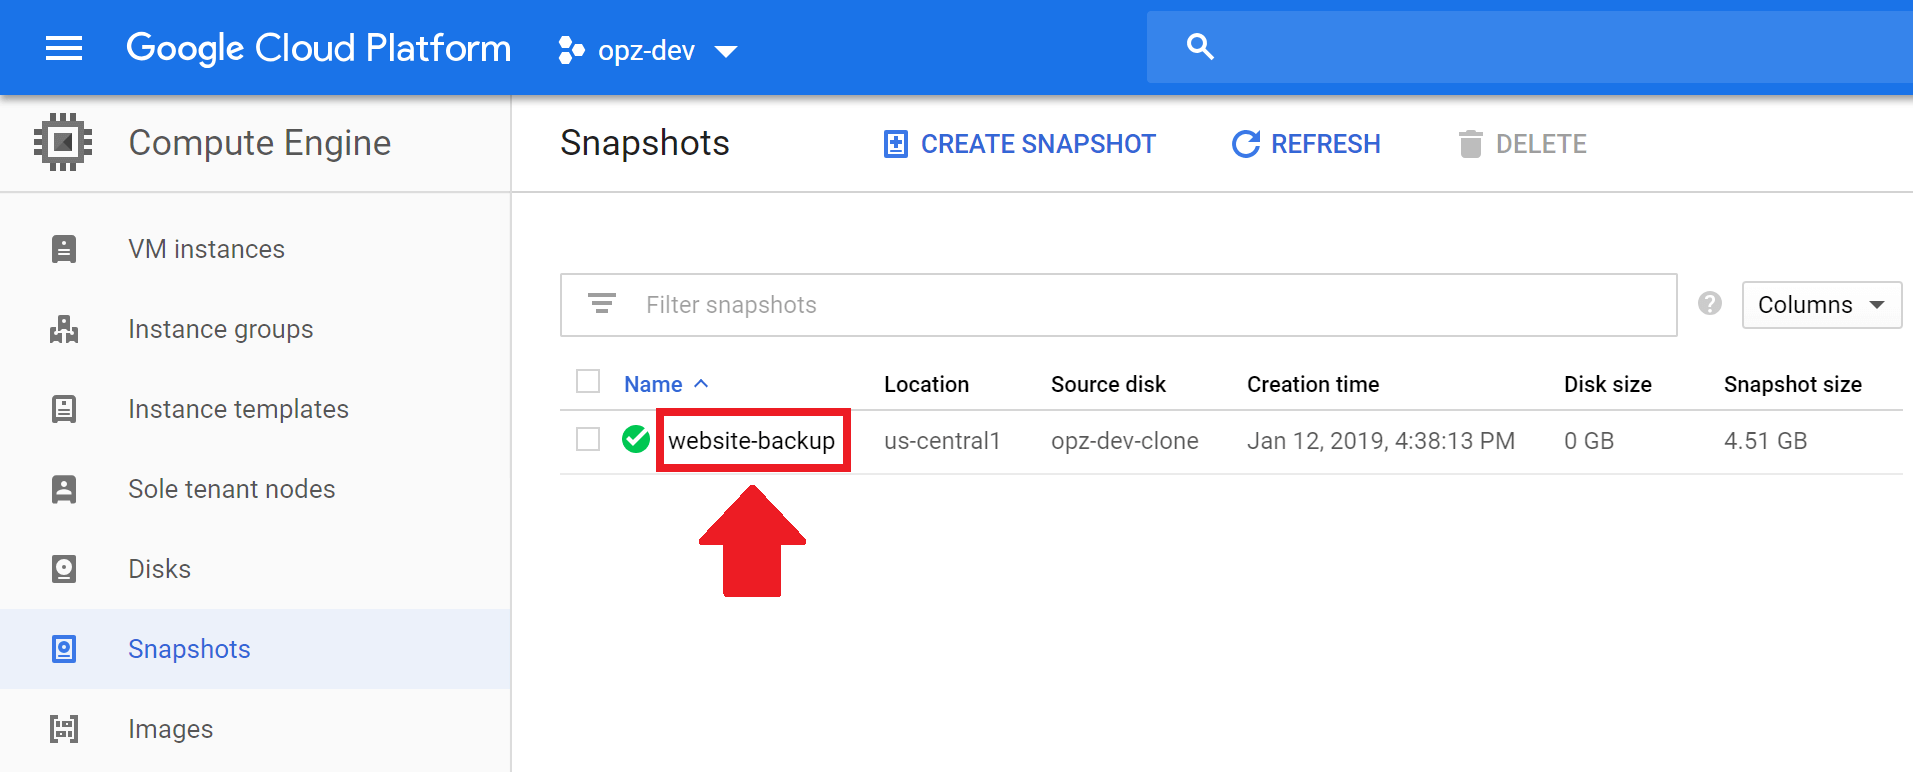
1. Create a Disk Snapshot
In this section of the tutorial, you will create a snapshot of the persistent disk that contains your website. Snapshots are used to capture the state of persistent disks at a given point in time, allowing you to restore your virtual machine instances in cases of failure.
Restore a Website
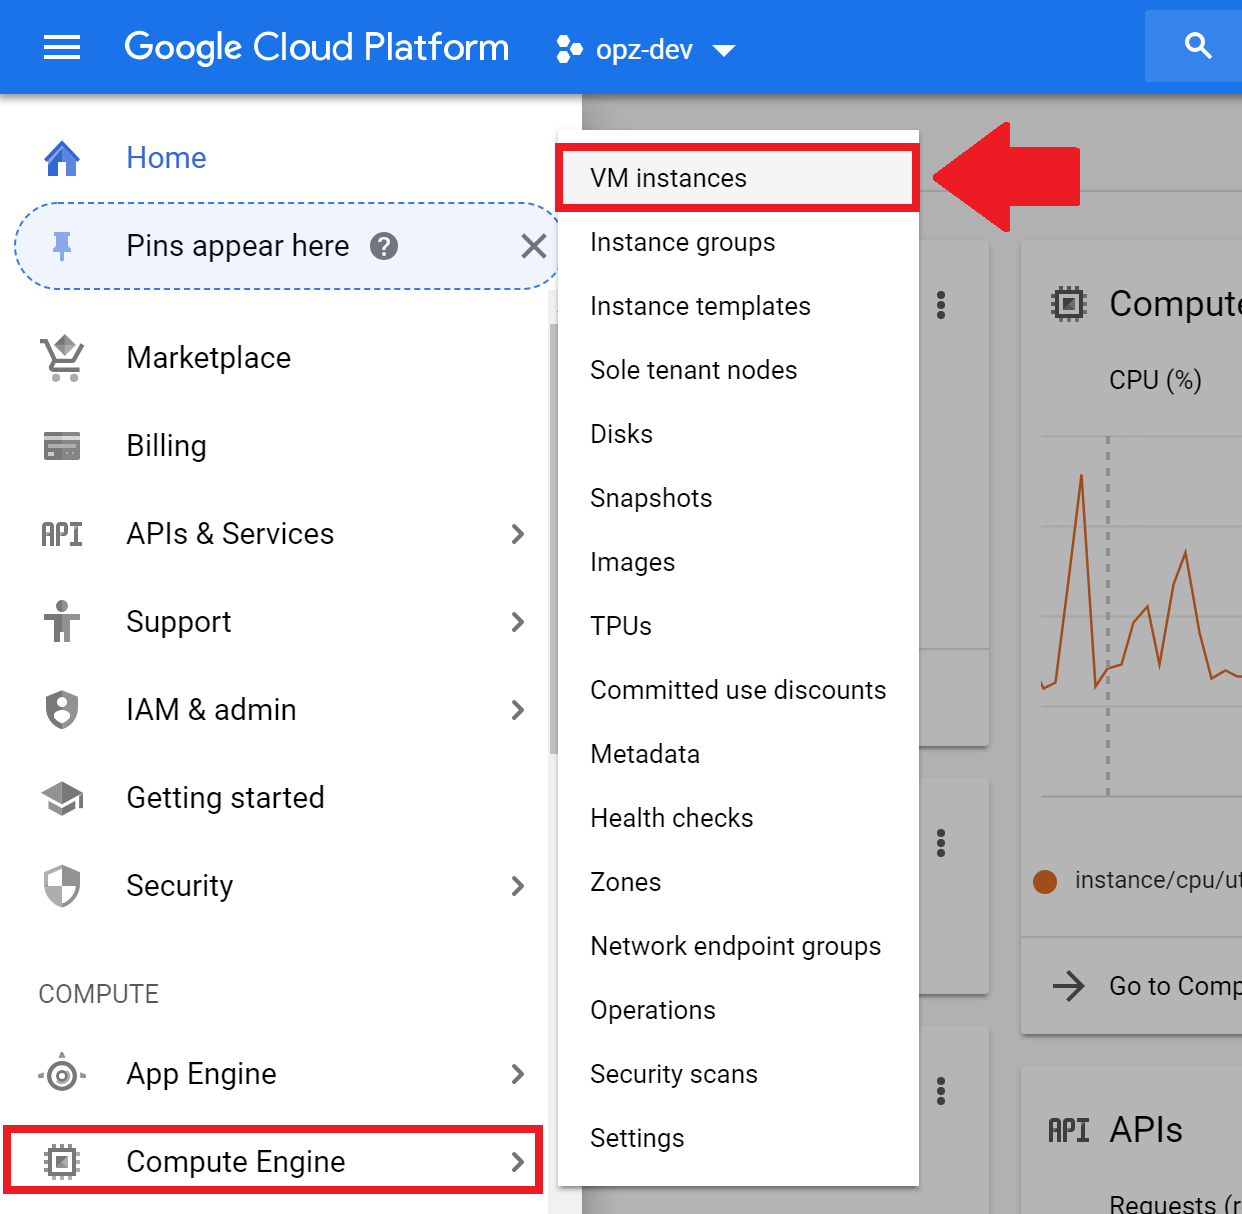
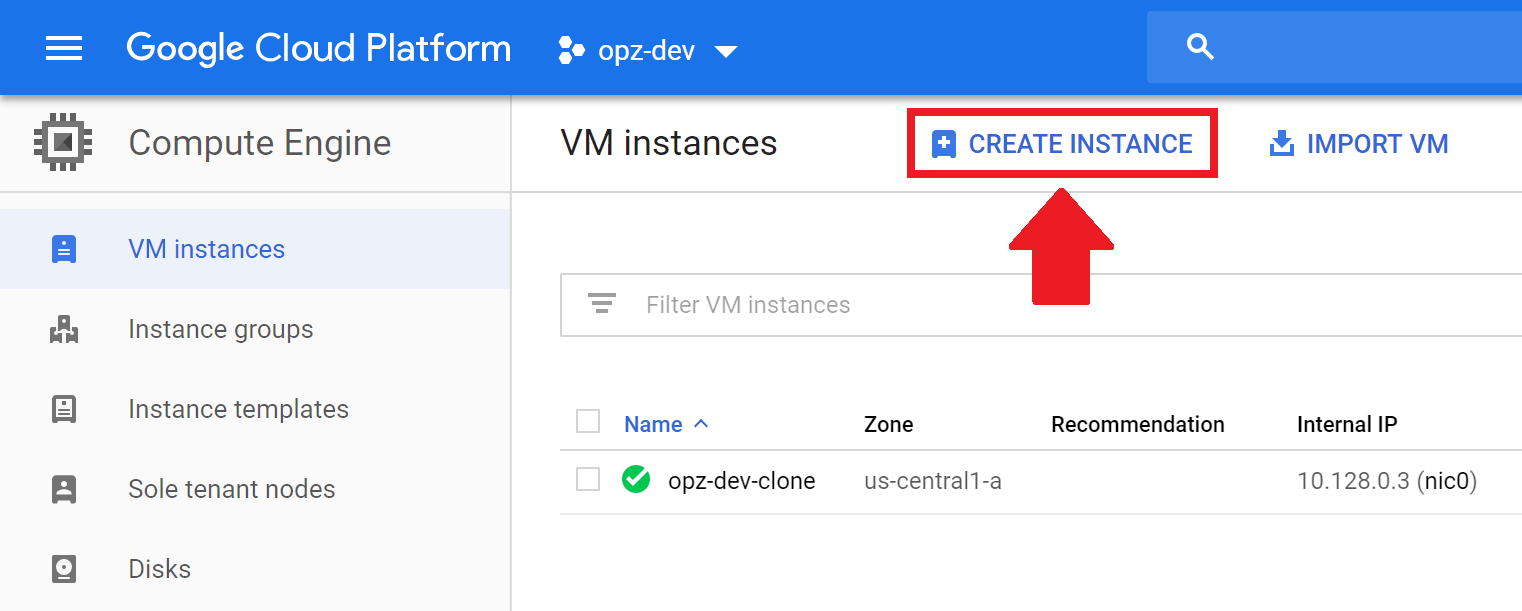
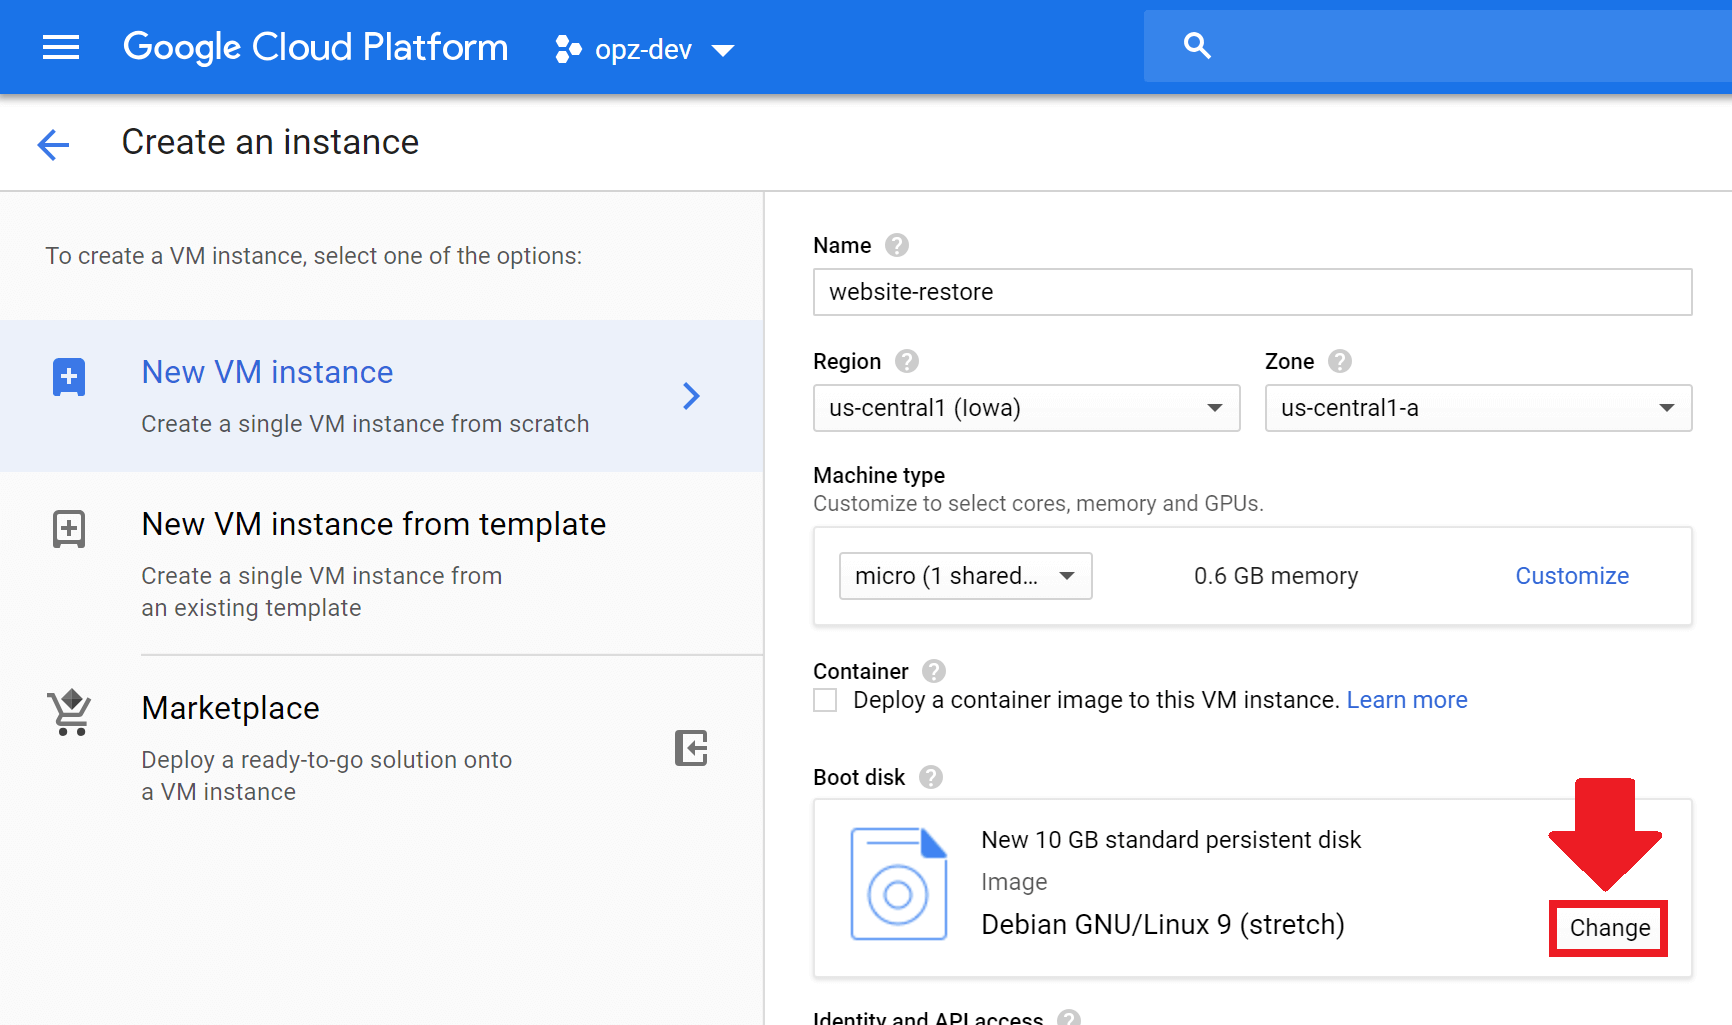
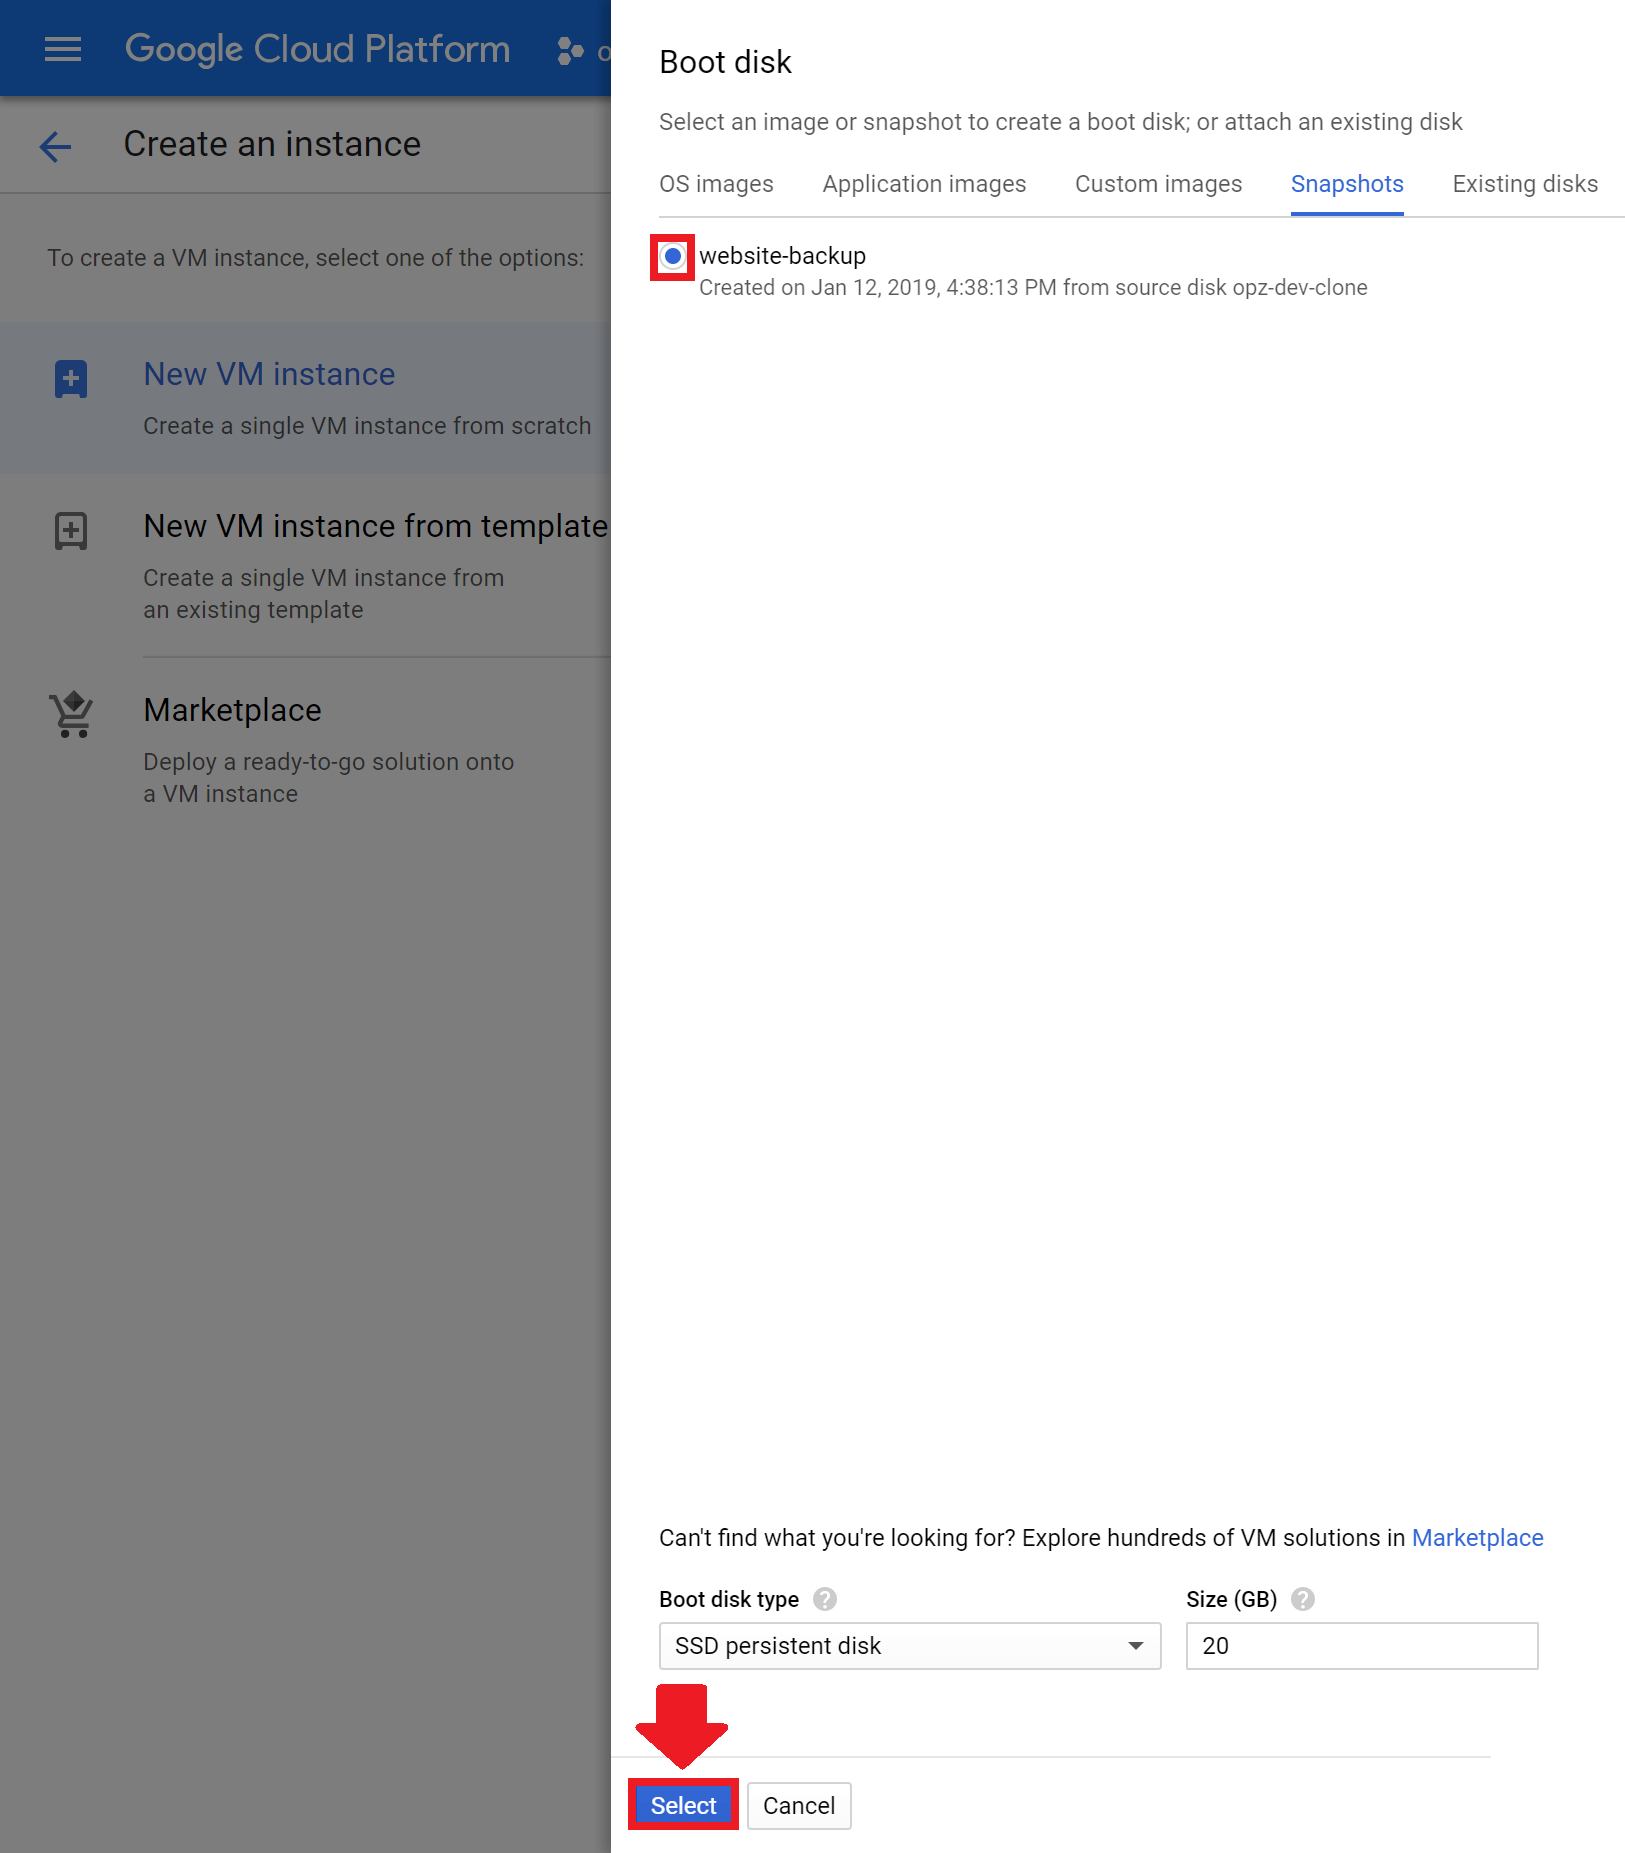
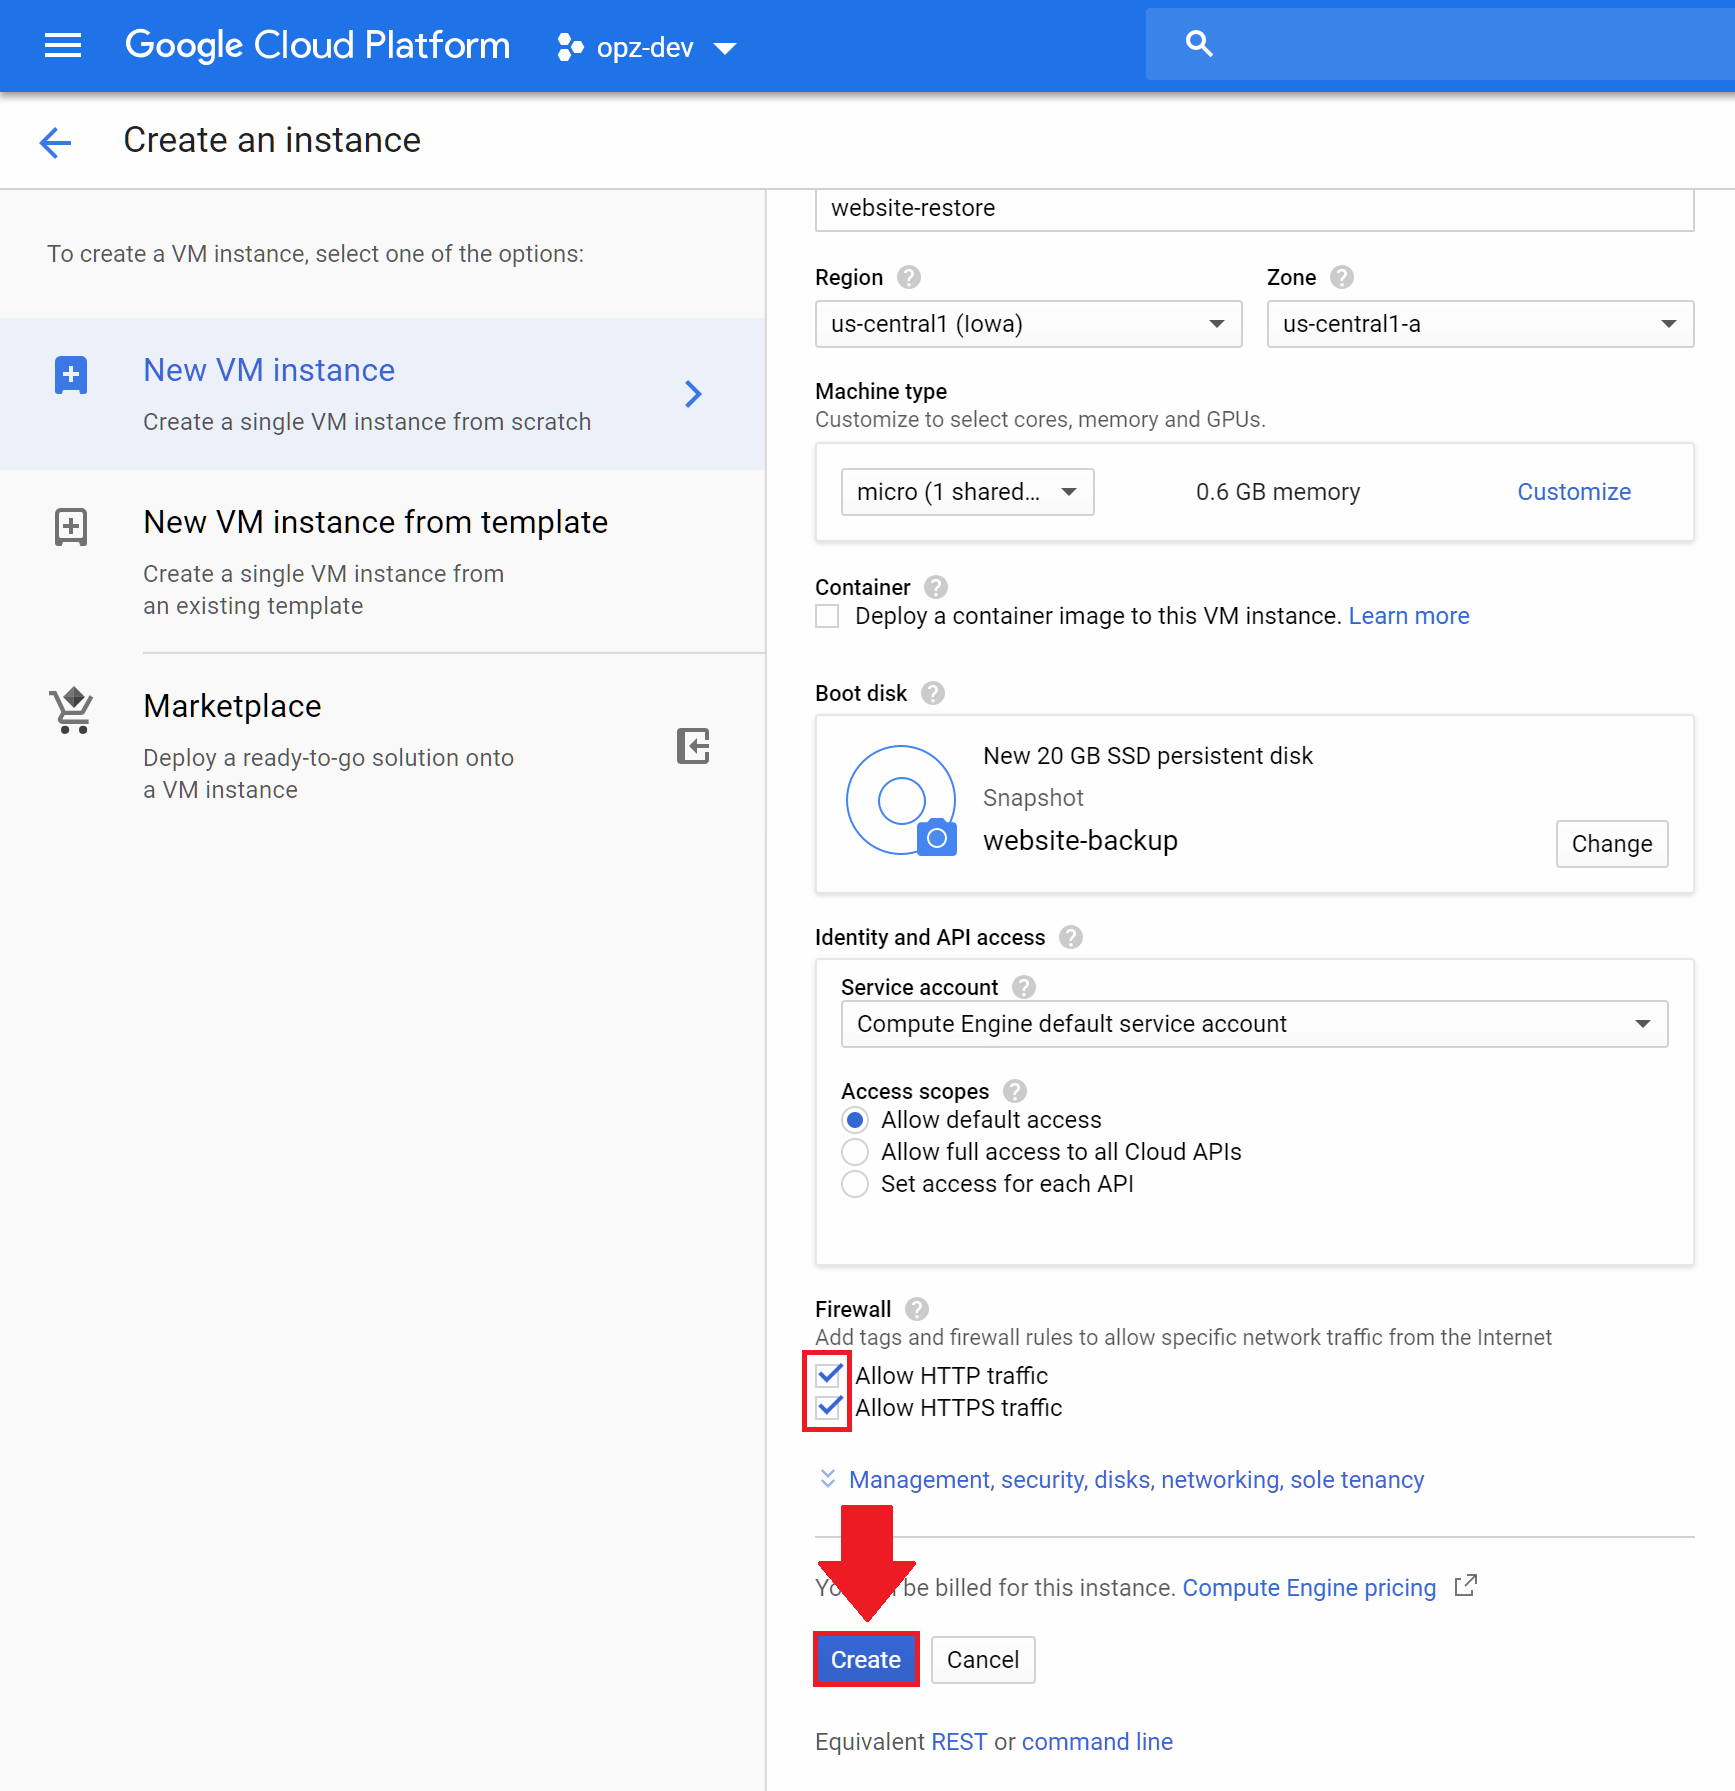
1. Create Instance from Disk Snapshot
In this section of the tutorial, you will learn how to restore your website from a snapshot.
In order to restore your website from a snapshot, the snapshot needs to have been created when the website was operating correctly. In other words, you can’t take a snapshot of a broken website, restore it, and expect it to work correctly.
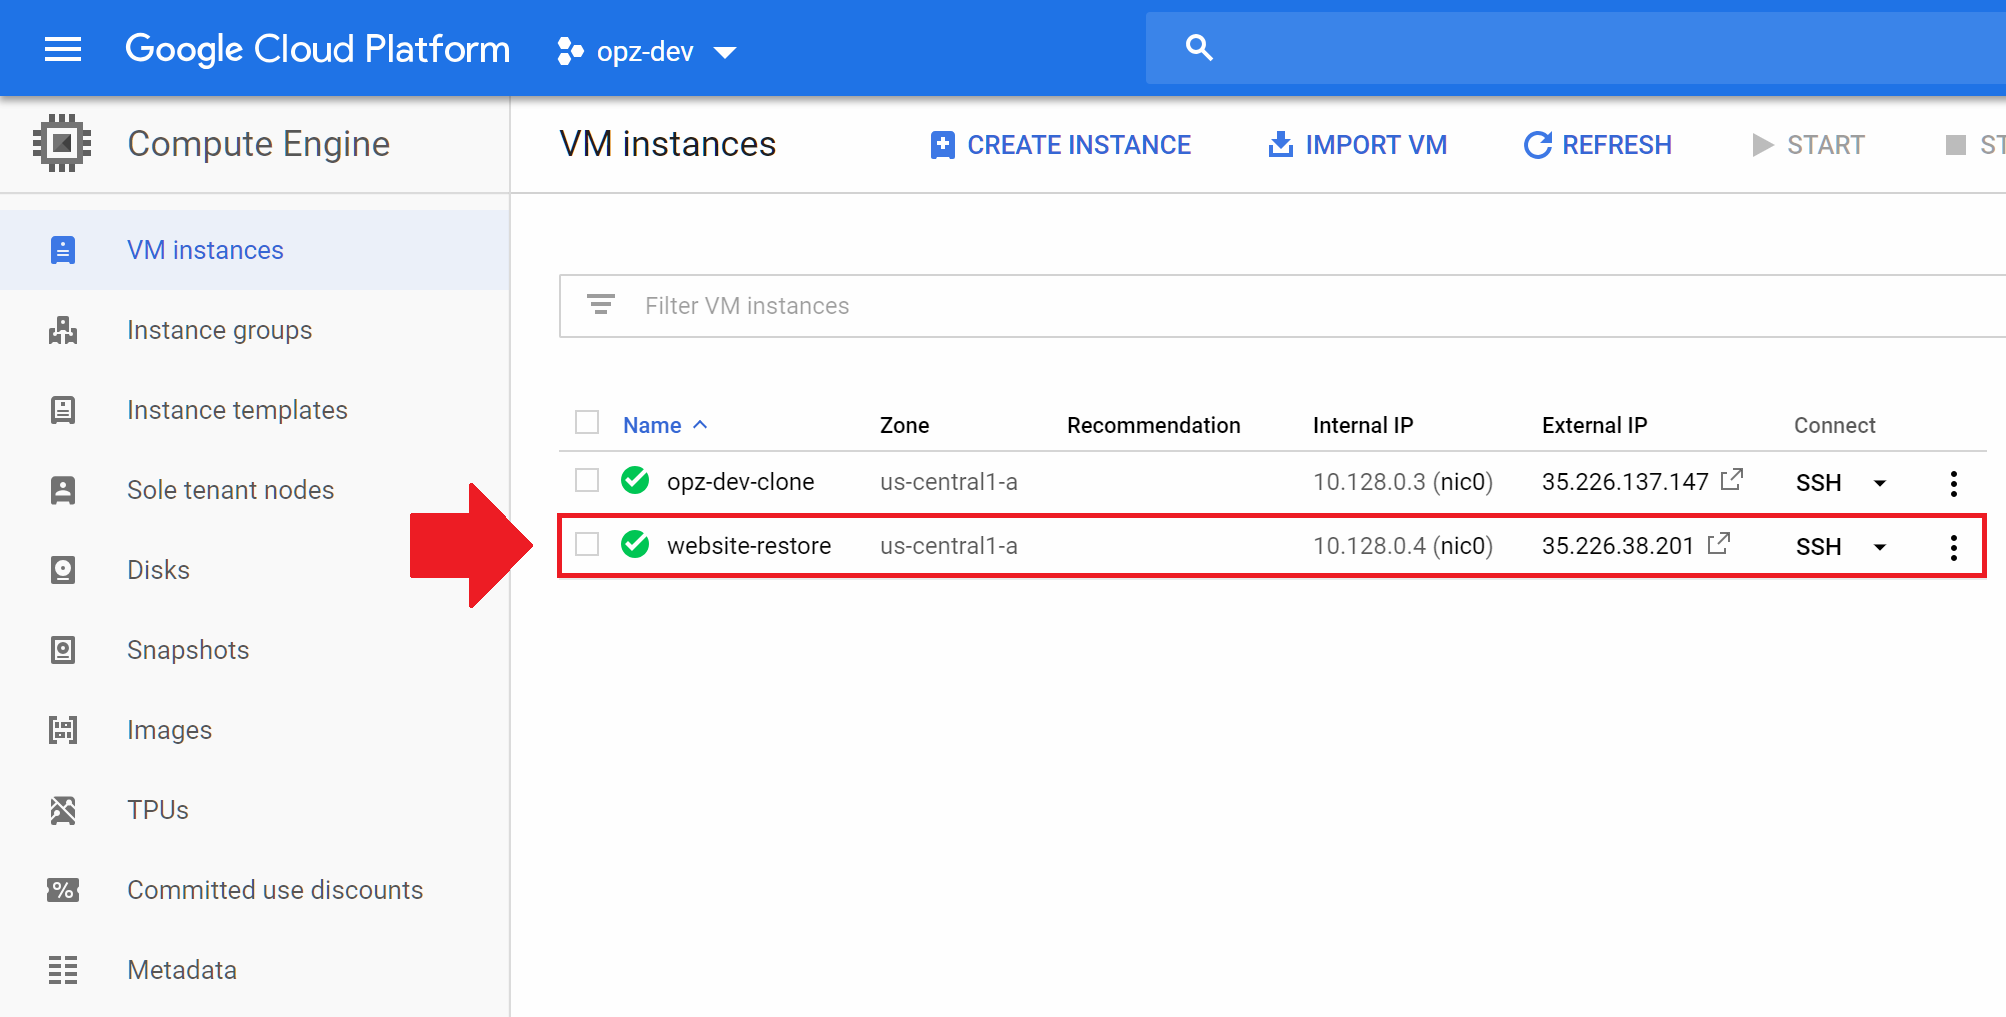
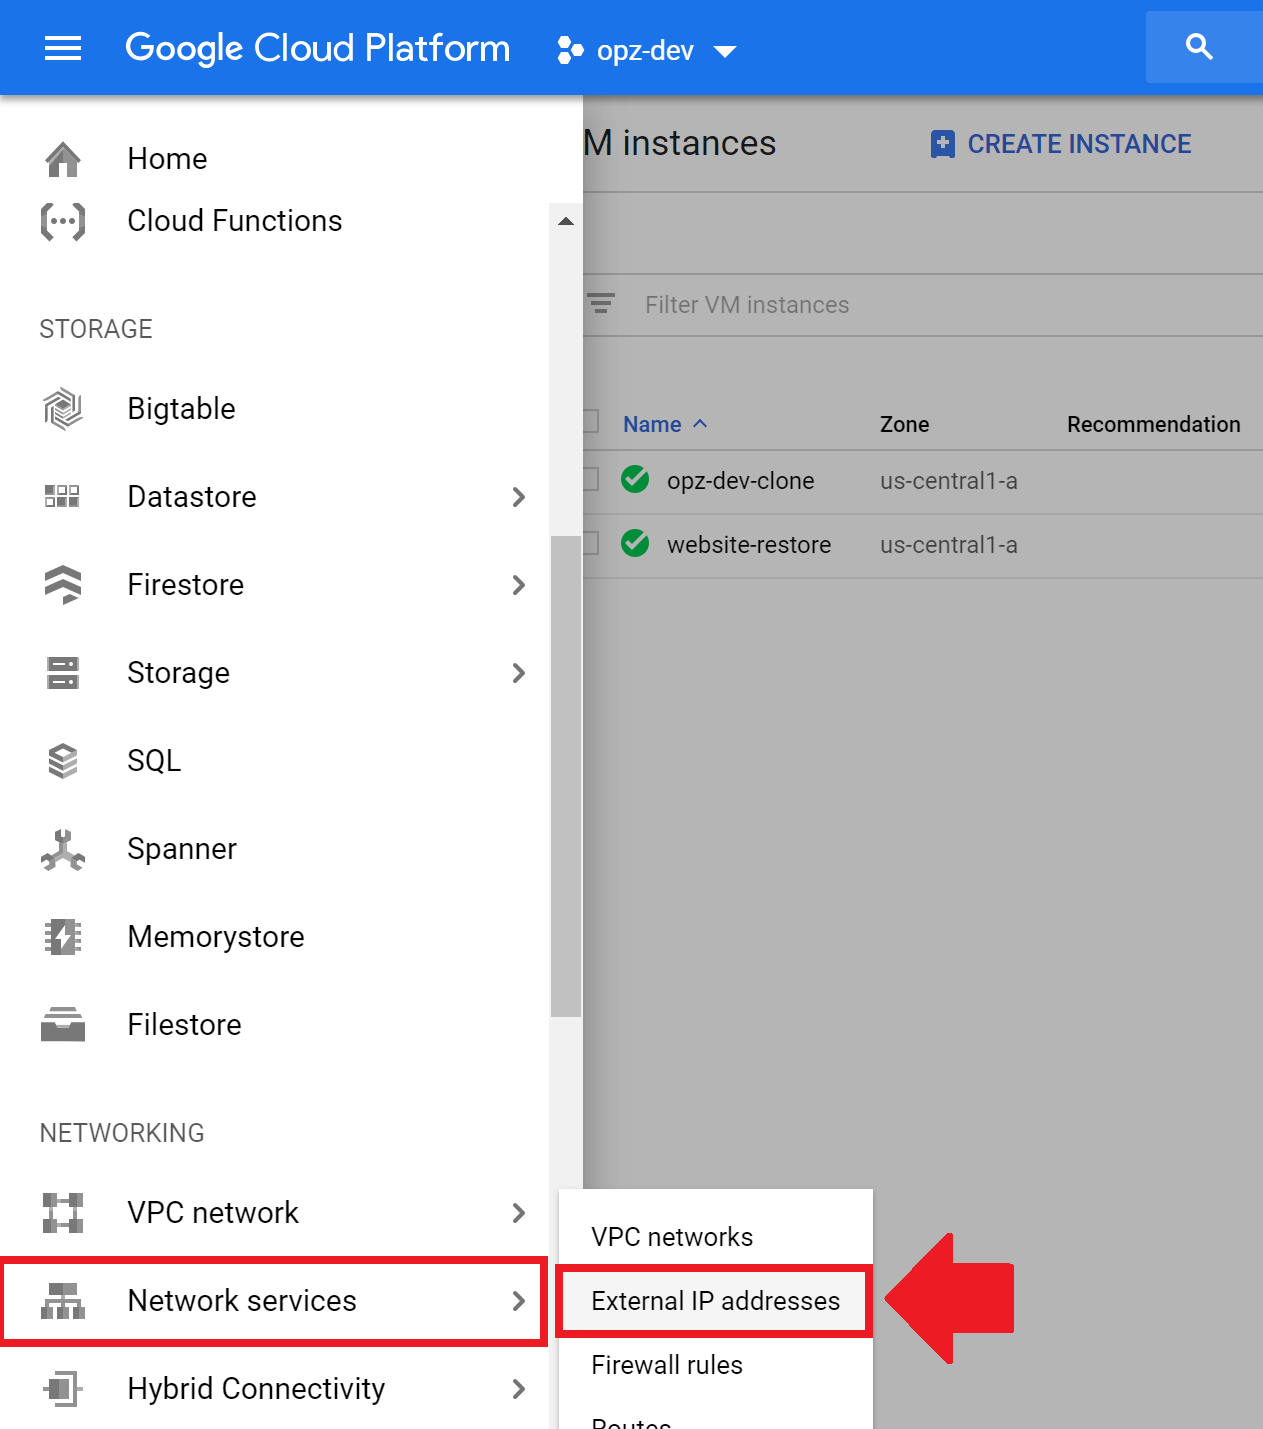
2. Assign IP Address to New Instance
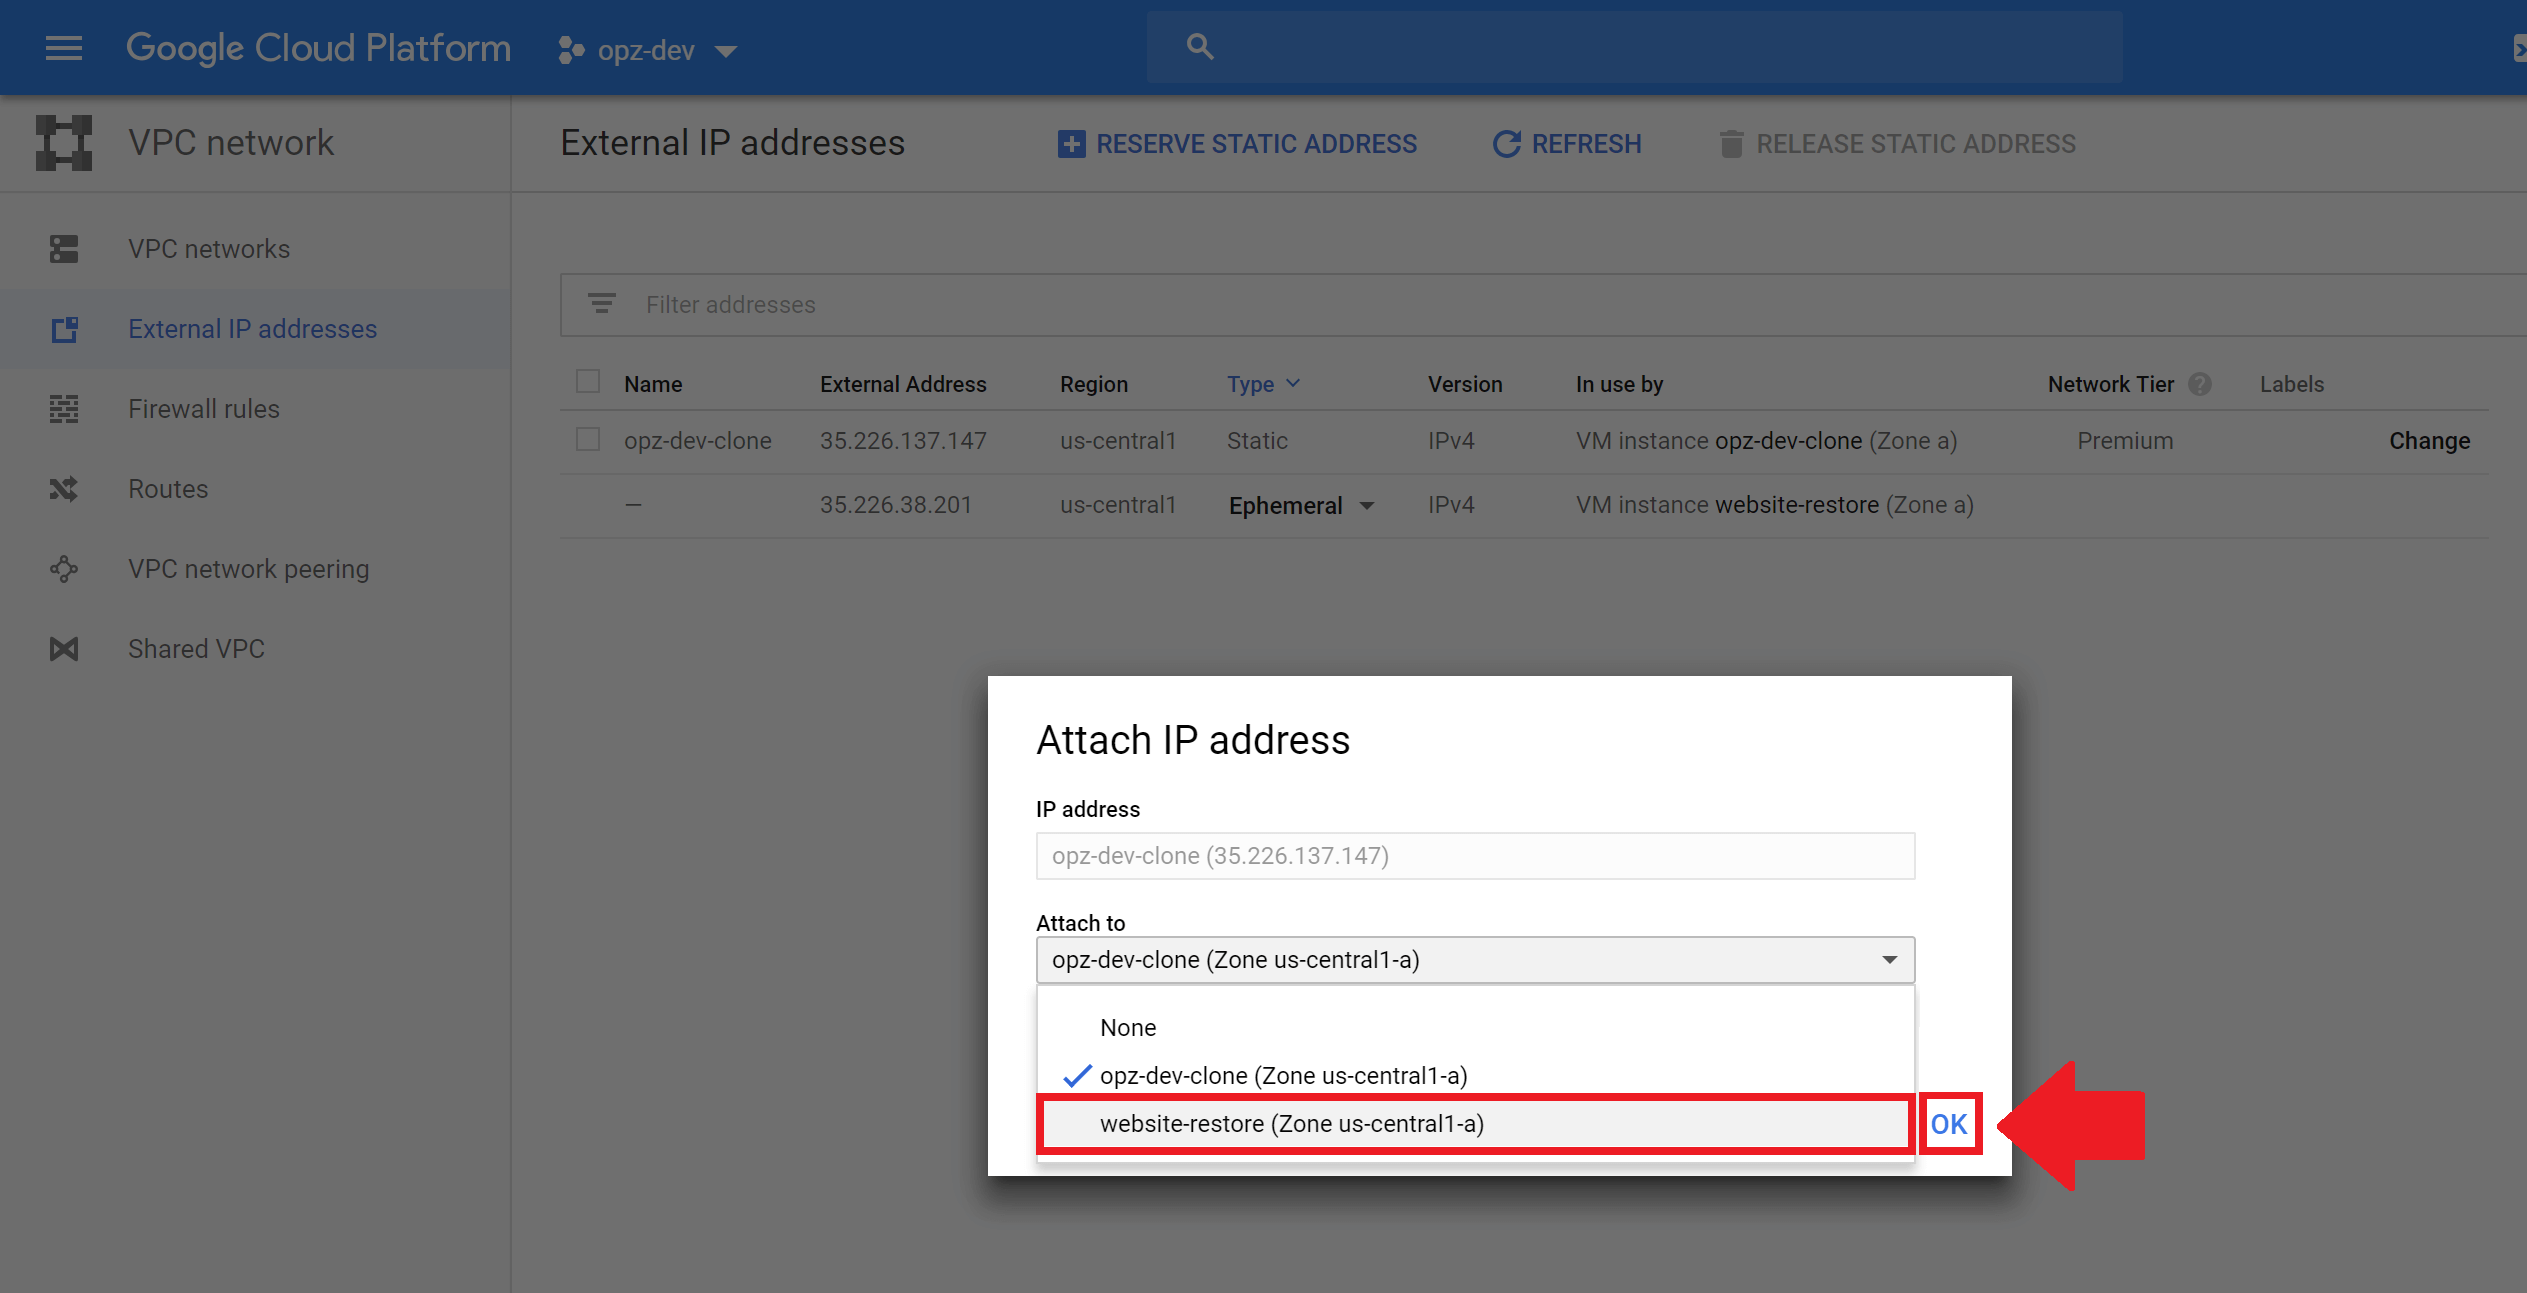
In this section of the tutorial, you will configure your website’s network settings to redirect traffic to the new instance.

That’s it!
Now that you know how to safely backup and restore websites on Google Cloud, you may be interested in automating your backups!
For improved reliability, you should take these preliminary steps before creating snapshots.
Please leave your questions and comments below!
![]()
Up Next…
George says
Hi Joe,
I was wondering if i can restore a snapshot on the existing vm . Is that possible?
i would like to avoid to open a new vm so as to keep my ip and all the data of my existing vm.
Thank you
Leron Amin says
Hi George,
No – you can’t restore a snapshot to the existing VM. I’m sure it’s possible, but it’s not a common pattern.
The common pattern is as follows:
1. Make sure the IP address assigned to the VM that you’re restoring is static and not ephemeral (see this tutorial on reserving static IP addresses for instructions).
2. Create a snapshot of your existing VM (let’s call this VM #1).
3. Create a new VM (let’s call this VM #2) and use the snapshot of VM #1 that you just created as the boot disk.
4. Once VM #2 is created from the snapshot, navigate to VPC Network > External IP Addresses, and unassign the static IP address from VM #1 and assign it to VM #2.
Keep in mind, you can always leave VM #1 running while you migrate to VM #2. If something goes wrong, or if VM #2 doesn’t work for some reason, you can always assign the static IP address back to VM #1.
This is something that you’ll end up doing regularly the more you work on GCP. It’s probably good to get some practice with it.
Hope this helps and please reach out if you have any other questions!
Joe
George says
thank you Joe,
i was wondering do you have any tutorial about updating the PHP in google cloud?
Leron Amin says
Hi George,
At this time I don’t have a tutorial on upgrading PHP.
I typically recommend that users export their websites using the All-in-One WP Migration plugin, then import it to an upgraded WordPress stack. That’s actually one of the downside’s of using Bitnami’s WordPress solution: there’s no way to easily upgrade PHP or any of the other components.
Hope this helps and let me know if you have other questions!
Joe
Mad says
Hey,
I love your page and really enjoy the tutorials here.
I just restored a snapshot as I am working on a huge (and outdated) project so I wanted to restore a snapshot so that I can work on the “staging site”. But the problem is that once I access the wp-admin site I can see the menu on the left but the content on the right in my wp-admin is blank.
Any idea how to solve this?
NB: I am using Bitnami Lamp
Tutorial idea: Migration from Apache to NGINX?
Thanks champ, keep up the good work!
Leron Amin says
Hey Mad,
Can you provide additional details? What exactly do you mean when you say you can’t see your content on the right? Does text display? What about images?
Talk to you soon,
Joe
Mark says
This was really helpful. Thank you! My WordPress site went down and I just followed your instructions, it is working now.
Leron Amin says
Glad to hear it – thanks for the feedback Mark!
Faisal Amin says
I am facing the issue “error establishing a database connection” how can resolve this issue.
Leron Amin says
Hi Faisal,
This is a common WordPress error.
First things first: are the database credentials in your wp-config.php file correct?
What happens when you restart your VM? Try restarting and see if you get any error messages.
Talk to you soon,
Joe
Faisal Amin says
Thanks, Leron Amin, I try to restart VM then the Problem is Solved.
Leron Amin says
Glad to hear it Faisal!
Samil says
I just wanted to say you guys are great. Thank you for all of your works.
Leron Amin says
Thanks for the feedback Samil!
icecrackers says
Hi onepagezen!
Just would like to say thank you!
I turned to your website for all the things I need to learn as a Google Cloud beginner.
Your site has helped a lot.
Leron Amin says
Thanks for the feedback icecrackers – I’m glad I could help!
ggrobot says
hi joe i have 4 snapshots manually taken, and they are like 2,1g , 1,8 etc. can i delete them all and keep the last one or there is essential information in the first snapshot.
My question is how i can keep only one snapshot so as not to have any space problems in the future?
thank you
Leron Amin says
Hi ggrobot,
The snapshots are not saved on your persistent disks – they are saved in Google’s data centers and so you can technically create an unlimited amount of snapshots without running into any storage issues, the only implication would be the cost involved.
Check out this helpful diagram from the Google Cloud docs which documents best practices for deleting snapshots.
Take a look and let me know if you have questions,
Joe
Aurangzeb says
I am creating following message after visiting the created instance.
Apache2 Debian Default Page
It works!
This is the default welcome page used to test the correct operation of the Apache2 server after installation on Debian systems. If you can read this page, it means that the Apache HTTP server installed at this site is working properly. You should replace this file (located at /var/www/html/index.html) before continuing to operate your HTTP server.
If you are a normal user of this web site and don’t know what this page is about, this probably means that the site is currently unavailable due to maintenance. If the problem persists, please contact the site’s administrator.
Leron Amin says
Hi Aurangzeb,
That message means that Apache isn’t running.
For WordPress Click-to-deploy, run the following command:
For WordPress Bitnami, run the following command:
Let me know if you have questions,
Joe
aurangzeb says
still unable to access website and i am getting following msg. please reply urgently
taskeen_aurangzeb786@instance-1:~$ sudo /opt/bitnami/ctlscript.sh start
/opt/bitnami/mysql/scripts/ctl.sh : mysql (pid 2952) already running
/opt/bitnami/php/scripts/ctl.sh : php-fpm (pid 3008) already running
Syntax OK
(98)Address already in use: AH00073: make_sock: unable to listen for connections on address [::]:80
(98)Address already in use: AH00073: make_sock: unable to listen for connections on address 0.0.0.0:80
no listening sockets available, shutting down
AH00015: Unable to open logs
/opt/bitnami/apache2/scripts/ctl.sh : httpd could not be started
Leron Amin says
Hi Anurag,
To fix the problem, run the following commands:
sudo /opt/bitnami/ctlscript.sh stopsudo pkill -f apache
sudo /opt/bitnami/ctlscript.sh start
Let me know if you have questions,
Joe
David says
Hello Joe,
First of all, Thanks for the valuble tutorial that helped me alot.
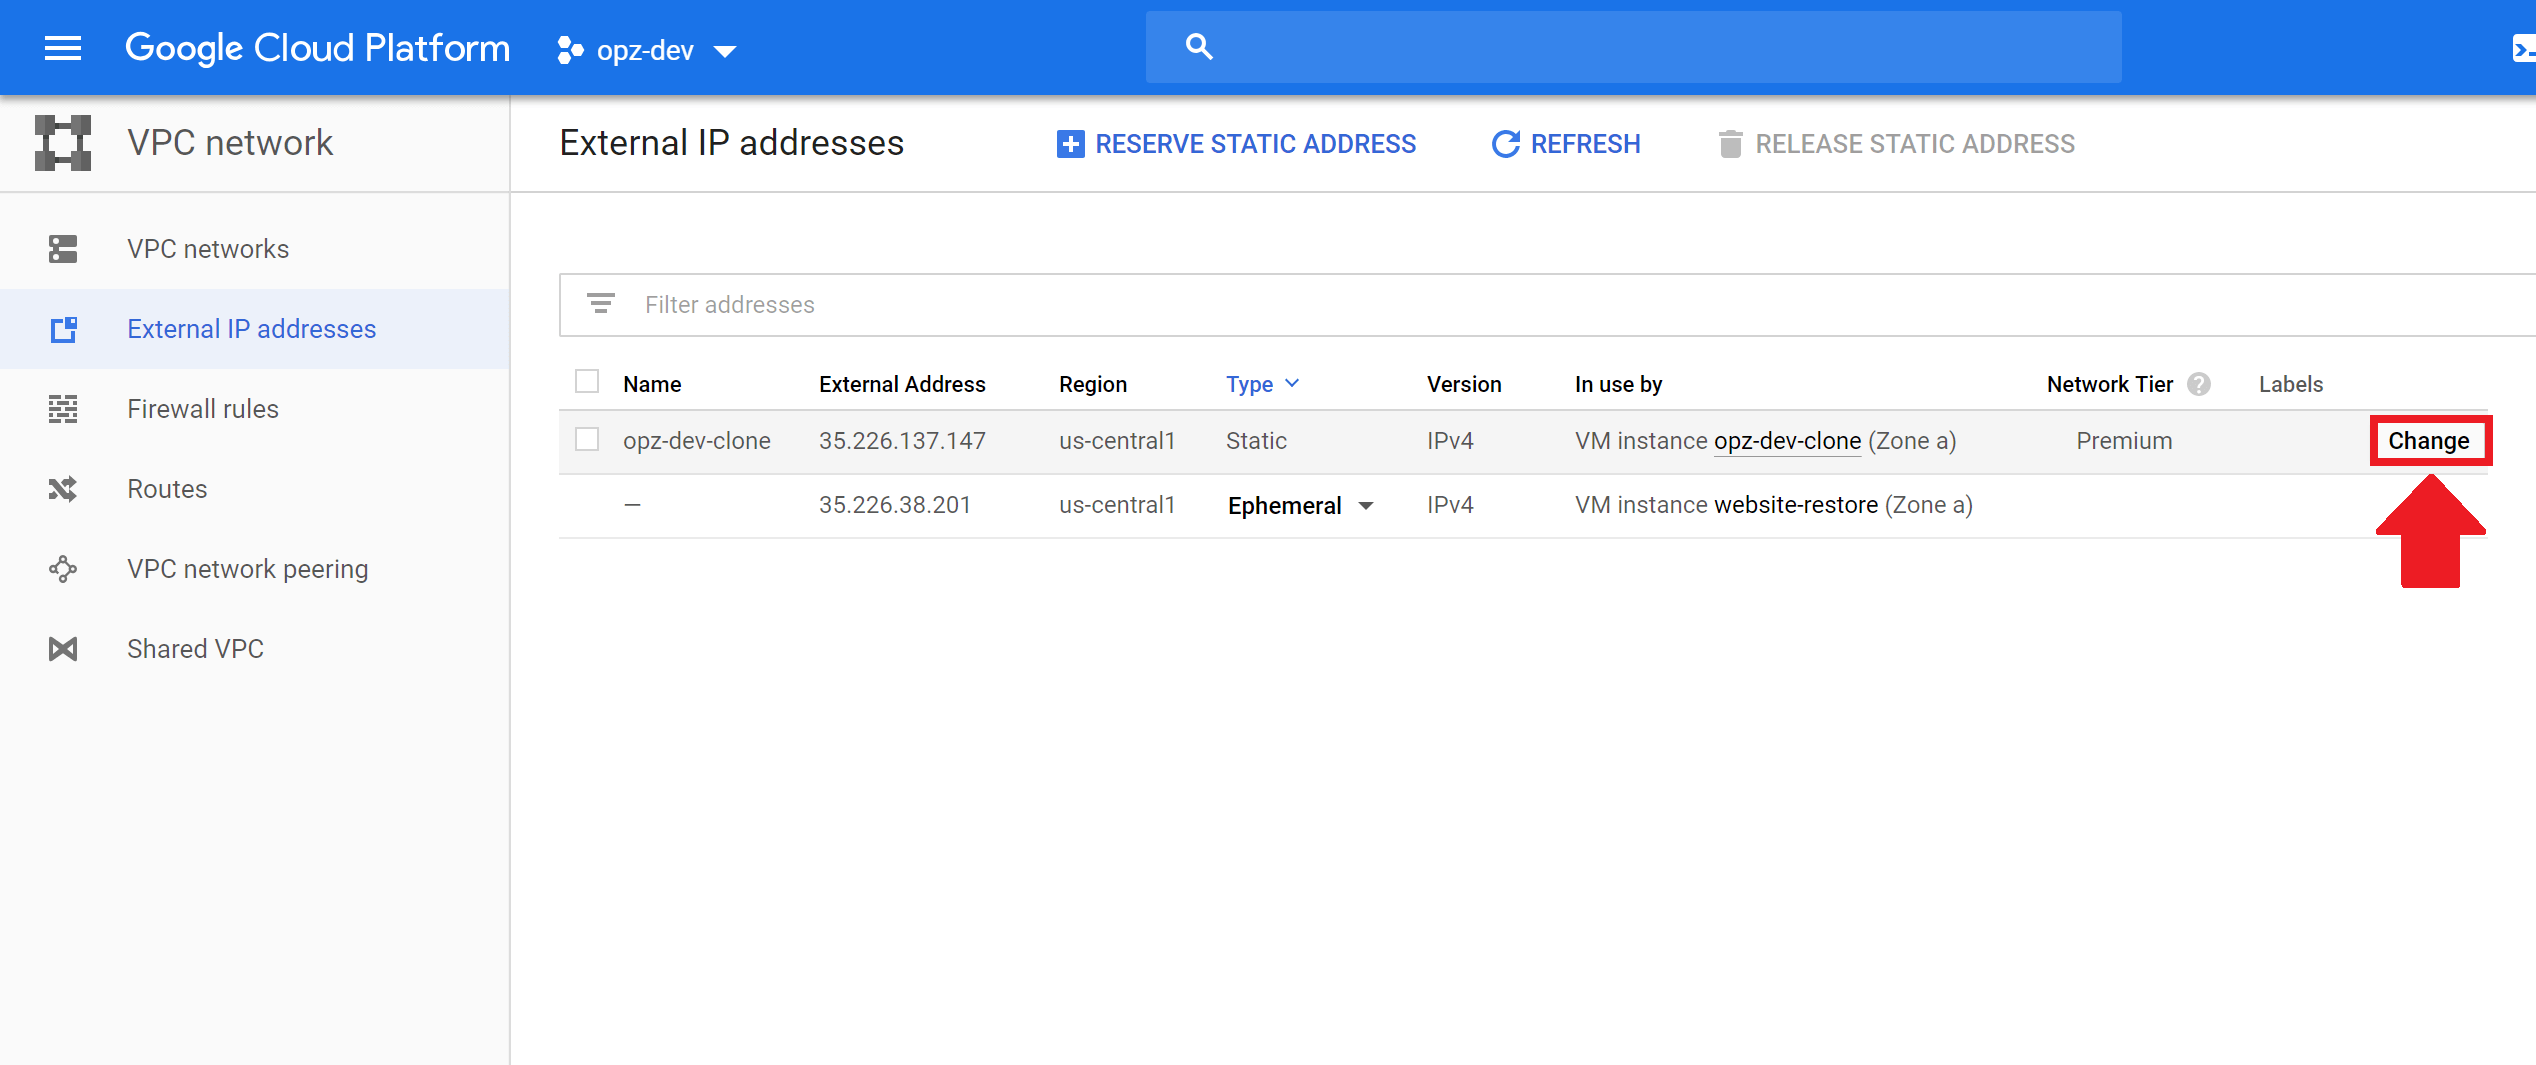
When I click the change button in the external IP addresses to assign the static IP to the newly created instance, there isn’t the new instance available in the multiple option. what I see are two options: the existing instance and None. please help
Thanks
Leron Amin says
Hi David,
Make sure the instance has been created successfully before attempting to re-assign the IP address.
Let me know if you have any questions,
Joe
Bobby Zopfan says
I too had the same problem (while attaching the IP to newly created instance, only old broken instance and ‘none’ option were present in the dropdown menu).
I was in doubt, perhaps the new instance has to be created in the same region and zone etc. Am I correct?
Leron Amin says
Hi Bobby,
That’s correct that the IP address has to be assigned to an instance in the same region as the original. From the Google Cloud docs:
“If the instance is moving between zones in the same region, the external IP address remains the same. Otherwise, you will need to pick a different IP address for the VM instance.”
Let me know if you have questions,
Joe
Kushal says
I just created new instance using snapshot ..the snapshot I had created was snapshot of WordPress deployment
I get a problem my website is working all this correctly buy I am unable to access my phpmyadmin and /var/www/html / showing no directory found
Please help me to access my FB and wp content oh server
Leron Amin says
Hi Kushal,
I don’t know why that would be – the snapshot is a disk replica of your instance, so if you had PhpMyAdmin configured on your original instance, it would also be configured in the snapshot. Did you install PhpMyAdmin when you first created the instance?
Also, what do you mean when you say that /var/www/html is not showing? Are you using WordPress Click-to-deploy?
Talk to you soon,
Joe
Paul says
I followed the instruction and encountered the same issue as Amr had earlier 2018. I could create a new instance with the snapshot, but when I entered its IP address in the browser, it got redirected back to the original wordpress site IP address. So I can’t really know if the new instance works as a wordpress site.
The old thread by Amr did not actually had a follow up resolution for closure. May I know if anyone knows the cause of this issue?
Leron Amin says
Hey Paul,
If you don’t have a domain name configured, make sure that your site URL is defined in WordPress with the IP address of the new instance, not the old one. You can access this setting from your WordPress dashboard by going to Settings > General. If you’re using a Bitnami stack, you will have to do this by connecting to the instance via SSH and change the Site URLs that are defined in your wp-config.php file.
If you have a domain name configured, you will also need to configure your Cloud DNS and change the IP address of any existing A record to the IP address assigned to the new instance.
Let me know if you have questions or need clarification on any of this.
Talk to you soon,
Joe
Amr says
Hello ,
i have done the same but after restoring the snaptshot by creating a new instance , going to the ip of the server is not working nor i can do anything , keeps connecting and doesnt show any errors , i dont have a domain yet so i didnt do the dns part , any help would be great
Thanks
Leron Amin says
Hi Amr,
If you’re not using a domain name or a static IP address, then your instance was likely assigned a new public IP after it was restarted. Try accessing the website using the new IP address. Also, what application were you running on your instance?
Did you check to make sure that your instance is running? Check out this list of linux commands to stop/start and view the status of your instances.
Talk to you soon,
Joe
Amr says
Thanks alot joe for the answer , acutally now it look like its working in general but i had a plugin that redirects traffic and this plugin was using the old server IP , and now i can’t open the website at all due to the plugin keep redirecting to the old IP also can’t even locate the htaccesses file
thanks
Efron Hirsch says
Oh yeah, one more question. How do we set up cron jobs?
Leron Amin says
Hey Effron,
Check out this tutorial about editing/managing cron jobs.
Check out this tutorial to learn about how to create cron jobs.
Let me know if you’ve found these resources helpful!
Best regards,
Joe
Efron Hirsch says
This may sound like a ridiculous question, but is there any way of setting up thigs on Google Cloud Platform without ever touchig a C-panel?
If not, the if we follow all your tutorials and set up Bitnami, domain name, ssl and know how to do backups? Is that all there is to it? And the things just runs like putting my site on host gator?
Lastly, how do we set up a CDN, Google’s CDN, the same one that is used for Youtube and Googles other stuff? Or is that not worth it?
Leron Amin says
Hi Efron,
Yes – if you are an advanced user you could configure entire projects using the command-line-interface exclusively.
I will do more tutorials on configuring site backups in the future.
As you’ve noticed, Google Cloud Platform is fast, and a CDN is only worth it if you’re running large, dynamic websites that are serving large amounts of content to users across specific geographies.
Video, large image files, file downloads – these are all types of content that should be served with a CDN configured.
Let me know if you have additional questions!
Thanks,
Joe
Rob McDonald says
Hey Joe,
Is there any way to automate this process of making backups with the snapshot feature, plugin or otherwise??
–Rob
Leron Amin says
Hi Rob,
There are multiple ways of automating the snapshot process; I will likely do a tutorial on it in the future.
In the meantime, you might find this thread on Stack Exchange useful, as it provides information on how other people have automated their snapshot management process.
Thanks for posting this comment!
Joe
Borislav says
Really usefull, Joe!!!
Thank you!!
And thank God I found your web site 🙂
Real treasure 🙂
Leron Amin says
Thanks Borislav!
I am glad the tutorial helped you!
Best regards,
Joe
Borislav says
Joe, just an idea!!
You can make a tutorial how to speed up an WP site without plugins, only with proper Apache mods /Mod Speed, Mod Expires , cache and Mode Deflate , gzip / and proper .htaccess file configuration 🙂
I think it will be very useful for the people out there.
Leron Amin says
Hi Borislav,
That’s a great idea for a tutorial!
It seems like most people like to avoid using plugins – and rightly so.
Thanks for the suggestion – and let me know if you have any others 😀
Best regards,
Joe
David Lee says
Hi Joe,
thank you for your video is help me a lot ^^
i have a question, is that possible restore back to same instances ?
if create new instance the external ip will be different. please help.
TQ ^^
Leron Amin says
Hi David,
Make sure that you have a static IP reserved.
Then from the Google Cloud Dashboard left-column menu, go to Networking > External IP Addresses > and click on “Change”.
This will allow you to assign the IP to your new instance.
Let me know if this works for you.
-Joe
Leron Amin says
What did you think of this tutorial?
Share your questions and comments below.
Also, let’s connect on social media!
https://www.facebook.com/onepagezen
https://www.twitter.com/onepagezen
https://www.google.com/+onepagezen
-Joe
Ahmad Jamil says
Sangat membantu dan terima kasih joe
Leron Amin says
Sama-sama 😀