In this tutorial I will show you how to remove the Bitnami corner banner that appears on your WordPress site after installing WordPress on Google Cloud Platform.
Before getting started with this tutorial, you should’ve already installed WordPress on Google Cloud Platform.
To get started, follow along with the video above. If you get stuck, check below to see the steps listed individually with their commands.
There are 3 steps in this tutorial:
Beginner Method:
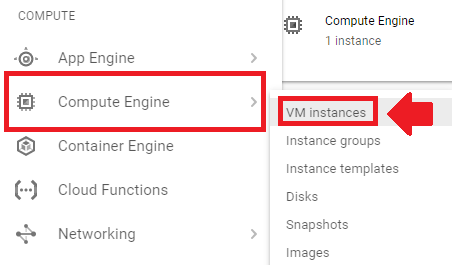
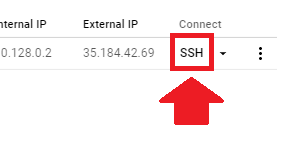
1. Access your WordPress instance

2. Enter command to disable banner
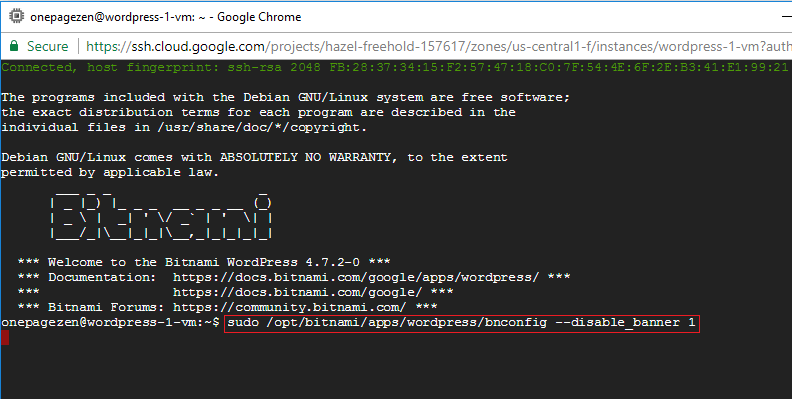
sudo /opt/bitnami/apps/wordpress/bnconfig --disable_banner 13. Restart Apache
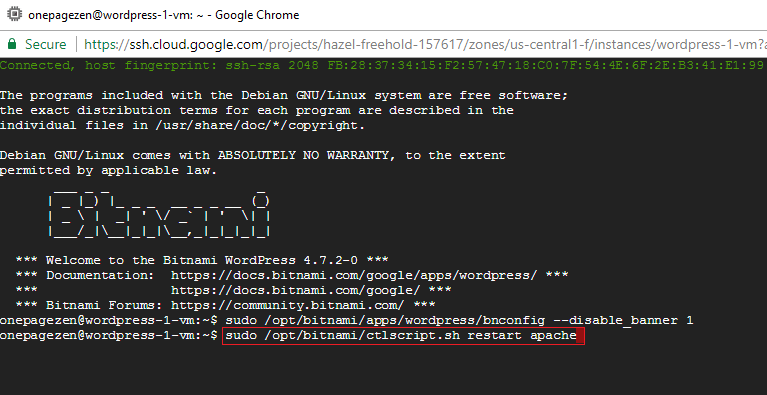
sudo /opt/bitnami/ctlscript.sh restart apacheThat’s it!
You will not longer see the Bitnami banner at the corner of your WordPress website.
Beginner Method
Use Custom CSS
If you would rather disable the banner using CSS, enter the following code in your WordPress custom CSS:
#bitnami-banner {display:none;}Did this tutorial work for you?
Please leave your questions and comments below!
![]()
Rohan says
Thank You It helped me remove bitnami banner permanently.
Leron Amin says
Thanks for the feedback Rohan – I’m happy to hear you were able to remove the banner!
ranjan says
command to disable the banner: sudo /opt/bitnami/apache2/bnconfig –disable_banner 1
The 2nd Space says
Try One Command
sudo /opt/bitnami/apps/wordpress/bnconfig.disabled –disable_b
anner 1
Al says
Perfect, simple solution! Many thanks
Leron Amin says
Thanks for the feedback Al!
Anthony says
Suuuuuper helpful! Been searchin for DAYS
Leron Amin says
Glad to hear it – thanks for the feedback Anthony!
Cristian Chacon says
I have tried using the code but I keep getting this message.
I have copied the code from the oficial bitnami documentation (and changed appname to worpress just like you have)
sudo: /opt/bitnami/apps/wordpress/bnconfig: command not found
Leron Amin says
Hi Christian,
Open your httpd-app.conf for editing by running the following command:
Once inside the file, locate the following line:
Next, comment out the line by adding a # symbol in front of it – as shown:
Next, save and exit the file (CTRL+X then CTRL+Y), and restart your Apache server by running the following command:
Let me know if you have any questions,
Joe
Rollen Trainer says
Thanks for this guidance.
Helped me as the comment was not found before as well.
Leron Amin says
No problem – glad it helped!
Dapo says
Thanks Joe. Your comment solved my problem.
Leron Amin says
Glad to hear it Dapo – thanks for the feedback!
ron says
had the same problem thanks man it worked
Marshley says
I spent hours yesterday trying to figure this out. There have been many people with this problem and the Bitnami support pages explanations and fixes are not meant for beginners. I really appreciate how clearly you’ve explained these steps. Thank you!
Andreas Grimm says
Great. Thank you so much! I didn’t try the CSS way; the other worked perfectly.
Nickie Oakwood says
css works still though
MR JAMES SULLIVAN says
Superb Instructions
Went through Multisite and single site with no issues at all.
Well done and Many thanks.
Regards
James
Leron Amin says
Thanks for the feedback James!
Nakamoto says
Dear Leron,
I am quite newbie in this field. Thank you for your instruction.
I did. But after that, my website does not work any more. I cannot connect to the site.
Please give me a hint.
Sincerely,
Leron Amin says
Hi Nakamoto – were you able to get your website running?
Yuvraj Khavad says
Working perfectly. Thanks for this best informative article.
Leron Amin says
Glad to hear it – thanks for the feedback Yuvraj!
brent says
Boom. Worked. Thanks.
Sam says
Very Useful!
Ryan says
Leron your tutorials are so very helpful. Thank you!!!
Leron Amin says
Thanks for the feedback Ryan! 🙂
tarteel says
sudo /opt/bitnami/ctlscript.sh restart apache
tried this command but it always says httpd could not be started
when i visit domain it says ***** .com refused to connect
Leron Amin says
Hi Tarteel,
Try running the following command to get a better idea of the error location:
Let me know if you have any questions,
Joe
Eric says
Hey Leron,
i have learned hosting on google cloud from your videos.
thank you
Leron Amin says
Thanks for the feedback Eric!
I am glad to hear the tutorials have helped you!
Regards,
Joe
Arman says
Thanks for sharing this post with us thanks a lot
Arman
Leron Amin says
No problem Arman – I’m glad to hear you found it helpful!
Umanath K says
Thanks
Leron Amin says
No problem! 🙂
Kaibron says
Hello,
how to validate the change? Because when I press Enter, nothing happens and when I close the window, it tells me that the changes will not save
Leron Amin says
Hi Kaibron,
You have to press CTRL + X, then Y, then press the Enter key.
Let me know if you have any questions,
Joe
Gouse says
thank you very much, Hi sir How to replace Nginx Server instead of Apache Server, Is it Possible ?
Leron Amin says
Hi Gouse,
There are a couple of pre-configured LEMP (Linux, Nginx, MySQL, PHP) stacks in the GCP cloud launcher library.
You can learn about them here and here. I’d recommend the Bitnami LEMP stack (the second link) because they provide a very thorough documentation with all of their stacks.
Please let me know if you have any questions,
Joe
Daniel Bermudez says
Amigo déjeme felicitarlo yo no hablo Ingles pero he visto sus vídeos y me han sido de mucho ayuda de verdad muchas gracias.
Leron Amin says
Gracias por el comentario Daniel 😀
Supriyo Mahato says
Helpful post indeed!!
Leron Amin says
Thanks Supriyo! 😀
Saurabh Manchanda says
Thanks man, I appreciate it!!
and relax, I’m not her for spam or promotion or anything.
genuine thanks!!!
Leron Amin says
Hi Saurabh,
I’m glad the tutorial helped you! 😀
Thanks,
Joe
eric says
If you can make a tutorial on how to upload HTML/CSS Files with Images and a domain name link to it on GCP. That would be awesome!
Leron Amin says
Sounds good, Eric!
I appreciate all of the great comments and tutorial suggestions!
Best regards,
Joe
eric says
I did the same with ghost cms and it work flawlessly. awesome bro.
Leron Amin says
Great to know!
I think the tutorial should work across most (if not all) of Bitnami’s cloud stacks.
Thanks,
Joe
Leron Amin says
If you’re having any issues with this tutorial, leave a message and I will see how I can help!
-Joe
joe says
I followed the tutorial exactly. Now when I try to log into the site the page is not recognized in the browser. Can you help?
Leron Amin says
Hi Joe,
Please describe exactly what page you see when you try to load your website.
Does it show 500 error? Is it an Apache start page?
Please provide more details and I will help you fix the problem. 🙂
Thanks,
Joe
joe says
Yes, in google chrome I see a 500 error. In Safari, I see a blank white page. I set up a VM and a SSL for that site before then the auto-renewal stopped working so I All-in-one magrated the site to a new VM. Next I set up the Static IP and pointed the URL. Everything was up and running fine, however, woocommerce kept bringing up that the information page was not secure. So, I followed your tutorial again to set up the SSL and it now has done this.
Leron Amin says
Hi Joe,
The things you need to check are that your DNS records are configured properly, that the IP address of your virtual machine matches the IP assigned to the A record in your Cloud DNS, that your Apache server is running (try running the restart command), and that your bitnami.conf file is configured properly as well.
Unfortunately, there is not easy way to diagnose 500 errors – you just have to do a bit of digging.
Let me know if you have any questions.