IMPORTANT: There is an updated version of this tutorial available here.
In this quick-start tutorial you will learn how to configure free, auto-renewing SSL certificates for WordPress websites that are hosted on Google Cloud Platform compute engine using the Bitnami version of WordPress on Google Cloud Platform.
Go to your Google Compute homepage and click the hamburger menu in the upper left-hand corner.Go to your Compute Engine, then to VM instances to access your WordPress installation.Once inside your Compute Engine, click on the SSH button to connect to your WordPress installation.
2. Install CertBot Client
Now that you’ve connected to your website’s Apache server, you are going to execute the command to install the Certbot client. The Certbot client is used to issue the SSL certificates that will be used later on in this tutorial.
After executing each of these commands, you can either stay in the same SSH window or exit and open a new one.
3. Generate Certificates
In this step you are going to execute the command below in order to tell the Certbot client to create SSL certificates for your website. Remember to replace 1pagezen.com with your own domain name.
After entering these commands, your certificates will be generated. Take note of the directory where your certificates are installed.
Note: Instructions for testing the certificate auto-renew script were moved here.
4. Test Certificate Renewal
Before setting up auto-renewal for your certificates, you are first going to execute the commands below in order to test the auto-renewal function.
./certbot-auto renew --dry-run
If you get a success message, it means that the certificates are renewing properly.
5. Setup Auto-Renewal
Important Notice: The auto-renew configuration instructions outlined in this section are no longer valid. For updated instructions on configuring auto-renewal, click here. Before configuring auto-renewal, you should skip to step 6 and finish the tutorial first.
In order to program your certificates to automatically renew themselves, you need to configure a crontab that will automatically renew the SSL certificates before they expire.
sudo crontab -e
After entering the crontab -e command, choose the text editor to use to create the crontab. Nano (1) is the easiest text editor to use.
1
Now that you’ve created a new crontab file, scroll to the bottom and paste the commands listed below. The command will tell Certbot to check for renewals twice per day.
After adding this code, enter ctrl+o to save changes, followed by ctrl+x to exit back to your home screen.
6. Configure the Certificates
The next step is to configure your certificates. First, execute the command below to open your bitnami.conf file for editing.
Next, paste the following 3-lines of code below the DocumentRoot line of the bitnami.conf file. This will tell the server to always serve your website's pages with HTTPS encryption. Remember to replace 1pagezen.com with your own domain name. (Update 03/08/2018: 'permanent' added to code to mark redirect as a 301 instead of 302).
Next, use the down-arrow key to scroll down the page. Place a # sign next to each of the two placeholder certificates, and paste the path to your three SSL certificate files as shown in the command below, making sure to replace 1pagezen.com with your own domain name.
After adding this code, enter ctrl+o to save changes, followed by ctrl+x to exit back to your home screen.
7. Update Domain URLs
Changing your website URLs via Settings > General is disabled in the Bitnami version, so you'll need to change your URLs by editing your wp-config.php folder.
In order to open your wp-config.php file for editing, run the command below.
After adding this code, enter CTRL+o to save changes, followed by CTRL+x to exit back to your home screen.
8. Restart your Apache Server
In order for your certificate changes to take effect, you need to restart you Apache server by entering the command below.
sudo /opt/bitnami/ctlscript.sh restart apache
9. Additional Resources
Now that you've completed the tutorial, you should configure your certificates to auto-renew using this tutorial. Also, if your configuration isn't working properly, check out the tutorial below to learn about common SSL errors and how to fix them.
Did it Work?
If your SSL certificates were configured properly, you will notice that your website is being loaded with a green padlock icon.
To configure certificate auto-renewal, please view the tutorial here.
If you have any questions or comments, please post them below!
It appears that your server is using a self-signed certificate. You can view this information by looking up your domain on sslshopper.com.
Based on this information, it’s likely that you missed step 6 of the tutorial. It’s possible you forgot to save the file after adding the paths to your SSL certificates.
Looks like you may have configured multiple redirects, which is what’s causing the conflict.
To fix this issue, I’d first try commenting out the HTTPS redirect that you added to your Bitnami.conf file (put a # next to it), save the file, then restart your server. You’re doing this because there is likely another HTTP to HTTPS redirect elsewhere in your Apache configuration.
Let me know if you have questions,
Joe
Pratiksays
Hi Joe,
Thanks for the help. I actually copied code on the wrong line. Thanks for all the help
Hi,
Thank you so much , I am having an issue in the end when i login again. I can’t access my wp-admin panel and dashboard now.
The website is http://www.trendonpedia.in/wp-admin/
I get this
This site can’t be reached refused to connect. http://www.trendonpedia.com’s server IP address could not be found.
I recently made a wordpress website following your tutorials on GCP, SSL & CLOUD FLARE.
Now my website is showing ” Error 522 Connection timed out ”
How could i fix this problem. All your tutorials were really helpful for beginner like me, after getting bunch of craps and useless content on searching online regarding error 522, my only hope for fixing this problem is onepagezen.com
The 522 error likely indicates that there is an issue with your Cloudflare DNS.
You’ll need to verify that your DNS is configured correctly and that you have an A record pointing to the static IP address of your WordPress instance.
Please reach out if you have any other questions,
Joe
Tisays
Thanks a lot for this tutorial. Thank you for showing how to setup the SSL certificate for Google Cloud hosted website (bitnami).
Hi, The dosument helped me alot. I have installed the certificate. But the certificate is applied only to the mail home page and not to other sub pages. Any advice ?
I followed your tutorial step-by-step, and it worked perfectly for 2-3 hours. Then the site went down and I have not been able to get it back up. I can still access the files on the server, but nothing on the front-end is loading.
I have a question: could having installed and activated wordpress plugins designed to do https redirection conflict with this tutorial? The site I did this tutorial on had two plugins designed for https redirection, namely https-redirection and really-simple-ssl.
My hypothesis is that one of these two plugins has a cron-job that overrode the settings laid out in your tutorial, and caused some sort of conflict.
Yes – the plugins that you installed for re-direction would conflict with this tutorial.
I’d recommend deactivating those plugins (or deleting them from the backend, since the front-end is down). After that, restart your server and hopefully the redirect issue will be resolved.
Also check your server log for additional information:
Typically, Apache failures are due to config errors. In your case, I’d recommend checking your Apache error log by running the following command:
cat /opt/bitnami/apache2/logs/error_log
There could also be other issues at play. Bitnami has a useful guide on debugging Apache errors, which you can view here.
Let me know if you have questions,
Joe
Kaue Macruzsays
Hey there. Thanks for this tutorial, it really works.
Im having an issue tho. I had it done for this website and worked fine, but then
i tried to change the domain name following the previous tutorials and create a new certificate with the new domain and now my website is completely broken. I have tried to erase all changes and start from scratch but couldnt not even use website with initial ip address. So im getting this error now.
This site can’t be reached
The connection was reset.
Try:
Checking the connection
Checking the proxy and the firewall
Running Windows Network Diagnostics
ERR_CONNECTION_RESET
Is there a way to reset everything without loosing the content of the website?
There are many issues that I can foresee if you try to switch domains on an existing WordPress website – especially on a live site.
In the future I’d recommend the following process when switching the domain of a WordPress website:
1. Create a snapshot of the existing WordPress website, and create a new VM from the snapshot (use the snapshot as the boot disk, and don’t use the old domain’s IP address for the new domain – use a new one instead. Using a new IP address will allow you to migrate the website without any downtime and will also prevent any DNS cache issues).
2. On the new VM that was created, configure the new domain, including SSL.
3. Next, use the All-in-One WP Migration plugin to create an export file of the original WordPress website. Make sure to use the find/replace functionality of the All-in-One WP Migration plugin in order to replace all instances of your old domain with the new domain name (for instance, you’d replace website1.com with website2.com).
4. Now import the export file into your new WordPress install.
5. Now you can safely STOP and DELETE the instance with the old WordPress website.
6. Voila – You’ve migrated your website to a new domain name with zero downtime!
Hope this helps, and let me know if you have any questions!
Joe
Hello Leron
Thank you for the tutorial. I followed it like you explained. The problem i have is that the SSL padlock sign only shows on the homepage and other pages like about us, contact us etc. The SSL padlock sign does not show on all the posts. So if you click on any post on the site that you want to read, there will be no SSL padlock sign on it. The site is http://www.excel737.com Please help me fix this
From what I can see, the SSL padlock is displaying on all of the pages.
Typically when the padlock is only displaying on certain pages, it indicates that there’s ‘mixed content’ being loaded; that is, a resource being loaded via HTTP instead of HTTPS. You can check for these errors by following the steps outlined in step one of this tutorial on how to fix SSL errors.
Options Indexes FollowSymLinks
AllowOverride All
<IfVersion
Order allow,deny
Allow from all
= 2.3 >
Require all granted
As you can see in the above I am getting the usual where the certs won’t take. Is there not an easy eway to just delete the cert and start again? I have spent 2 days trying to sort this. In the world of compliance where I usually inhabit we have a thing called ‘The Risk Hierarchy’ which begins with eliminate! For instance, eliominate the corrupted SSL and start again. Simples.
When you execute the certificate issuing command again, the old certificates are overwritten by the new ones; so in that sense, the certificates are deleted.
You can always roll-back to the default version of the config file before adding the certificates? Let me know if you need instructions on this process.
All Righty Joe when trying to renew a cert that was showing fine I now run in to trouble. Please see message below. Any idea dude?
hello@nwp-2:~$ ./certbot-auto certonly –webroot -w /opt/bitnami/apps/wordpress/htdocs/ -d thenakedwordpress.com -d http://www.thenakedwordpress.com
Requesting to rerun ./certbot-auto with root privileges…
./certbot-auto has insecure permissions!
To learn how to fix them, visit https://community.letsencrypt.org/t/certbot-auto-deployment-best-practices/91979/
Saving debug log to /var/log/letsencrypt/letsencrypt.log
Plugins selected: Authenticator webroot, Installer None
Obtaining a new certificate
Performing the following challenges:
http-01 challenge for thenakedwordpress.com
http-01 challenge for http://www.thenakedwordpress.com
Using the webroot path /opt/bitnami/apps/wordpress/htdocs for all unmatched domains.
Waiting for verification…
Challenge failed for domain thenakedwordpress.com
Challenge failed for domain http://www.thenakedwordpress.com
http-01 challenge for thenakedwordpress.com
http-01 challenge for http://www.thenakedwordpress.com
Cleaning up challenges
Some challenges have failed.
IMPORTANT NOTES:
– The following errors were reported by the server:
To fix these errors, please make sure that your domain name was
entered correctly and the DNS A/AAAA record(s) for that domain
contain(s) the right IP address.
hello@nwp-2:~$
Certbot is trying to validate your domain in order to issue the certificate, but for whatever reason your website is responding with a 404. It’s possible that this is due to the current certificates being expired.
To fix the error, comment out the certificate paths in your Apache configuration file, and edit the Apache redirect rules at the top of your configuration file to direct traffic to the HTTP version of your site (instead of the HTTPS version). Lastly, change the WP_HOME and WP_SITEURL values in the wp-config.php file to the non-HTTPS version of your domain. Once you’ve completed these steps and your able to access your site via HTTP, try executing the certificate issuing command again.
Once the certificates have been issued, you can go ahead and revert back those settings.
Hi I’m getting error when I try ./certbot-auto certonly –webroot -w /opt/bitnami/apps/wordpress/htdocs/ -d 1pagezen.com -d http://www.1pagezen.com this code it returns An unexpected error occurred:
The server experienced an internal error :: Error creating new order
The error that you’re encountering isn’t one that I’ve seen before. That being said, I did a Google search on the error and was able to find this resource.
If this doesn’t provide a solution to the problem, I’d recommend doing a Google search for “The server experienced an internal error :: Error creating new order” and checking out some of those resources.
Hope this helps and let me know if you have questions,
Joe
Phil Daumsays
Hello,
I followed this tutorial except I did it on Azure. It worked well, however, now I need to remove the Let’s Encrypt certificate, because I uploaded another one into Azure. How can I remove the Let’s Encrypt Certificate only? It was not providing my site what it needed.
Hi,
Thank you so much for helping out in setting up my website on the google platform. But I am having an issue in the end when I did the changes in PHP file. I can’t access my wp-admin panel now.
The website is http://www.longrunco.com/wp-admin/
I get this
This site can’t be reached127.0.0.1 refused to connect.
and the site is not working fine either.
Which changes did you make in your PHP file? It seems to me like there could be a typo somewhere and it’s breaking your site.
I’d recommend checking your log files and seeing if there’s any data regarding a PHP error, additionally, I would paste whichever PHP file you edited into a PHP editor and see if it picks up any syntax errors.
Hope this helps and let me know if you have questions,
Joe
Benjamin Wallersays
Hello Joe,
Hope you are good.
I am having trouble renewing a SSL certificates for one of my sites. So I would if you could help troubleshoot.
When I run the following commands, I get a message about the following error.
“`
sudo apachectl configtest
AH00526: Syntax error on line 53 of /opt/bitnami/apache2/conf/bitnami/bitnami.conf:
SSLCertificateFile: file ‘/etc/letsencrypt/live/vietnamesehacks.com/cert.pem’ does not exist or is empty
“`
If I take a step back, I first tried renewing the Certificate the following ways:
“`
sudo /opt/bitnami/letsencrypt/scripts/generate-certificate.sh -m ben@elearnvietnamese.com -d vietnamesehacks.com -d http://www.vietnamesehacks.com
“`
Then got the following message:
“`
It seems there is a valid certificate in the web server configuration folder. Please renew that certificate or generate new ones manually
Please check our documentation or open a ticket in our community forum, our team will be more than happy to help you!
“`
Then I tried creating new certificate the following way but got an error message:
“`
cd /opt/bitnami/letsencrypt/
sudo mv certificates certificates.bak
sudo ./lego –tls –email=”ben@elearnvietnamese.com” –domains=”vietnamesehacks.com” –domains=”www.vietnamesehacks.com” –path=”/opt/bitnami/letsencrypt” run
———
2019/09/03 12:31:14 You have to pass an account (email address) to the program using –email or -m
“`
I not sure what I should do now. Please suggest a course of action if possible.
It looks like you were able to resolve the issue – how did you end up fixing it?
I’ve seen these problems occur typically when there are incorrect permissions on the certificate files, and/or there are additional spacing characters around the file paths in your Apache server configuration file.
Hope you’ve been well, and talk to you soon!
Joe
Benjamin Wallersays
Hi Joe,
Yes. It is a bit of a blur now…I was trying so many different things to solve the issue so I think I lost count in the end. From memory I had to uncomment the following two lines which and removed the other style .pem lines “` SSLCertificateFile “/opt/bitnami/apache2/conf/vietnamesehacks.com.crt”
SSLCertificateKeyFile “/opt/bitnami/apache2/conf/vietnamesehacks.com.key” “`…Also I don’t think I am using the Certbot now because in my crontab I am using the following command for renewals “`0 0 1 * * /opt/bitnami/letsencrypt/scripts/renew-certificate.sh 2> /dev/null“`
Anyways what ever I did it worked. I just hope it will renew next time round without an issue.
Thanks again.
Ben
In order to fix this problem, I corrected the error and ran the command a second time. Now when I run the ls command, it’s telling me that there are two certs: certbot-auto and certbot-auto.1
I’m not sure which is original, which is backup, or what to do next. I know that my site isn’t yet secure. I kept a copy of the entire sequence of steps if you willing to look at it.
And on my second attempt, I typed it correctly, with my domainname. As far as I can tell I installed a certificate successfully. But my site isn’t secure.
Try re-running the certificate issuing command and see if it prompts you to overwrite the existing certificates. If it does, choose “Yes” and proceed to edit your bitnami.conf file and add the paths to your correct certificates.
Also, delete certbot-auto.1 – the certbot-auto script is generic and isn’t dependent on your existing configuration.
Hi Leorin Amin
Hope you are doing great and fine!
I have lost my SSL paid certificate just for one-click on GoDaddy.
I have revoked it by mistakenly how I can get back?
Thanks once again, I seem to keep finding your tutorials whenever I need to get something done.
I am having trouble with the Dry-run command:
Attempting to renew cert (humanitybeacon.com) from /etc/letsencrypt/renewal/humanitybeacon.com.conf produced an une
xpected error: Missing command line flag or config entry for this setting:
Select the webroot for humanitybeacon.com:
Choices: [‘Enter a new webroot’, ‘/opt/bitnami/apps/wordpress/htdocs’]
(You can set this with the –webroot-path flag). Skipping.
All renewal attempts failed. The following certs could not be renewed:
/etc/letsencrypt/live/humanitybeacon.com/fullchain.pem (failure)
I think it’s telling what to do, but it’s beyond my limited knowledge base. Any suggestions would be appreciated.
Otherwise, the rest of the tutorial seemed to work just fine.
Thank you,
TB
Select the webroot for your website, which in your case is /opt/bitnami/apps/wordpress/htdocs. Based on your message, it appears as though it’s prompting you with this option in the terminal.
Hope this helps and let me know if you have questions,
Joe
Alliesays
Thank you so so so so much!!!! I made it ! I had spent a lot time in solving this problem, but failed all the time.
This means there is an error with your certificates.
Check out this troubleshooting tutorial for more information.
Let me know if you have questions,
Joe
Lynnsays
I created a new vm instance from an existing one and used the last backup snapshot from the existing site so I would have a starting point for the new one that had many of the features that I wanted. I thought I had changed the domain everywhere that I needed to but when I got to setting up the ssl I ran into trouble. Every time I try to create the certificate it fails verification / challenges because it looks for the old domains :
You have to configure the redirect or rewrite in your Apache configuration file to temporarily direct traffic to the HTTP version of your domain. In this example, that file is bitnami.conf.
What’s happening is that the certbot client is attempting to validate your domain, but when it hits the HTTPS-version of your domain it gets hit with an ‘insecure content’ error.
Once you get your website working properly with HTTP, then try re-issuing the certificates and it should work fine.
Hope this helps and let me know if you have questions,
Joe
Talhasays
I’m getting ERR_CERT_AUTHORITY_INVALID I’ve followed all the steps and I’ve also replaced domain where needed. My domain name is madnumber.org
I have the same error message. This happen, after I installed the cerbot (finished step 1 to 4) and after running set 6 (jumped to set 6 from 4). This message appears.
This site can’t be reached http://www.ovalkart.com’s server IP address could not be found.
Try running Windows Network Diagnostics.
DNS_PROBE_FINISHED_NXDOMAIN
Note: i am trying update my SSL cert (again, cause cron cannot for whatever reason). Every time I come back to this issue it is a rabbit hole of confusion.
I have made a very silly mistake while installing the ssl certificate. Web address still shows the connection is not secure. When I view the certificate, it shows that it is issued to example.com instead of my domain address. Now I am not sure what should I do. Should I re install the certificate or is there any way to change it?
A quick solution is to simple re-execute the certificate issuing command with the correct domain name. After doing this, a new certificate will be issued for your correct domain name.
Let me know if you have questions,
Joe
Anil Thapliyalsays
Thanks for your video!!
I am getting below exception could you please tell me which step I have missed or implemented incorrectly.
Saving debug log to /var/log/letsencrypt/letsencrypt.log
Plugins selected: Authenticator webroot, Installer None
An unexpected error occurred:
ConnectionError: HTTPSConnectionPool(host=’acme-v02.api.letsencrypt.org’, port=443): Max retries exceeded with url: /directory (Caused by NewConnectionError(‘: Failed to establish a new connection: [Errno -3] Temporary failure in name resolution’,))
Please see the logfiles in /var/log/letsencrypt for more details.
You can check for errors in the letsencrypt.log file, which you can view if you SSH into your instance and execute the following command:
sudo cat /var/log/letsencrypt/letsencrypt.log
Let me know if you have questions,
Joe
Benoysays
Hi There,
Whenever GCP calls, I turn to you 🙂 Whole site up and running via your tutorials. Thanks. Just cropped up a small issue and thought I might ask the expert.
My site is working fine and no issues with SSL. I have a reserved static IP but when I click on the IP, it provides me an ssl version of the ip link, but isn’t secure and an error shows saying NET::ERR_CERT_COMMON_NAME_INVALID . However, non ssl ip directs it to my ssl site.
Just a bit confused. Hope you might extend a helping hand.
The error is happening because you can’t register SSL certificates for IP addresses – so when you access your instance via it’s IP, it’s throwing an error because your IP address is not listed in the SSL certificate. This is expected behavior.
You can configure a re-direct in Apache to forward traffic from your IP address to your domain name – see here.
Let me know if you have any questions – and I’m glad you’ve enjoyed the tutorials!
Joe
Hi, Thank you for your videos. I have done the tutorial and and I received this error when I tried to restart the apache.
Unmonitored apacheAH00526: Syntax error on line 53 of /opt/bitnami/apache2/conf/bitnami/bitnami.conf:SSLCertificateFile: file ‘/etc/letsencrypt/live/ nomadrepublic.tv /cert.pem’ does not exist or is emptyapache config test fails, abortingAH00526: Syntax error on line 53 of /opt/bitnami/apache2/conf/bitnami/bitnami.conf:SSLCertificateFile: file ‘/etc/letsencrypt/live/ nomadrepublic.tv /cert.pem’ does not exist or is emptyapache config test fails, abortingMonitored apache
Then I edit the line and update the config file. now I get :
Unmonitored apache
Syntax OK
/opt/bitnami/apache2/scripts/ctl.sh : httpd stopped
Syntax OK
/opt/bitnami/apache2/scripts/ctl.sh : httpd started at port 80
Monitored apache
There appears to be an empty ‘space’ character in your file paths before and after your domain name – this is illegal and will break your configuration. You need to remove the spaces and restart Apache in order for your server to function properly. See below:
Hi,
I followed all the steps. But post this update, my website is not loading. It is giving HTTP 500 error. On the 7th step, the code above and below “define” statements look little different for me than yours. I’m not sure if this is causing the problem. I’m seeing the define statements inside the if loops in my file. Whereas in your video, the define statements are above the if loop. Please let me know how to fix this error. Thank you.
Regards,
Manivannan Y
The ‘define’ statements were copied and pasted from the section of code a few lines above, and then uncommented (see the second screenshot from step 7).
If the ‘define’ statements are in a different location in your config file, then just go with it – it is unlikely that this is causing the 500 error, except in the case of a syntax error.
Let me know if you have questions,
Joe
Sah Alamsays
cs@wordpress-1-vm:~$ ./certbot-auto certonly –webroot -w /opt/bitnami/apps/wordpress/htdocs/ -d homet.co.uk -d http://www.homet.co.uk
Requesting to rerun ./certbot-auto with root privileges…
Saving debug log to /var/log/letsencrypt/letsencrypt.log
Plugins selected: Authenticator webroot, Installer None
Enter email address (used for urgent renewal and security notices) (Enter ‘c’ to
cancel): c
Hello I got this error to install the ssl certificate. please take a look and I am waiting for your reply.
Don’t enter ‘c’ when it asks for an email address – that cancels the certificate issuing process. If you don’t want to provide an email address, just put in a placeholder address such as example@example.com.
Hello sir after following all steps successfully apache server could not restart and get an error
(Unmonitored apache
AH00526: Syntax error on line 90 of /opt/bitnami/apache2/conf/bitnami/bitnami.conf:
ServerAlias only used in
apache config test fails, aborting
AH00526: Syntax error on line 90 of /opt/bitnami/apache2/conf/bitnami/bitnami.conf:
ServerAlias only used in
apache config test fails, aborting
Monitored apache)
this is the server error when I restart the apache server tell me, sir, how to solve this problem because my website is also down after installing ssl certificate
Then, jump to line 90 in the file by pressing the following key combination: CTRL + SHIFT + –
From there, look for the error. From my understanding, there should not be a ServerAlias directive in line 90 of the file (as the error message suggests) – it should be toward the top of the file under the opening tag.
Hope this helps and let me know if you have questions,
Joe
Thanks Leron, I was able to set up SSL on my site expressionbreak.com easily with the step by step guide you have posted. I would like to know how do I change the default user name that bitnami gives ? Couldn’t find a post on it.
I have Followed the tut, but after that I got a Curl error: 56 (RECV_ERROR) when sharing to Facebook(Image is no sharing) how to resolve that issue?
Best Regards,Sudath
Greate tutorial! I followed the SSL cerification installation processes, and I also got the same last confirmation you got at the end of the tutorial. The problem I’m facing now is that, after I’ve installed the SSL to my website: http://www.onlinetradingmen.com, I’ve not been able to access my web webiste. whenever I typed the domain name (www.onlinetradingmen.com), It returns “this page isn’t working , http://www.onlinetradingmen.com is currently unable to handle this request. HTTP ERROR 500.”
The worst part of it is that I can’t even acess my admin dashboard. I’m using google cloud platform.
sir after ssl certificate process done.
ip not working sir. I’ve Tried All Process, But Not Working
in kproxy.com its working.
website godparcel.com
When I tried to create another instance. No:of:certificates issued error came what to do ?
in browser not working, but in kproxy working.kindly check it manually yourself sir
Hello,
Will this tutorial work for AWS EC2 Instance as well. I have used WordPress Bitnami Client for my site, issued the certificate but not able to connect with ELB or Cloudfront.
Yes – the process is the same for configuring SSL on an AWS EC2 instance. However, configuring the certificates with ELB or Cloudfront is a completely separate process, and one that I don’t cover in this tutorial. I would check the AWS documentation for additional information.
Error:
viv_kr_85@wordpresssemplice-vm:~$ ./certbot-auto certonly –webroot -w /opt/bitnami/apps/wordpress/htdocs/ -d nagrajviv.com -d http://www.nagrajviv.com
Requesting to rerun ./certbot-auto with root privileges…
/opt/bitnami/apps/wordpress/htdocs/ -d nagrajviv.com -d http://www.nagrajviv.com does not exist or is not a directory
/ -d atharvajobs.com/ -d http://www.atharvajobs.com/
Requesting to rerun ./certbot-auto with root privileges…
Saving debug log to /var/log/letsencrypt/letsencrypt.log
Plugins selected: Authenticator webroot, Installer None
Obtaining a new certificate
An unexpected error occurred:
The request message was malformed :: Error creating new order :: Invalid character in DNS name
Please see the logfiles in /var/log/letsencrypt for more details.
Hi, I tried doing this and after everything is done, my site is not loading and it says http error 500, please advise ,how to fix this error and my site is theonlinecart.in
Try restarting your Apache server and see if there are any error messages that print to the terminal.
sudo /opt/bitnami/ctlscript.sh restart apache
Also, check your Apache error logs for any additional information that could pertain to the error, and make sure that your cloud DNS is configured properly and that your A record IP value matches the IP of the instance that is running your website.
Let me know if you have any questions,
Joe
ggrobotsays
i will try these two options and let you know. thank you Joe for your help.
hi one page zen , thank you for your great help to all of us. i followed your steps precisely and it seems that all pages are secure except the homepage. is something i can do for it?
2. there are some redirects from the ip url to my domain name url , is there a way to cut them off as it lowers the loading time.
Thanks for another amazing tutorial. My installation went smooth thanks to your straightforward step-by-step instruction. I can see “The connection to this site is using a valid, trusted server certificate issued by Let’s Encrypt Authority X3” notification in Google Chrome therefore the SSL seems to be working fine. Whereas, via my SEO plugin in WordPress I’m getting 404 Errors from .well-known/acme-challenge/h-vsCtyrnRYOeV2kj0qlQy1V59b3aKouDu8P address. What do you think the potential issues related to this server message? Thanks in advance.
The acme-challenge is created on your server to validate your ownership of the domain (that you’re securing with SSL) before a certificate can be issued. For instance, if you tried to issue a certificate for a domain that wasn’t validated/connected with your server, the acme-challenge would fail. I see this happen a lot when users copy and paste the certificate issuing command directly from the tutorial, and forget to replace 1pagezen.com with their own domain names.
That being said, if your plugin is showing a 404 from the ‘well-known’ directory, I wouldn’t pay any attention to it. It has no real value to your website aside from it’s role in domain validation for the Certbot client. Don’t delete the directory though, as you will need it when you run the command to renew the certificate later on.
Thanks for your reply. Actually I have recently changed the domain name and the old domain is (301) redirected to the new one. Should I suspect 301 redirection might cause this 404 behaviour since .conf files seems to be configured correctly.
Yes, the redirection could be causing the 404 error. You should at some point run a ‘dry-run’ (see the section of this tutorial titled ‘Basic Auto-Renew Testing’). After running the command, see if you get an error related to the Acme challenge – as this could be caused by the redirect. If not, don’t worry about the 404.
I’ve run the test and got “Congratulations, all renewals succeeded. The following certs have been renewed” message without any error. As you suggested earlier, I’d just ignore 404 now. Thanks for the support.
Hsusays
Hi!
Thanks for this tutorial!
I have Followed the tut, but at the last point I got a failure.
last step I write: sudo /opt/bitnami/ctlscript.sh restart apache
and show:
Unmonitored apache
AH00526: Syntax error on line 13 of /opt/bitnami/apache2/conf/bitnami/bitnami.conf:
Redirect takes one, two or three arguments, an optional status, then document to be redirected and destination URL
apache config test fails, aborting
AH00526: Syntax error on line 13 of /opt/bitnami/apache2/conf/bitnami/bitnami.conf:
Redirect takes one, two or three arguments, an optional status, then document to be redirected and destination URL
apache config test fails, aborting
Monitored apache
As the error indicates, there is a syntax error on line 13 of your bitnami.conf file.
You will have to open the file, identify the error (jump to line 13), and fix it. Things to look for are extra spaces at the end of line 13 (these must be removed), and typos or missing spaces between words.
I have been using GSuite, since the program started as Google Apps. I decided to migrate to GCP in order to be able to create the site I really wanted and to learn as much as I could. Your tutorials have been my mind saving lifeline. I appreciate the time, effort and energy you put into creating these tutorials. You are a master educator and VERY good at what you do. For you, I am grateful. Thank you so much.
Thanks for the feedback Yejide! It makes me happy to know that you’ve found the tutorials helpful and have been able to benefit from them! 🙂
Walkersays
You may already be aware, but your instructions say to use cert.pem, which will break apache2 on any reboot (requires manual passphrase entry, and if you’re using GCloud and bitnami over BASH SSH you won’t see the dialog (plus I don’t even know how to find the passphrase from certbot, which is my own fault for being a noob, but still ridiculously confusing). Should use fullchain.pem instead.
Thank you for the detailed steps. I’ll be contacting you soon to ask your assistance in cleaning up the mess I made ;).
I only needed one certificate for one site on my WordPress Multisite Bitnami to install on Google Cloud Platform. I was hoping this would still work. Needless to say, it’s created some problems. The good news is that my Google Search results from my old site are successfully redirected to the new WordPress site. The bad news is I can not log into my Multisite install to fix the mixed security issues.
I’m only posting the pubicly so others don’t make the same mistake I did, or at least know what will happen.
Thanks for the words of wisdom. I’m sorry to hear about the login problems, but hopefully this will be helpful to users who are going down the same route.
It looks like there’s a temporary issue with the download site. You can either wait for it to come online again, or download from an alternative location:
wget https://raw.githubusercontent.com/certbot/certbot/master/certbot-auto && chm
od a+x certbot-auto
Hope this helps,
Joe
Amarinsays
Hi Joe,
I’ve already commented on the earlier version of your SSL installation guide. Anyhow, I’m listing my issue here as well, in case you prefer to communicate via the updated installation guide thread.
Thank you for your tutorial, I followed all your instructions but then I am unable to see anything after installing the SSL as per four instructions, all I see is a white page now, I cannot even access the WP admin anymore. could you please help, sorry about this.
i have a problem… i did this tutorial and it is working great, i had another page on wix which i replaced with this one. i have pointed my other domain to his page and when i try to go to a page from my other domain it says it is not secure.
All you need to do is configure domain forwarding through your domain name provider – you don’t need to add SSL to the secondary domain.
If you need to instructions on how to configure domain forwarding, do a google search for your domain name provider followed by ‘domain forwarding’. For instance, you would search for NameCheap domain forwarding or GoDaddy domain forwarding.
I already did that, I can’t configure much, only the cname to redirect as it was a wix site domain, is there any way to include it into the same ssl I already use?
I’m not aware of what types of restrictions Wix puts on their domain names.
Are you able to change the nameservers on the Wix domain to Google Cloud nameservers? If so, it will likely be possible to configure SSL on that domain. All you’d need to do is re-issue the certificates, making sure to include both domains when running the certificate issuing command. For example:
i used that code you provided and it seems that it the certificates are now generated for both domains, but i still get the not secure page when trying to go into http://www.decenmuebles.com, do i need to follow the hole tutorial again but with http://www.decenmuebles.com domain? i already made it with decen.com.mx
also it seems to show the not secure page only on safari
This is a tutorial for LAMP stack. I have 2 versions – the version you’re viewing now is the Bitnami version, and there is also a version for the Click-to-deploy version. Both of these tutorials are for LAMP stack (Linux, Apache, MySQL, PHP).
Hope this helps and let me know if you have any questions,
Joe
Hi, thanks for answering, when I’m in the apache restart step these errors are generated:
(It’s a php application I do not use wordpress
Unmonitored apache
AH00526: Syntax error on line 52 of /opt/bitnami/apache2/conf/bitnami/bitnami.conf:
SSLCertificateFile: file ‘/etc/letsencrypt/live/yakarei.com/cert.pem’ does not exist or is empty
apache config test fails, aborting
AH00526: Syntax error on line 52 of /opt/bitnami/apache2/conf/bitnami/bitnami.conf:
SSLCertificateFile: file ‘/etc/letsencrypt/live/yakarei.com/cert.pem’ does not exist or is empty
apache config test fails, aborting
Monitored apache
Hope this helps and let me know if you have any questions,
Joe
Ernesto Vencessays
I have the same problem.
/
AH00526: Syntax error on line 54 of /opt/bitnami/apache2/conf/bitnami/bitnami.conf:
SSLCertificateFile: file ‘/etc/letsencrypt/live/sagadescrl.com/cert.pem’ does not exist or is empty
/
But I verified and it’s not a Syntax error. Actually, cert.pem does not exist.
I hoppe you can help me to solve.
Thanks
Ernesto
If you’ve verified that it’s not a syntax error and you’re 100% certain that the file doesn’t exist, then you will have to re-issue the certificates in order to create that file:
Hello,great tutorials,but i have problem,when i add static address and domain and ssl,and in some point website don’t work.Installing order is next,add static ip,point domain,add ssl .Can’t figure where is mistake,can you advice me.Have other website,works fine with these steps.
Thanks
/opt/bitnami/apps/wordpress/htdocs/ is the webroot for the Google Cloud Bitnami LAMP stack. The webroot for the Click-to-deploy version is /var/www/html and that tutorial can be found here.
Hope this helps!
Joe
Ahesansays
Thanks for your reply.
Actually I am using Amazon aws wordpress manage by bitnami.
The root directory for the AWS installation is the same, so there shouldn’t be any difference:
/opt/bitnami/apps/wordpress/htdocs/
Try to navigate into that directory and see if it works:
cd /opt/bitnami/apps/wordpress/htdocs/
Talk to you soon,
Joe
Yurisays
Hi Leron, I find you on YouTube video to configure my domain on Amazon. I start to use a Lighsail and you help me a lot! Thanks! Now I’m trying to configure a free SSL certificate on Lightsail. This is possible? Thanks!
I have not used the AWS Lightsail service so I’m not sure whether or not it is possible.
I would recommend doing a Google search for “letsencrypt lightsail aws” and see what you find. I just ran the search myself, and there appears to be numerous tutorials on the subject.
Unfortunately that won’t work. Because the certificate was issued for the .tk domain, it will only work for the .tk domain. If you try to use that certificate with another domain, you will see an SSL ‘mismatch’ error in the browser.
You will have to change all of your files to reflect the new domain name, and then re-issue the SSL certificate for the new domain name.
Easiest thing would be to start from scratch, but you can always work backwards if you feel you have a good grasp on how the configuration works.
Hope this helps and let me know if you have any other questions,
Joe
michael millssays
Hi thanks for posting the great tutorial I am fine with the setting this up now. I have the lock symbol on my site thanks to you. I wrote another message to say thanks and that there is no reason to respond to my earlier message but it does not seem to have posted, so I just wanted to let you know that the earlier issue is resolved and that I am working on other issues now with the ‘redirect chains’. Thanks, Mike
sudo crontab -e
no crontab for root – using an empty one
crontab: installing new crontab
“/tmp/crontab.CclGhz/crontab”:0: bad minute
errors in crontab file, can’t install.
Do you want to retry the same edit? (y/n) y
crontab: installing new crontab
“/tmp/crontab.CclGhz/crontab”:0: bad minute
errors in crontab file, can’t install.
Do you want to retry the same edit? (y/n)
I picked no and got :
Do you want to retry the same edit? (y/n) n
crontab: edits left in /tmp/crontab.CclGhz/crontab
What should I read or do next if you have time to advise me. Thanks, Mike
The error means that there is an error in your crontab file. In this case, it appears to be a formatting issue (incorrect characters/formatting).
Go back through the cron section of the tutorial and verify that your crontab file is configured as shown in the example.
Also, please check out the following resource for additional information about the bad minute error, and this resource for a basic outline of cron and how it works.
Hope this helps,
Joe
michaelsays
sudo crontab -e is the command I got stuck on.
after that I get this output:
# Edit this file to introduce tasks to be run by cron.
#
# Each task to run has to be defined through a single line
# indicating with different fields when the task will be run
# and what command to run for the task
#
# To define the time you can provide concrete values for
# minute (m), hour (h), day of month (dom), month (mon),
# and day of week (dow) or use ‘*’ in these fields (for ‘any’).#
# Notice that tasks will be started based on the cron’s system
# daemon’s notion of time and timezones.
#
# Output of the crontab jobs (including errors) is sent through
# email to the user the crontab file belongs to (unless redirected).
When you run the sudo crontab -e command, it opens your crontab file. The output that you pasted in your message is simply the default text contained in the crontab file. You will need to paste the auto-renew script at the bottom of the default text, and then save the file.
Hope this provides some additional clarification and let me know if you have any questions,
Joe
Michaelsays
Hello,
I am trying to install the SSL on Google Cloud Bitnami WordPress Multi-Tier and I have the following questions:
1. Which of the two IP addresses generated my the deployment should I use is the one linked to the frontend or the one linked to the database and backend?
2. The installation on either IP addresses Aborts when I am generating the Certicate, specifically when I enter Y for yes for the installation to continue, the operation suddendly Aborts. How do I address this issue?
Hello, I followed the manual, and it works.
Although at the time of auto renew fails, and I have to rebuild the certificate.
I’m obviously in wordpress and bitnami.
why? And what code I have to implement to forget the certificate.
Follow the instructions in this tutorial to configure auto-renewal for your certificate. If your certificate is already expired, execute the ./certbot-auto renew command from the directory where certbot is installed. For example, try executing the command right after you finish with step 2.
Hope this helps and let me know if you have any questions,
Joe
to renew my certificate, but they tell me that it’s going to expire:
Your certificate (or certificates) for the names listed below will expire in 20 days (on 21 Dec 18 18:45 +0000). Please make sure to renew your certificate before then, or visitors to your website will encounter errors.
When I do a renewal test:
cd /etc/letsencrypt/ && ./certbot-auto renew –dry-run && /opt/bitnami/ctlscript.sh restart
he says: No such file or directory, but by FTP, I see the indicated folder and the indicated file
You should verify that you have certbot installed in the /etc/letsencrypt/ directory:
cd /etc/letsencrypt/
After navigating to that directory, you should see ‘certbot’ listed. If certbot isn’t listed, then that means it isn’t installed in that directory. While still in the /etc/letsencrypt/ directory, re-download the certbot client:
I have performed the steps indicated to me, placed in the directory I installed cerbot in that directory.
Then run the test command, and perform a test, indicating syntax as ok and I indicate:
Congratulations, all renewals succeeded. The following certificates have been renewed:
/etc/letsencrypt/live/mydomai.com/fullchain.pem (success)
** DRY RUN: simulating ‘certbot renew’ close to cert expiry
** (The test certificates have not been saved.)
I have to assume, that now the certificate is correctly configured, and I do not have to worry about it anymore.
That looks good – the renewals should work just fine. Check back about 20 days before the certificates are due to expire to ensure that the auto-renewal script is working correctly.
Hi Gergely – I’m glad to hear it worked! Thanks for the feedback!
Scottsays
Great tutorial! Thank you! I have setup my site with ssl. Now I’ve bought a new domain name which I also want to set up using SSL. What do I need to do? Do I need to repeat this tutorial again? Will both domain names work with us to sell after doing this? Thank you
Thanks for the feedback – I’m glad to hear the tutorial worked for you!
Did you want your new domain name to link to the same website as your other domain? Did you want it to link to a subdirectory of your website?
There are many, many different ways of configuring multiple domains for a single website. And as far as encryption, it is best to add all of the domains to a single certificate, so that all domains on your server are utilizing the same certificate.
The process of issuing multiple domains under a single certificate is similar to the process in step 3 of the tutorial, however, you would add additional -d flags for each of the additional domains that you wanted to secure under the certificate. For example, if you wanted to secure your original domain and your new domain, your certificate issuing command would looks something like the code below (assuming your domains are scottjones.com and scottjones2.com):
I think you’re allowed to add upwards of 100 domains to a single certificate.
I hope this answers your question. If not, please provide additional details about which type of configuration you’re going for and I will do my best to help.
Talk to you soon,
Joe
Scottsays
Great. I’ve already setup ssl on one domain name on my WordPress setup using your tutorial. So, do I only need to run the code you provided for domain #2 (scottjones2.com in your example) and it will be added to what I’ve already setup?
Yes – that will add SSL to that domain, however you still need to configure it with your server.
Just like with configuring the first domain, you need to configure another Apache virtual host for your new domain. Check out this resource and this resource to get a general idea of the process.
Please reach out if you have any questions,
Joe
Albertsays
Thanks for this tutorial! It helped.
May I ask how will I be able to access the private and public key as well as CSR of the SSL installed?
I am trying to set up a CDN in Google cloud and I was prompted by these questions.
I have used this guide before and had no issues at all, but I just tried to configure SSL for my new website and I am having an issue. After restarting the server, my site was loading with no problem (however, “https://” was in grey and not green), and about 5 minutes later it will not load at all.
The SSL is fine, it’s just that your website is serving insecure content (see part 1 of this tutorial) from your website’s IP address instead of it’s domain name.
Make sure that you update your WordPress site URL’s in your WP config file (step 7 of this tutorial). Then refresh your URLs by going to Settings > Permalinks – then selecting the post name option (click the save button twice again, even if it’s already set to post name setting).
Hope this helps and let me know if you have any questions,
Joe
Once again you have saved the day! The mixed content was the issue. I had to fixed the urls for all of my pictures and now every page is properly secured.
After last night, the website was loading perfectly and with the green padlock. But this morning the same thing has happened, where the site is loading the domain host page and is also not secure.
My URL’s are correct, but I can’t get into my site to check mixed content and permalinks (even though these were working perfectly last night). Any ideas?
Hello Leron,
Thank you for your outstanding tutorial video. It is very helpful.
Over 3 months ago, I followed your instruction to obtain a free SSL certificate and set auto renewal for trendyls.com. I wasn’t sure the auto renewal set up properly. However, the trendyls.com certificate was expired 3 days ago. I followed your instruction again, It granted the Certificate valid for the next 90 days but it fail the auto renew. I got the syntax error in bitnami.conf as described below, I have no luck so far to correct it. Please take a look and give me some instruction.
Thank you in advance.
Unmonitored apache
AH00526: Syntax error on line 59 of /opt/bitnami/apache2/conf/bitnami/bitnami.conf:
SSLCertificateChainFile: file ‘/etc/letsencrypt/live/trendyls.com/chain.em’ does not exist or is empty
apache config test fails, aborting
AH00526: Syntax error on line 59 of /opt/bitnami/apache2/conf/bitnami/bitnami.conf:
SSLCertificateChainFile: file ‘/etc/letsencrypt/live/trendyls.com/chain.em’ does not exist or is empty
apache config test fails, aborting
Monitored apache
You have a typo. You typed your file path as /etc/letsencrypt/live/trendyls.com/chain.em, but it should be /etc/letsencrypt/live/trendyls.com/chain.pem
Make the suggested change, restart your server, and the problem should be fixed.
Let me know if you have any questions,
Joe
James NBsays
Hi, is there any tutorials for wildcard domain configuration?
You will have to change the permission level of your wp-config.php file to 755, as shown in step 3 of this tutorial.
If that doesn’t work, you may have to use 777 instead of 755, or better: verify that the file has the proper owner. You can learn more about the chown command and Linux file ownership here.
Feel free to reach out if you have any questions,
Joe
Mixed Content: The page at ‘https://www.printzx.com/’ was loaded over HTTPS, but requested an insecure image ‘http://demo.themeum.com/wordpress/wp-megamenu/wp-content/uploads/2017/07/brand-logo.png’. This content should also be served over HTTPS.
This is the error in my website when i upload free ssl certificate google cloud . Can you tell me how to solve this problem ?
Hi Leron
Beautiful job with the tutorials. really loving them.
Just to let you know + if you are able to suggest a way out of my troubles: I set up the ssl certificates according to your instruction – they worked but I didnt get the green lock yet – I came back a few hours later to continue with your tutorials and Google cloud was telling me I needed to resize my VM instance – I did it and.. Apache no longer starts.
I sourced info on the bitnami forum and there they requested an error log in similar cases – by running: /opt/apache2/logs/error.log
But I get: “-bash: /opt/apache2/logs/error.log: No such file or directory”
So I cant move forward there at the moment either.
Have you ever come across anything similar – its definitely the resizing that threw my set up off.
Hi Sami,
In most cases you won’t need to resize your VM – the micro machine is fine for 99% of WordPress websites.
Next, what is the error message you see when you try to restart Apache?
Also, to view your error log in the future, run the following command:
Hi Joe
Thanks for the reply – I reached out to someone on my inhouse my support team and they managed to get the apache back and running again – as soon as I get confirmation on what they did I will comment here for everyones benefit.
We had to upgrade as we are building a prestashop in addition to the wp site and even if we arent at the very limit now (google cloud was suggesting we upgrade) they idea was to get set up on the micro level and near launch upgrade.. Anyways Love your blog and the advice here, you are addressing a great niche and expect that if your business hasnt totally blown up yet it is ikely to do so, such quality is the material, sure to attract loads if traffic. Well done & thanks!
Hi Sami,
Thanks for the feedback. Also, I am glad to hear that you were able to get the issue resolved.
And I didn’t realize you were going to be running on online store, in which case a more robust machine would be appropriate.
Looking forward to hearing about the solution. 🙂
Talk to you soon,
Joe
Hi Joe
Here is what our guy had done:
I disabled Debian’s default Apache with:
sudo update-rc.d apache2 disable
> >then restarted the server using
sudo reboot
(not sure if this is the recommended way to restart a google cloud instance)
> >and Bitnami’s Apache is now able to start
I now need to follow up with a few more of your tuts – thanks again, and if anyone has that same issue I experienced, the ommads here might work for you but try at your own risk
sami
Hello,
Please I have an issue after following your tutorial. thank for the tutorial first.
After configuring my SSL cerftificates succssfully, I received a message from Certbot saying my certificates will expire in a few days. Thoug I set automatic renewal.
I dont understand why. I assure you, I went through your video tutorial, and you post, followed everything as you said but I still have that issue.
Hi Damien,
Follow this tutorial for updated instructions on how to configure auto-renewal for your certificates.
Let me know if you have any questions,
Joe
When I go to restart Apache, I’m getting the following:
AH00526: Syntax error on line 54 of /opt/bitnami/apache2/conf/bitnami/bitnami.conf:
SSLCertificateFile: file ‘/etc/letsencrypt/live/www.bella-vr.com/cert.pem\xe2\x80\x9d’ does not exist or is empty
root@bitnami-wordpress-dm-d806:/etc/letsencrypt# sudo /opt/bitnami/ctlscript.sh restart apache
Unmonitored apache
AH00526: Syntax error on line 54 of /opt/bitnami/apache2/conf/bitnami/bitnami.conf:f/bitnami/bitnami.conf
SSLCertificateFile: file ‘/etc/letsencrypt/live/www.bella-vr.com/cert.pem\xe2\x80\x9d’ does not exist or is empty
apache config test fails, aborting
AH00526: Syntax error on line 54 of /opt/bitnami/apache2/conf/bitnami/bitnami.conf:
SSLCertificateFile: file ‘/etc/letsencrypt/live/www.bella-vr.com/cert.pem\xe2\x80\x9d’ does not exist or is empty
apache config test fails, aborting
Monitored apache
Hi Reid,
Try CJ’s solution of changing the permissions of the letsencrypt directories. If that doesn’t work, go back to line 54 of your bitnami.conf file and make sure there are no spaces at the end of each line. Also, make sure sure there are no spelling errors on either of the 3 certificate paths (extra quotation marks, etc).
Let me know if you have any questions,
Joe
You are awesome. Actually awesome! I’m working on a website. Following your tut, I just made it safe. Next step should be managing content in the site.
Do you have any related tutorials concerning customising WordPress website (bitnami) on GCP?
Hi Andy,
I’m glad you were able to get your website running on Google Cloud.
I don’t offer have any front-end tutorials for WordPress, but if you do a Google search, you will find thousands (if not millions).
Good luck and let me know if you have any questions,
Joe
Leron i am using lamp stack on my engine, therefore i changed wordpress to apache and apche2 as well but no luck resolving the error.
~$ ./certbot-auto certonly –webroot -w /op
t/bitnami/apps/apache/htdocs/ -d lamicane.com -d http://www.lamicane.com
Requesting to rerun ./certbot-auto with root privileges…
/opt/bitnami/apps/apache/htdocs/ does not exist or is not a directory
Hi Nishant,
The error message is saying that the directory /opt/bitnami/apps/apache/htdocs/ doesn’t exist.
From my understanding, if you’re running your application on a standalone Bitnami LAMP stack your webroot is /opt/bitnami/apache2/htdocs.
If you’re using the pre-built WordPress LAMP stack, your webroot is /opt/bitnami/apps/wordpress/htdocs/
Hope this helps and please reach out if you have any questions,
Joe
Thanks Leron, this worked perfectly but now i am having trouble with this line
sudo nano /opt/bitnami/apps/wordpress/htdocs/wp-config.php. after changing it to sudo nano /opt/bitnami/apache2/htdocs/config.php blank screen appears.
If a blank screen appears it means that the file does not exist, and therefor it created a new empty file at that location.
Word of advice: if in doubt about whether a file exists at a certain location, use the cd command. For example, if there is in fact a wp-config.php at the location /opt/bitnami/apps/wordpress/htdocs/, then it will show up when you enter the command cd /opt/bitnami/apps/wordpress/htdocs/. If not, it will show a file not found error.
Get familiar with using this process as it will save you a great deal of hassle down the road from entering invalid file paths.
Also, check out this tutorial on Basic Linux Commands for Google Cloud – this will help you get comfortable with navigating the Linux Shell, and will help a lot in the future with configuring your websites in the cloud (the Linux Shell is universal across all cloud platforms).
Let me know if you have any questions,
Joe
OMKsays
Hi thank you for your blog.
I have gone through all instruction and it works fine and perfect.
However I can’t login to phpmyadmin, do you know how to fix this issue?
Hi OMK,
For Bitnami stacks, you have to access phpMyAdmin via SSH tunnel, which I demonstrate in this tutorial.
Please have a look at the tutorial and let me know if you have any questions,
Joe
AH00526: Syntax error on line 10 of /opt/bitnami/apache2/conf/bitnami/bitnami.conf:
ServerAlias only used in
apache config test fails, aborting
Monitored apache
Hi Dennis,
There is an error on line 10 of your bitnami.conf file, specifically on the line with the ServerAlias directive.
Go back to step 6 of the tutorial and make sure the three lines starting with ServerName are configured properly.
Let me know if you have any questions,
Joe
Hey, Love your site and al your videos by the way. I recently setup the SSL for Bitnami on Google Cloud and My website does NOT always load the GREEN SSL LOCK. How do I fix this issue?
I am getting this error :
jay@omsai-wordpress-1-vm:~$ sudo /opt/bitnami/ctlscript.sh restart apache
Unmonitored apache
AH00526: Syntax error on line 51 of /opt/bitnami/apache2/conf/bitnami/bitnami.conf:
SSLCertificateFile takes one argument, SSL Server Certificate file (‘/path/to/file’ – PEM or DER encoded)
apache config test fails, aborting
Monitored apache
Make sure there aren’t any spaces at the end of the certificate path on line 51 (and for the other two certificate paths) – this is probably what is causing the error.
I will make an AWS SSL tutorial in the future. That being said, the configuration for the GCP and AWS Bitnami WordPress stacks are nearly identical, so you should be able to use this tutorial to configure SSL on AWS.
If you try it and run into any issues, let me know and I will see how I can help.
Joe
Try moving to the destination one level at a time and see what happens: cd opt then cd bitnami then cd apache2 then cd conf then cd bitnami then sudo nano bitnami.conf
Let me know how it goes,
Joe
Mehransays
Leron, Thanks for this great tutorial. I already setup SSL successfully and everything is Ok except accessing to phpmyadmin since I’m using wordpress bitnami on GCP I have to get access to phpmyadmin through http://127.0.0.1:8888/phpmyadmin but it redirect s me to main domain e.g https://www.1pagezen.com. Just as a note After finishing tour tutorial to get access to phpmyadmin locally I followed https://docs.bitnami.com/google/components/phpmyadmin/ also I had access to phpmyadmin before setting up SSL on my website.
At the end of step 4.5, were you able to create the SSH tunnel (see the black terminal showing the Bitnami text)?
Mehransays
Yes.
Mehransays
In error_log:
localhost:443:0 server certificate does NOT include an ID which matches the server name
Command line: ‘/opt/bitnami/apache2/bin/httpd.bin -f /opt/bitnami/apache2/conf/httpd.conf’
client denied by server configuration: /opt/bitnami/apps/phpmyadmin/htdocs/import.php
What is your domain? If you don’t want to provide it, make sure to run a check with an SSL Checker to make sure you have both the www-version and non www-version of the domain listed in your SSL certificate.
Let me know what you find out,
Joe
Mehransays
Leron, Thanks for reply but to clarify again I have no problem with SSL it means already setup successfully but not able to access to bitnami phpmyadmin as I mentioned. Please check the bitnami link I posted before for accepting to phpnyadmin which is only possible on localhost.
Are you referencing your server logs? Try using Chrome browser and accessing localhost and choose the “proceed anyway” option when the browser warns that the SSL certificate is invalid.
This error is expected as localost is not listed in the SSL certificate, and therefor will show a security warning by default.
I want to go to google cloud but i have it hard fining a cost for a simple wordpress website hosting, can you give me a rught idea the cost to host a site like yours?
You could run a website like onepagezen.com for around $2-5/month using the most basic settings. That being said, remember that this is not a data intensive website (no stored user account data or video), so the storage/networking costs are low.
Thanks for your response, so your saying i should just select the basic options when signing up? my site is under 500mb when i use all in one migration, so i beleve its very small.
What I would recommend is that you start with the most basic option, and then if you’re experiencing issues with performance, you can always upgrade (see the performance graphs at the top of your GCP dashboard).
Great tutorials – very clear and well documented.
I’m wondering if you could provide alternate instructions for Step 6 of the “Free SSL Certificate Setup for WordPress on Google Cloud (Bitnami)” tutorial specific to the nginx server rather than apache. I’ve deployed Bitnami’s “bitnami-wordpresspro-dm-fa11” which is WordPress with Nginx and SSL for Google Cloud Compute Engine. The settings for nginx will be a little different than those for apache. I’m trying to intuitively figure it out, but so far I haven’t successfully mapped the calls to the certificates to the correct location in /etc/letsencrypt/… so my site isn’t secure yet.
Hi James,
Thanks for the feedback!
Unfortunately I won’t be doing any Nginx tutorials because Apache is the default server for most of the stacks covered in these tutorials.
That being said, I would check StackOverflow for troubleshooting and Digital Ocean for some great Nginx tutorials.
Let me know if you have any questions!
Joe
Hi Leo,
Thanks for this tutorial, I did this a few months ago and today I receive an email from
Let’s Encrypt Expiry Bot, is it normal? Is it going to renew automatically?
Thank you very much.
“Hello,
Your certificate (or certificates) for the names listed below will expire in
20 days (on 04 Mar 18 13:03 +0000). Please make sure to renew
your certificate before then, or visitors to your website will encounter errors.
….”
The auto-renew script from the first version of the tutorial didn’t seem to work for most people. For this reason, I created an updated tutorial that focuses specifically on how to configure auto-renewal for Let’s Encrypt SSL certificates, and you can view that tutorial here.
Please reach out to me if you have any questions or encounter any issues while going through the tutorial.
Sounds good – let me know if you have any questions!
Tejeshwarsays
Hi, thanks for the great tutorial. I found the solutions before you approving my comment.
please tell me can I use the below code. I have static IP address in order to eliminate duplicate code I wrote code like this. As of now everthing working perfectly.
Thank you for your good introductions.
I had success of the SSL Certificate Setup on my MAIN domain.
Then when I tried the process again on my SUB domain, I got the SSL Certified SUB domain.
But unfortunately, my SSL Certified MAIN domain came back to Non-Certificate state, instead.
I will show you partly what I did on my SUB domain procedure. The rest was same with that of MAIN domain steps
following your example , 1pagezen.com (MAIN domain) with subzen.1pagezen.com (SUB domain),
Please, answer to me what point was wrong and should be modified when I try again the SSL Certificate Setup
for both my MAIN and SUB domains.
What I did :
<<>> step
(prompt)$ ./certbot-auto certonly –webroot -w /opt/bitnami/apps/wordpress/htdocs/ -d subzen.1pagezen.com -d http://www.subzen.1pagezen.com
….
IMPORTANT NOTES:
– Congratulations! Your certificate and chain have been saved at:
/etc/letsencrypt/live/subzen.1pagezen.com/fullchain.pem
Your key file has been saved at:
/etc/letsencrypt/live/subzen.1pagezen.com/privkey.pem
…
<<>> step
(prompt)$ ./certbot-auto renew –dry-run
…
Processing /etc/letsencrypt/renewal/subzen.1pagezen.com.conf
…
new certificate deployed without reload, fullchain is
/etc/letsencrypt/live/subzen.1pagezen.com/fullchain.pem
…
Processing /etc/letsencrypt/renewal/1pagezen.com.conf
…
new certificate deployed without reload, fullchain is
/etc/letsencrypt/live/1pagezen.com/fullchain.pem
Congratulations, all renewals succeeded. The following certs have been renewed:
/etc/letsencrypt/live/subzen.1pagezen.com/fullchain.pem (success)
/etc/letsencrypt/live/1pagezen.com/fullchain.pem (success)
…
Hi Mi,
You should only have one certificate – and in this certificate, it should include every domain and sub-domain you will be using for your website (maximum 100).
Let me know if you have any other questions,
Joe
Misays
Thank you for your answer.
Then how can I apply the only one certificate of main domain to a sub-domain.
For example, when I already have a SSL certificate for a main domain, 1pagezen.com,
how can I apply it to a sub-domain, subzen.1pagezen.com ?
Can you answer the steps in detail for the procedure?
Configuring sub-domains is not a simple process. DigitalOcean has great tutorials on the subject if you would like to look into it.
Also, if you’re going to be configuring multiple WordPress websites on individual subdomains, I would recommend using Bitnami’s WordPress Multisite stack. Check out their documentation here.
Good luck and let me know if you have any questions. 🙂
Rachelsays
Hi Joe
Thanks again for your fab tutorials.
I have a bit of a problem with this one – I went throug the tutorial step by step and all seemed to be successful until I viewed my site after completion and realised all of my images were missing from my website. I have the Really Simple SSL plugin installed which came back with the following error:
System detection encountered issues
A definition of a siteurl or homeurl was detected in your wp-config.php, but the file is not writable.
Set your wp-config.php to writable and reload this page.
Saw this and not sure if this helps… After Rachel has done the previous steps of course.
But great fast (smart) way to fix for SEO audit purposes is the Broken Link Checker plugin (By Janis Elsts, Vladimir Prelovac) that runs on my website.
You may find/have a similar one but this is what I use.
1. Inside WordPress dashboard > Settings > Link Checker
– I have kept it at default 72 hour run settings
– Custom select your choice of inside – Look for links in (Tab) and Which Links To Check (Tab)
All (454) |Broken (0) |Warnings (0) |Redirects (100) |Dismissed (0)
It helps me see if there are any broken links on my website and I also check the redirect list of links its brought back. In it you can go in directly and fix some links (including website’s image links that are still reading hht instead of https)
Cheers 😉
Rachelsays
Thanks Isabel I’ll give that a go 🙂
Rachelsays
Great thanks Joe, I had a feeling that was the case. Not sure if i’m comfortable doing that. Thank you again. Rachel.
My certificate recently expired–I was getting warnings that it was about to expire, but I thought the auto-renew process would take over. I had set up the auto-renew process as you recommended. I’ve re-run the process you recommend in the tutorial.
Hi Joe,
Same issue for me as well. Did not auto-renew, and was throwing security warnings to users until I noticed. The command above fixed it, but I too would love to be notified of updated auto-renew cron. Thanks again!
Hi MC,
I am aware of the issue and am currently working on a solution.
I will send out on update via mailing list and will update the code on the tutorial.
In the meantime, to manually renew your certificate, you can run: ./certbot-auto renew
Let me know if you have any questions! 🙂
Okay thanks Joe, I see the differnce from previous SSL certificate install (Bitnami). Clearly it starts with installing git vs direct link to https://dl.eff.org/ and extras (chmod a+x certbot-auto).
Question I have here is, what if I want to change my website to run through this SSL certificate channel via https://dl.eff.org/ as per your tutorial here… How do I uninstall git via the ‘apt-get install git-all’ command, installed previously ? Or/And if there are any other further steps I need to do?
Also, can you briefly explain what the two differences are between the two previous/current. Obviously the latter is better but why? (just out of curiosity and for anyone who installed it via git and is reading this he he he) I know I’m a pain, sorry.
The idea behind the second tutorial was simply to make it more ‘streamlined’, and to clear up some of the inefficiencies found in the first edition.
Also, there was a mistake in the first edition of the tutorial, wherein the Certbot repository was being saved to the /tmp directory, which automatically clears over time.
And you’re not a pain! – I am sure several other people have had this same question, however, you’re the only one who mustered the courage to ask.
In the first edition of the tutorial, Git is downloaded to your home directory so you should be able to access the files by entering ls after connecting to your instance via SSH.
I hope this answers your question (and thanks for asking it!)
Well I hope you don’t have too many sites to update… O_O
And on the bright side you will know SSL configuration inside and out after doing it a million times! 😉
I got an error when trying to restart at step 8. Restart your Apache Server
AH00526: Syntax error on line 51 of /opt/bitnami/apache2/conf/bitnami/bitnami.conf:
SSLCertificateFile takes one argument, SSL Server Certificate file (‘/path/to/file’ – PEM or DER encoded)
apache config test fails, aborting
I’m not sure why because I added the 3 paths as per your example but is looks like something to do with the SSL certificate file paths.
Pls let me know what you think and any possible direction for a solution.
Best regards,
Ben
Hello Joe,
Have installed a moodle (bitnami) instance on CGP, reserved a static ip address, and transfered a domain name so all going good so far!
I have a question at 3. Generate Certificates. of your tutorial.
What would the command look like when creating a certificate for a moodle (bitnami) instance?
I just realise that the following command in your example is going to be incorrect!
However when I look at the following site (see link below) they are using an OpenSSL example, I think,
>How To Create An SSL Certificate? > Create a certificate:
The example code is:
sudo openssl req -new -key /opt/bitnami/apache2/conf/server.key -out /opt/bitnami/apache2/conf/cert.csr
So I am confused. Could you please help me out a little here?
Would i just need to replace the text “wordpress” to “moodle” in the first command snippet above?
Exactly like you said – run the command but replace wordpress with moodle. The directory path should be: /opt/bitnami/apps/moodle/htdocs/ instead of /opt/bitnami/apps/wordpress/htdocs/
Also, don’t run the Open SSL command; that’s for issuing self-signed certificates and is irrelevant to this tutorial.
You are on the right path! Let me know if this answer doesn’t make sense to you or if you have any questions!
That’s gets me into a file with the following lines:
But I don’t see the define example listed but I do see similar code for the domain. if i added my domain here “www.hocvietngu.com” which part of the line would i need to remove?
‘https://’ . $_SERVER[‘HTTP_HOST’];
dbtype = ‘mysqli’;
$CFG->dblibrary = ‘native’;
$CFG->dbhost = ‘localhost’;
$CFG->dbname = ‘bitnami_moodle’;
$CFG->dbuser = ‘bn_moodle’;
$CFG->dbpass = ‘0bfd904c0a’;
$CFG->prefix = ‘mdl_’;
$CFG->dboptions = array (
‘dbpersist’ => 0,
‘dbport’ => 3306,
‘dbsocket’ => ‘/opt/bitnami/mysql/tmp/mysql.sock’,
‘dbcollation’ => ‘utf8_general_ci’,
);
if (empty($_SERVER[‘HTTP_HOST’])) {
$_SERVER[‘HTTP_HOST’] = ‘127.0.0.1:80’;
};
if (isset($_SERVER[‘HTTPS’]) && $_SERVER[‘HTTPS’] == ‘on’) {
$CFG->wwwroot = ‘https://’ . $_SERVER[‘HTTP_HOST’];
} else {
$CFG->wwwroot = ‘http://’ . $_SERVER[‘HTTP_HOST’];
};
$CFG->dataroot = ‘/opt/bitnami/apps/moodle/moodledata’;
$CFG->admin = ‘admin’;
$CFG->directorypermissions = 02775;
$CFG->passwordsaltalt1 = ‘ba43a08e2f3577bf6b434c1229b33238187fd4457d1ca29dc37a6fcfd2093349’;
$CFG->passwordsaltmain = ‘493f919255f39b4f1b5f9c2f7af9d588628b04e26df41d84c4f008900b3e93cd’;
require_once(__DIR__ . ‘/lib/setup.php’);
// There is no php closing tag in this file,
// it is intentional because it prevents trailing whitespace problems!
Use the following code, however, make sure to use the ‘ character by your escape button on your keyboard, not the ‘ by your enter key.
My WP theme for some reason will automatically convert ` to ‘ so make sure that you don’t just copy and paste the code below. But this is what the code should look like:
Good morning
You are installing SSL according to the tutorial you have created. However, it can not be executed in the steps below.
What is the problem?
astheboy@wordpress-vm:~$ ./certbot-auto certonly –webroot -w /opt/bitnami/apps/wordpress/htdocs/ -d cslab.me
Requesting to rerun ./certbot-auto with root privileges…
Usage: certbot-auto [OPTIONS]
A self-updating wrapper script for the Certbot ACME client. When run, updates
to both this script and certbot will be downloaded and installed. After
ensuring you have the latest versions installed, certbot will be invoked with
all arguments you have provided.
Help for certbot itself cannot be provided until it is installed.
–debug attempt experimental installation
-h, –help print this help
-n, –non-interactive, –noninteractive run without asking for user input
–no-bootstrap do not install OS dependencies
–no-self-upgrade do not download updates
–os-packages-only install OS dependencies and exit
-v, –verbose provide more output
-q, –quiet provide only update/error output;
implies –non-interactive
All arguments are accepted and forwarded to the Certbot client when run.
Hi Astheboy,
This is not an error that I have come across before.
What you should do is open a support ticket on the LetsEncrypt forums and see if one of their developers can help you.
Talk to you soon,
Joe
rajender_rajotia@pilibangan-vm:~$ sudo /opt/bitnami/ctlscript.sh restart apache
Unmonitored apache
AH00526: Syntax error on line 68 of /opt/bitnami/apache2/conf/bitnami/bitnami.conf:
Invalid command ‘OB’, perhaps misspelled or defined by a module not included in the server configuration
apache config test fails, aborting
AH00526: Syntax error on line 68 of /opt/bitnami/apache2/conf/bitnami/bitnami.conf:
Invalid command ‘OB’, perhaps misspelled or defined by a module not included in the server configuration
apache config test fails, aborting
Monitored apache
rajender_rajotia@pilibangan-vm:~$
Hi Rajender,
This means there is an error in your bitnami.conf file on line 68.
So you will need to open the file and check line 68 for an error.
Use CTRL + SHIFT + – in order to jump to a specific line once you’ve opened the file in Nano.
Let me know if you have any other questions,
Joe
Misays
Hi, Joe
I have a question about Free SSL Certificate Setup for Subdomains
instead a main domain.
If I replace the domain name with a subdomain name,
following your example , 1pagezen.com (main domain) with subzen.1pagezen.com (sub domain),
the rest procedure is exactly same with that of the main domain steps except for the domain name ??
If it is different, can you introduce it for subdomains in detail like this website(for main domain) ?
Thanks.
Hi Mi, That is correct. 🙂 You just need to list the subdomains in the certificate, just like you would list your primary domain.
You are allowed to list up to 100 domains / subdomains in a single certificate.
Please let me know if you have any other questions,
Joe
Leesays
Thanks for the good tutorial. One question is,
can I use the Free SSL Certificate in your tutorial, including the auto-renewing,
for WordPress websites(domain and sub-domains) of a small “commercial enterprise” on Google Cloud Platform ??
In addition, if there is a license website on that, can you let us know or link it ??
Thank you again.
Hi Lee,
You will have to look over the policies and legal repository for Let’s Encrypt and also the Certbot license conditions.
I hope this answers your question, 🙂
Joe
Thank you very much for your kindness support, I would not able to do anything if I did not see your video and tutorials. Yesterday I moved my site to Google Cloud and it takes over one day to do that. It was really tired.
But I still have two more question, it would be great if you could help me and everybody
1. My site after setup the SSL certificate, it still appears the sign that is not secure 100% (images..) How can I fix that?
2. I was built the Bitnami WordPress, but that platform seems to conflict with the W3 Total Cache, so now my site speed on Google Speed Check even a litter bit slower. Is there any way I can fix it? Or can I remove the Bitnami Speed Check on my site?
You website is serving insecure HTTP images – this is a very common problem with SSL, and is easy to fix.
Check out this tutorial to learn how to fix the problem.
Also, either W3 Total Cache or WP Super Cache works better than the other on Bitnami installs – but I forget which one it is. If W3 isn’t working for you, I would give WP Super Cache a try, or else check out the section of Bitnami’s documentation dedicated to configuring W3 Total Cache.
Thank you very much for your time and your advice yesterday.
I follow your instruction and I already fixed the insecure HTTP image. Again, thank you very much for that.
I still have only one problem that I could not install W3 total Cache nor WP Super Cache properly. Both of the caches plugin requires the configuration in wp-cofig.php and htacess
For example, below is the warning when I installed W3 Total Cache.
” FTP credentials don’t allow to write to file /opt/bitnami/apps/wordpress/htdocs/wp-config.php”
W3 Total Cache Error: Files and directories could not be automatically created to complete the installation.
Please execute commands manually
Edit file /opt/bitnami/apps/wordpress/htdocs/wp-config.php and add next lines:
/** Enable W3 Total Cache */
define(‘WP_CACHE’, true); // Added by W3 Total Cache
W3 Total Cache error: It appears Minify URL rewriting is not working. Please verify that the server configuration allows .htaccess
Unfortunately, minification will not function without custom rewrite rules. Please ask your server administrator for assistance. Also, refer to the install page for the rules for your server.”
Thank you so much for your support. I follow your instruction, it appears the below request:
W3 Total Cache error: It appears Page Cache URL rewriting is not working. Please verify that the server configuration allows .htaccess
Unfortunately disk enhanced page caching will not function without custom rewrite rules. Please ask your server administrator for assistance. Also refer to the install page for the rules for your server.
In fact, before that, I had to set the command: sudo chmod 777 /opt/bitnami/wordpress/wp-content
And the error above is the only one problem left. I read the info from Bitnami, they try to hide the .htaccess file and they require to change the new .htaccess.conf
What you should do is open a support ticket at the Bitnami Community forums, and describe your issue in detail. The Bitnami engineers will know exactly how to fix the problem.
In the meantime, the solution you’re looking for is probably something similar to Beltran’s response in this thread.
Good luck and let me know if you have any questions! 🙂
Joe
I would like to describle again what I did for the setting of W3 Total Cache:
Before installing the W3 Total Cache, I run the command:
sudo chmod 777 /opt/bitnami/wordpress/wp-content
After that, I created the fie: sudo nano /opt/bitnami/apps/wordpress/htdocs/wp-config.php as your advice
And I paste the code: /** Enable W3 Total Cache */
define(‘WP_CACHE’, true); // Added by W3 Total Cache
And I save it and I restart Apache: sudo /opt/bitnami/ctlscript.sh restart
But the W3 Total Cache still requests me as below:
W3 Total Cache error: It appears Page Cache URL rewriting is not working. Please verify that the server configuration allows .htaccess
Unfortunately disk enhanced page caching will not function without custom rewrite rules. Please ask your server administrator for assistance. Also refer to the install page for the rules for your server.
I know Bitnami disable .htacceess file and allow us to create or modify the .htaccess.conf in stead
However, I don’t know how to FIND and SHOW the .htacceess.conf file for the modification
Can you instruct to me some commands to find show the .htaccesss.conf on SSH mode?
Also, what code I should use to insert into that file in order to allow .htaccess.conf work properly with W3 Total Cache? (allow rewriting matter)
Looking your reply soon and many thanks for your kindness help
Hi Bimbimz,
Just put a # sign next to the certificate file paths in the .conf file, or delete them.
You can delete the Certbot and LetsEncrypt files and directories by using the commands from the Linux commands list.
I hope this answers your question.
Joe
Bimbimzsays
yes it helps,
I have another question:
I tried to use SSL from comodo, and I have trouble setting it up in:
Hi Bimbimz,
I only offer support for configuring Let’s Encrypt certificates as shown in this tutorial.
If you’re curious on how to install Comodo certificates, check out this tutorial.
Hope this helps,
Joe
Hi,
Just put a # sign next to the certificate file paths in the .conf file, or delete them.
You can delete the Certbot and LetsEncrypt files and directories by using the commands from the Linux commands list.
I hope this answers your question.
Joe
Great tutorial! I got the SSL to work on my main site. Just wondering how I go about setting up SSL to work on subdomains and mapped domains that exist now and in future when I add more mapped domains?
This is my setup:
In wordpress:
rocketwebber.com is my main domain running on multisite.
example1.rocketwebber.com is a subdomain mapped to example1.com
In google:
I have zone name rocketwebber.com and example1.com
example1.com has an A record that points to the IP for rocketwebber.com
rocketwebber.com has an A record: example1.rocketwebber.com that points to the IP for rocketwebber.
For securing multiple top-level and subdomains in a multisite installation, you will have to install the Domain Mapping plugin. Also, check out the Bitnami Multisite documentation about how to properly configure SSL.
Configuring multiple domains with SSL on single virtual machines is complicated and usually takes some trial and error. Anyways, check out the link above, it should point you in the right direction. Let me know if you have any questions.
Talk to you soon, 🙂
Joe
Conorsays
Hey Folks,
So followed the tutorial, everything seemed to work perfectly. It shows in wordpress, https:// mydomain.com secure.
However, when I do an ssl checker on it I get the following warnings below:
1. The certificate is self-signed. Users will receive a warning when accessing this site unless the certificate is manually added as a trusted certificate to their web browser. You can fix this error by buying a trusted SSL certificate
2. None of the common names in the certificate match the name that was entered (www.mydomain.com). You may receive an error when accessing this site in a web browser. Learn more about name mismatch errors.
As it shows the cert has been created but it still shows up in the browser that it url is insecure.
Wondering if anyone has had the same problems before?
Hey guys,
Awesome tutorial! I would like to add subdomains to my domain and get the certbot to issue a cert for both the domain and the subdomains. Is the easiest way to just add the domains after directory like so: -d domain.com, subdomain1.domain.com, subdomain2.com and so?
I follow your step but unfortunately my website is totally down and not opening while i try to install ssl certificate.
I follow your each step but when in i use this command nly –webroot -w /opt/bitnami/apps/wordpress/htdocs/ -d teh1one.com -d http://www.tech1one.com
I found error NXDOMAIN
Please help me out i totally helpless. I try my best to resolve my issue always facing same issue that create A/AAA record i already created all the records but i unable to install ssl certificate and also unable to open my website.
Hi Shadman,
You have misspelled tech1one in your certificate issuing command.
Fix that and you likely won’t see that error anymore.
Let me know if you have any other questions.
Thanks,
Joe
Hi Shadman,
The causes of the error are likely that your DNS is not configured properly, that your Domain hasn’t resolved to your new website on GCP, or that the certificate issuing command isn’t being executed properly. What I would do is go over the links at the top of the tutorial page and make sure that you completed each of the 3 pre-requisite tutorials successfully. Check for any errors etc.
You may also have to do some troubleshooting on StackOverflow and Google.
Hope this information is helpful! 😀
Talk to you soon,
Joe
I change the domain of my site, and I’m getting troubles to install a new ssl cert because the older domain cert.. How I remove this to install a new cert??
Hey Matheus,
You can simply redo the tutorial: the Certbot client will ask if you want to overwrite your old certificates – choose “Yes”.
Also – make sure that when you re-do each step, you use your new domain name and not your old one.
Let me know if you have any questions 😀
Joe
To fix these errors, please make sure that your domain name was
entered correctly and the DNS A/AAAA record(s) for that domain
contain(s) the right IP address. Additionally, please check that
your computer has a publicly routable IP address and that no
firewalls are preventing the server from communicating with the
client. If you’re using the webroot plugin, you should also verify
that you are serving files from the webroot path you provided.
Hi Matheus,
Are you using the right tutorial?
Remember there are both Bitnami and Click-to-Deploy tutorials. If you are using Click-to-Deploy, you need to make sure that all future tutorials are designed for Click-to-Deploy. The same goes for Bitnami.
Talk to you soon, 🙂
Joe
Hi Matheus,
It is usually caused by an insecure content error, as shown in step 1 of this tutorial. As the tutorial shows, you will have to inspect the page and see which element is causing the error.
Hope this helps! 😀
Joe
& i got the result like this:
IMPORTANT NOTES: – Congratulations! Your certificate and chain have been saved at: /etc/letsencrypt/live/badmintonvillage.com/fullchain.pem Your key file has been saved at: /etc/letsencrypt/live/badmintonvillage.com/privkey.pem Your cert will expire on 2018-01-01.
5, Setup Auto-Renewal
& i got the result like this:
Congratulations, all renewals succeeded. The following certs have been renewed
6, Configure the Certificates
I have added servername, serverAlias, Redirect (my actual domain)
& I have added # sign next to each of the two placeholder certificates & paste the path to your three SSL certificate files
#SSLCertificateFile “/opt/bitnami/apache2/conf/server.crt”
#SSLCertificateKeyFile “/opt/bitnami/apache2/conf/server.key”
SSLCertificateFile “/etc/letsencrypt/live/mydomain.com/cert.pem”
SSLCertificateKeyFile “/etc/letsencrypt/live/mydomain.com/privkey.pem”
SSLCertificateChainFile “/etc/letsencrypt/live/mydomain.com/chain.pem”
8, Restart Apache Server by this code: sudo /opt/bitnami/ctlscript.sh restart apache
Result:
restart apacheUnmonitored apacheAH00526: Syntax error on line 53 of /opt/bitnami/apache2/conf/bitnami/bitnami.conf:SSLCertificateFile: file ‘/etc/letsencrypt/live/ badmintonvillage.com/cert.pem’ does not exist or is emptyapache config test fails, abortingAH00526: Syntax error on line 53 of /opt/bitnami/apache2/conf/bitnami/bitnami.conf:SSLCertificateFile: file ‘/etc/letsencrypt/live/ badmintonvillage.com/cert.pem’ does not exist or is emptyapache config test fails, abortingMonitored apache
But Eventually couldn’t Work properly. It mentioned that letsencrypt/live/ badmintonvillage.com/cert.pem’ does not exist.
All of the text that says mydomain.com needed to be replaced with you own domain name, which in this case is badmintonvillage.com.
You will need to go back through the tutorial and fix steps 6 & 7 and make sure badmintonvillage is listed in the place of mydomain.
Also, make sure a cert.pem was actually generated. You can check by executing the following command in your SSH terminal: ls /etc/letsencrypt/live/badmintonvillage.com/
The folder should show around 4 certificate files, one of them being cert.pem.
I need you to copy some text and send me it to me.
Will you please open your bitnami.conf folder using the following command: sudo nano /opt/bitnami/apache2/conf/bitnami/bitnami.conf
Next, copy the 3 lines at the top of the page that look similar to this: (Important: DO NOT type CTRL+C in nano, to copy, simply highlight the text and it will copy automatically) ServerName http://www.1pagezen.com
ServerAlias 1pagezen.com
Redirect / https://www.1pagezen.com/
Next, scroll down the page, and copy the three lines of code that look similar to this:
I ran an SSL report on your certificates, and it’s showing that your certificates were issued for example.com.
You will likely need to re-issue the certificates using the following command: ./certbot-auto certonly –webroot -w /opt/bitnami/apps/wordpress/htdocs/ -d badmintonvillage.com -d http://www.badmintonvillage.com
The above command is from step 3 of the tutorial – it’s the only step you need to repeat.
You won’t need to change anything in your bitnami.conf since the file paths will remain the unchanged.
The programs included with the Debian GNU/Linux system are free software;
the exact distribution terms for each program are described in the
individual files in /usr/share/doc/*/copyright.
Debian GNU/Linux comes with ABSOLUTELY NO WARRANTY, to the extent
permitted by applicable law.
___ _ _ _
| _ |_) |_ _ _ __ _ _ __ (_)
| _ \ | _| ‘ \/ _` | ‘ \| |
|___/_|\__|_|_|\__,_|_|_|_|_|
I have removed the HTTP / HTTPS on the command.
The web still cant access SSL while the result said that Certbot can obtain and install HTTPS/TLS/SSL certificates.
The result:
Certbot can obtain and install HTTPS/TLS/SSL certificates. By default,
it will attempt to use a webserver both for obtaining and installing the
certificate.
certbot: error: unrecognized arguments: –webroot
starwargift@badmintonvillage-vm:~$ ./certbot-auto certonly –webroot -w /opt/bitnami/apps/wordpress/htdocs/ -d badmintonvillage.com -d http://www.badmintonvillage.com
Requesting to rerun ./certbot-auto with root privileges…
usage:
certbot-auto [SUBCOMMAND] [options] [-d DOMAIN] [-d DOMAIN] …
Certbot can obtain and install HTTPS/TLS/SSL certificates. By default,
it will attempt to use a webserver both for obtaining and installing the
certificate.
certbot: error: unrecognized arguments: –webroot
starwargift@badmintonvillage-vm:~$
Try again, but this time copy and paste the command from the tutorial itself, don’t copy and paste it from my comments.
The comments on WordPress aren’t formatted as standard HTML (which is what is in the grey boxes in the tutorial); that’s why the “-” symbol in front of webroot isn’t being recognized by your SSH terminal.
Dear Joe,
I type the command: ./certbot-auto certonly –webroot -w /opt/bitnami/apps/wordpress/htdocs/ -d badmintonvillage.com -d http://www.badmintonvillage.com and it required me to reset the certificate, and i click yes. However, still not works for getting the SSL.
The Result shows :
– Congratulations! Your certificate and chain have been saved at
:
/etc/letsencrypt/live/badmintonvillage.com/fullchain.pem
Your key file has been saved at:
/etc/letsencrypt/live/badmintonvillage.com/privkey.pem
Your cert will expire on 2018-01-02. To obtain a new or tweake
d
version of this certificate in the future, simply run certbot-
auto
After putting the restart command, i put the step 3 command again. And then restart again. Still cant access SSL.
The result:
– Congratulations! Your certificate and chain have been saved at:
/etc/letsencrypt/live/badmintonvillage.com/fullchain.pem
Your key file has been saved at:
/etc/letsencrypt/live/badmintonvillage.com/privkey.pem
Your cert will expire on 2018-01-02. To obtain a new or tweaked
It shown up:
Unmonitored apache
AH00526: Syntax error on line 53 of /opt/bitnami/apache2/conf/bit
nami/bitnami.conf:
SSLCertificateFile: file ‘/etc/letsencrypt/live/ badmintonvillage
.com/cert.pem’ does not exist or is empty
apache config test fails, aborting
AH00526: Syntax error on line 53 of /opt/bitnami/apache2/conf/bit
nami/bitnami.conf:
SSLCertificateFile: file ‘/etc/letsencrypt/live/ badmintonvillage
.com/cert.pem’ does not exist or is empty
apache config test fails, aborting
Monitored apache
starwargift@badmintonvillage-vm:~$
Hi Rob,
I’ve worked through this tutorial several times, and it works fine. However, the last time I ran through the tutorial I encountered the issue that you described and the way I solved it was by changing the permission level on the certificate directory. I will run through the tutorial again and see if I can reproduce the issue to give you a more thorough documentation on how to avoid/fix it.
Thanks for pointing this out. 🙂
Joe
CJsays
What permission level did you set the certificate directory to? I’m currently having this issue.
Results from running apachectl configtest:
AH00526: Syntax error on line 58 of /opt/bitnami/apache2/conf/bitnami/bitnami.conf:
SSLCertificateFile: file ‘/etc/letsencrypt/live/mydomain.com/cert.pem’ does not exist or is empty
It does exist and it’s not empty because I checked running :
Hi, thanks very much for the helpful tutorial! When trying to obtain a new certificate, I got the following error. Any help is appreciated.
Chris
Obtaining a new certificate
Performing the following challenges:
http-01 challenge for globalgocare.com
http-01 challenge for http://www.globalgocare.com
Using the webroot path /opt/bitnami/apps/wordpress/htdocs for all unmatched domains.
Waiting for verification…
Cleaning up challenges
Failed authorization procedure. http://www.globalgocare.com (http-01): urn:acme:error:unauthorized :: The client lacks sufficien
t authorization :: Invalid response from http://www.globalgocare.com/.well-known/acme-challenge/JnaGPMHqkk2puEIPHBtnhHtsy
OxwuxbIJA6jbSuTwyc: ”
<meta name="viewport" content="width="
To fix these errors, please make sure that your domain name was
entered correctly and the DNS A/AAAA record(s) for that domain
Joe, I also did your tutorial on domain name configuration and did that work and everything went fine. I’m noticing a thread there “From Google Cloud Platform dashboard, go to cloud DNS. Check your IP address of your A record. Go to your VM instance page, look at the IP address of the VM instance that is running your WordPress website. Do they match?” I’m using the Bitnami click to deploy app. I don’t have a cloud DNS zone. Let me know if that’s part of my problem. Thanks.
You need to have a DNS zone that is managing the IP/domain that is running your instance, as shown in this tutorial. What the certbot error is essentially saying is, “the nameservers of this domain aren’t connected to your Google Cloud Platform account, so for that reason you don’t have permission to issue certificates for that domain”.
Take a look at the tutorial that I sent you in the link, and after you’ve completed that let me know if you have any questions.
You’re very kind, and I’m pretty inexperienced in this! I followed your directions for transferring the domain name and reserving a static IP address. But my site isn’t available now. I assume it’s related to the following: when I change the name servers at Google Domains, I get the message, “It looks like you’ve changed your name servers. All settings for your domain (including website, email, synthetic records and resource records) are currently disabled. To enable these settings, you will need to restore the Google Domains name servers. ” Thanks for any help. Chris
When you changed your name servers on Google, you basically opted to manage your domain name through Google Cloud DNS instead of through Google domains.
I think the issue with your website not loading likely has to do with your nameservers and DNS not being configured properly. In addition, make sure your WordPress domain name URLs are set to globalcare.com or http://www.globalcare.com. StackOverflow is also a great resource to use when troubleshooting a DNS configuration.
Good luck, and let me know if I can be of further assistance. 🙂
Joe
Joe, the site is up again, but with the “not secure” warning in the address bar, and the changes seem to have taken out my G-Suite email, which may be part of the coordination problem. I don’t want to take advantage of your good will here, and would be OK paying you to go through my settings with me and get everything on track. Let me know. Thanks, Chris
I sent you an email requesting images from your Cloud DNS, Google Domains DNS, and Cloud VM instances page. I will take a look at the images to see if there are any basic issues that can be quickly and easily resolved.
Talk to you soon,
Joe
Chrissays
All set up with a SSL Cert and G Suite functioning well. Thanks for all the help!
I am glad to hear that everything is working well! 🙂
Let me know if you ever have questions or suggestions for future tutorials!
Best,
Joe
Georgisays
Hi Leron
Thanks for your reply.
I have connection via sftp but the problem is probably permissions. I can see the files but I am able to download only some of them but not the keys.
I am afrate if I change the permissions to sub files and folders they may be different permissions in each of them. I am afrate to not mestup all of them.
Best regards
What you could do is just change only the permissions of the file that you want to edit, within the SSH terminal as shown in this tutorial. Change permissions to 777, download and edit the file (or whatever you want to do with it), and then change the permissions back.
Hope this answers your question! 🙂
Joe
Rajsays
Where ssl certificate store in google compute wordpress Bitnami. I want installed ssl certificate but I don’t know where is save certificate. I’m installing certificate suggested step by you. please Email me root name where ssl store.
Hey Raj,
The load balancing and CDN tutorials are in the making.
They’ve been difficult tutorials to simplify, so that’s why they are taking awhile to make.
Stay tuned, and make sure to join the mailing list to be notified when the tutorials are released!
Talk to you soon,
Joe
Hey Raj,
All of your SSL certificates are located in the folder located at: /etc/letsencrypt/live/YOURDOMAIN.com/
You can view each of the certificate files by executing the command: ls /etc/letsencrypt/live/YOURDOMAIN.com/
Remember to replace YOURDOMAIN.com with your own domain name.
If you want to download the certificates, you can use an FTP client such as FileZilla to locate and download the certificate files (see this tutorial).
Let me know if this answers your question.
Talk to you soon, 😀
Joe
Georgisays
Hi Leron
thank you for you great tutorials! Everything works just fine! Thank you for you quick responds as well!
I have just one question regarding ssl on google cloud. I can not backup the ssl key as I suppose to do following the tutorials for some premision reasons I guess. Can you help out with that?
Thank you in advance
Best regards
Hey Georgi,
I am glad everything is working fine!
Are you looking to backup your SSL certificate files?
You can open up the files and and copy and paste the contents in to a text editor – then save the file with the correct file extension (.pem).
The other thing you can do is download the files via FTP, which I set up in this tutorial.
Let me know if this answers you question. 😀
Talk to you soon,
Joe
Thanks for this tutorial. It is really helpful and I will try this out. There were a few decisions that you made that prompted some questions. Such as why do you prefer to use ‘www’ when setting up your wp-config.php file? Also, should I upload all images to the site before setting up the ssl certificate or doesn’t it matter ? Sorry if I have asked you this one before but I am still a unsure how images are treated for ssl.
I hope you’ve been well! I was happy to see your name popup in the comment feed. 🙂
Regarding your first question – I just personally prefer to use www. with my domains, but you can find a million arguments on the internet arguing that www is better than non-www for SEO, and vise versa. Honestly, I don’t think it matters one way or the other as long as you choose one and stick with it.
As far as uploading images is concerned, I would recommend uploading your pictures after you’ve completed the tutorial, as this will save you from having to change your image URLs later on.
Also, before starting the tutorial, I would recommend taking a snapshot of your instance as a backup, according to step 1 only of this tutorial.
Let me know if you run into any issues with the tutorial, as I would be more than happy to help you through them.
What did you think of this revised version of the Bitnami SSL certificate tutorial?
Did you find it easier, more challenging, not much different?
Please share your questions and comments below!
Thanks,
Joe
I found it perfect. Helped me a lot just when I almost gave up. I was thinking that I would need to change back to HTTP and had no idea how to do that with this bitnami installation. When I found your tutorials it changed my day to great. Truly thanks

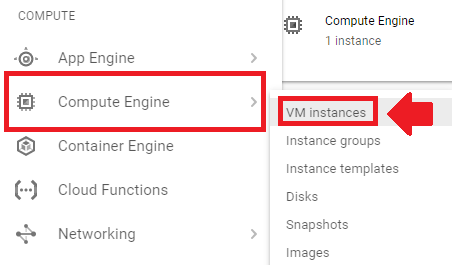
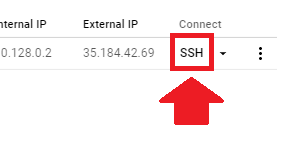
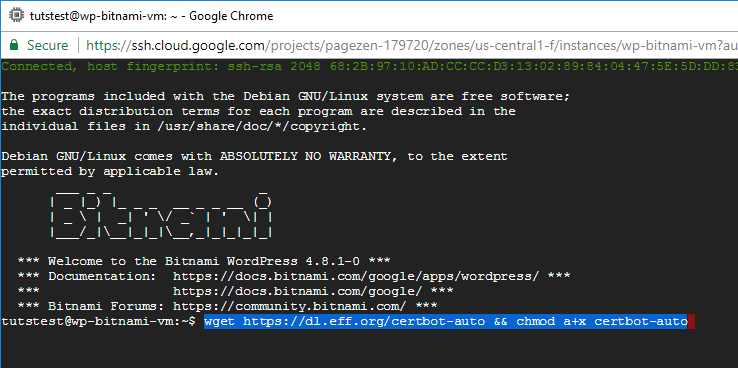
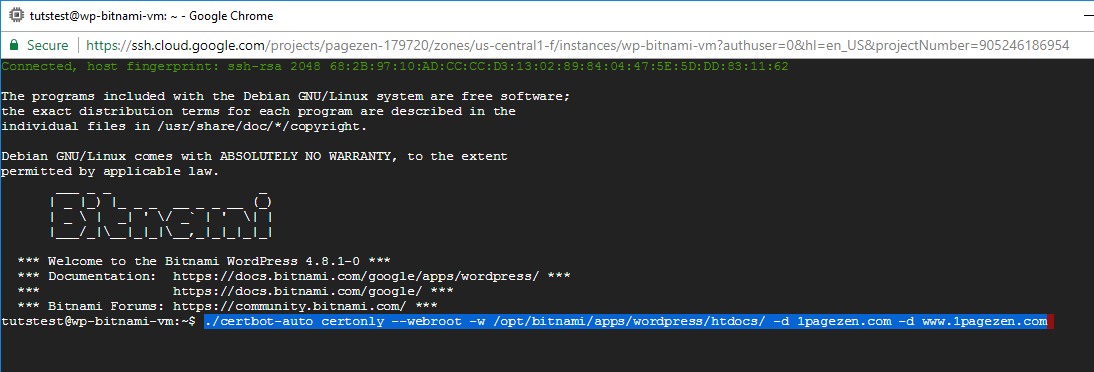
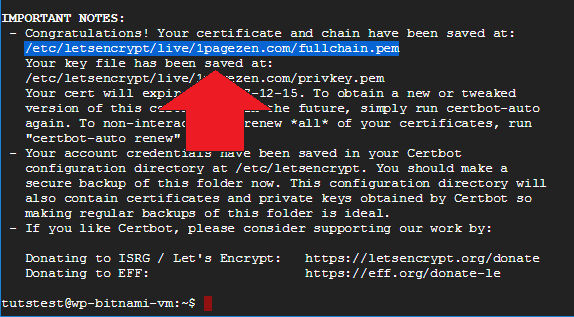
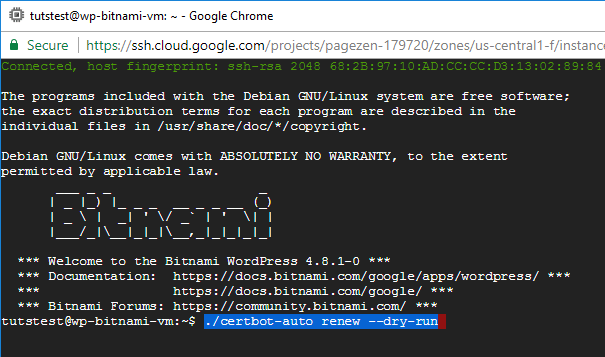
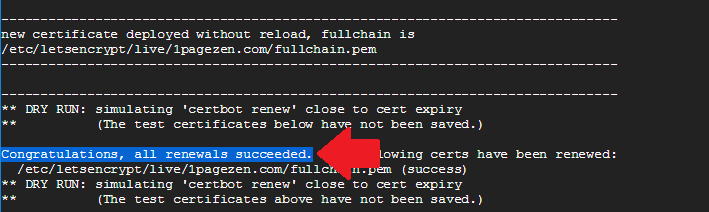

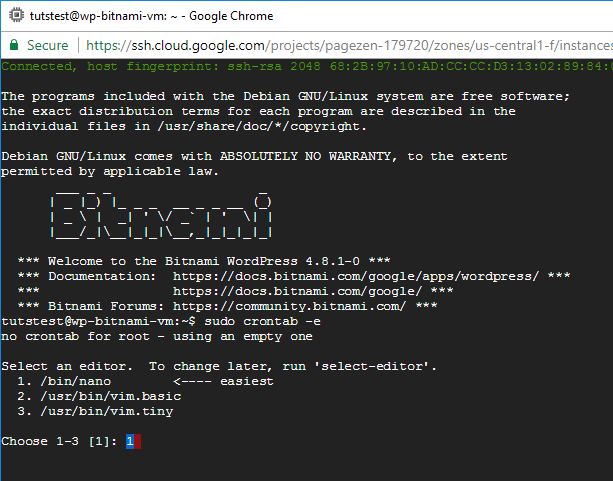
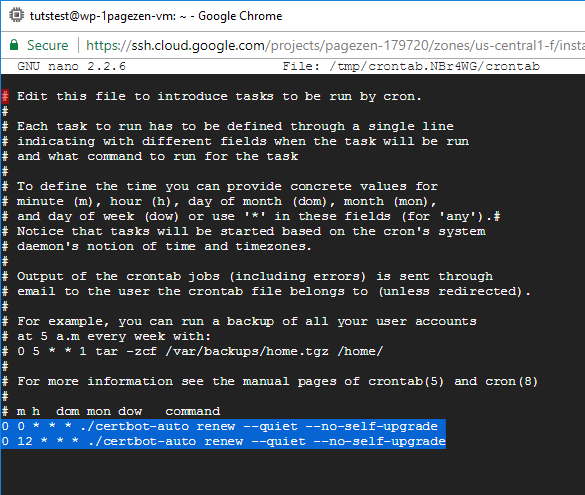

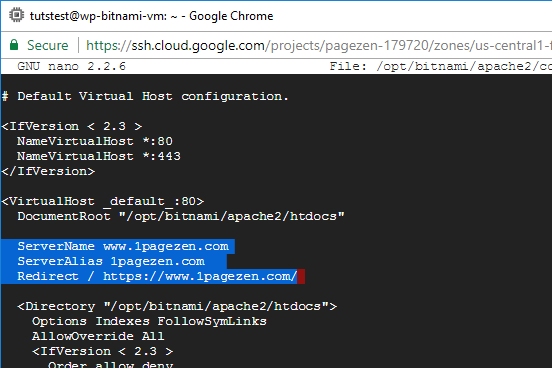
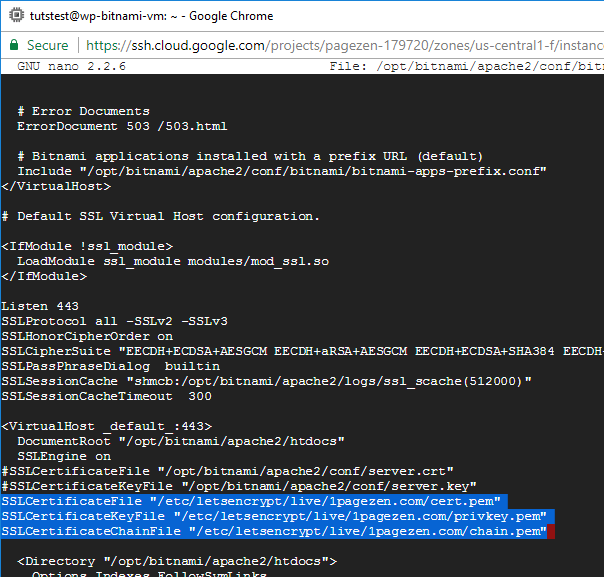
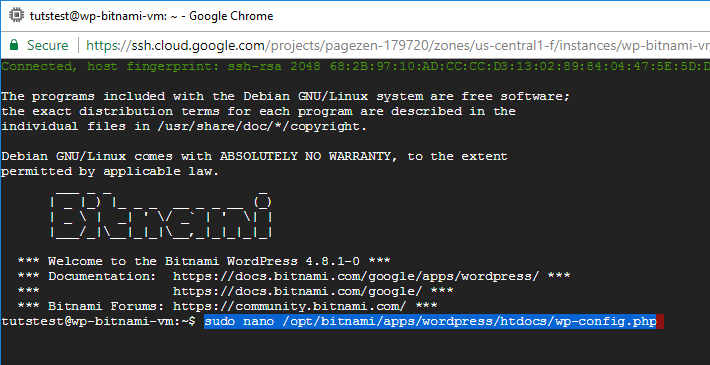
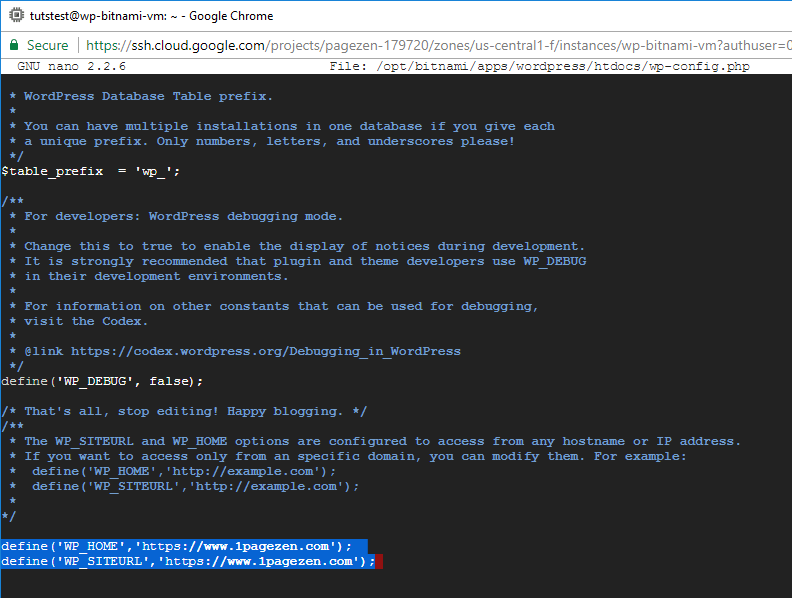
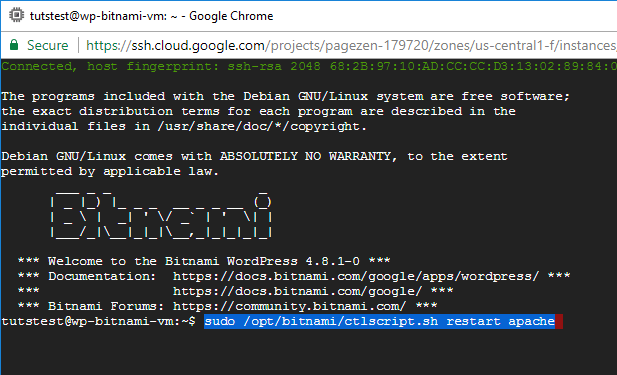
Allana says
Hi, I’ve installed the SSL cert according to this tutorial but why is my SSL cert invalid?
Leron Amin says
Hi Allana,
It appears that your server is using a self-signed certificate. You can view this information by looking up your domain on sslshopper.com.
Based on this information, it’s likely that you missed step 6 of the tutorial. It’s possible you forgot to save the file after adding the paths to your SSL certificates.
Let me know if you have questions,
Joe
Pratik says
Hi Joe,
I have done as the tutorial but when I am trying to open the url its showing error of :
http://www.trygreenrecipes.com redirected you too many times.
Can you help
Leron Amin says
Hi Pratik,
Looks like you may have configured multiple redirects, which is what’s causing the conflict.
To fix this issue, I’d first try commenting out the HTTPS redirect that you added to your Bitnami.conf file (put a # next to it), save the file, then restart your server. You’re doing this because there is likely another HTTP to HTTPS redirect elsewhere in your Apache configuration.
Let me know if you have questions,
Joe
Pratik says
Hi Joe,
Thanks for the help. I actually copied code on the wrong line. Thanks for all the help
Regards
umesh mahajan says
Hi,
Thank you so much , I am having an issue in the end when i login again. I can’t access my wp-admin panel and dashboard now.
The website is http://www.trendonpedia.in/wp-admin/
I get this
This site can’t be reached refused to connect.
http://www.trendonpedia.com’s server IP address could not be found.
and the site is not working fine either.
Thanks again for such nice videos.
Regards
Leron Amin says
Hi Umesh,
Did you reserve a static IP address for your instance?
If not, I’d recommend checking to ensure your instance IP address matches the IP in the DNS zone for your domain.
Let me know if you have questions,
Joe
umesh mahajan says
ok thank you
Amit kumar says
Hello,
I recently made a wordpress website following your tutorials on GCP, SSL & CLOUD FLARE.
Now my website is showing ” Error 522 Connection timed out ”
How could i fix this problem. All your tutorials were really helpful for beginner like me, after getting bunch of craps and useless content on searching online regarding error 522, my only hope for fixing this problem is onepagezen.com
Thanks
Leron Amin says
Hi Amit,
The 522 error likely indicates that there is an issue with your Cloudflare DNS.
You’ll need to verify that your DNS is configured correctly and that you have an A record pointing to the static IP address of your WordPress instance.
Please reach out if you have any other questions,
Joe
Ti says
Thanks a lot for this tutorial. Thank you for showing how to setup the SSL certificate for Google Cloud hosted website (bitnami).
Leron Amin says
No problem – glad it was helpful!
Yogesh says
Hi, The dosument helped me alot. I have installed the certificate. But the certificate is applied only to the mail home page and not to other sub pages. Any advice ?
Leron Amin says
Hi Yogesh,
Did you confirm that it’s not an insecure content error?
Let me know,
Joe
Saugata says
Please make a tutorial on Google cloud wordpress by bitnami with nginx version.
Leron Amin says
It’s on my list! Thanks for the suggestion.
Tik says
Thanks a lot. The certificate seems to work.
Leron Amin says
Glad to hear it – thanks for the feedback!
Dan says
Hi there,
I followed your tutorial step-by-step, and it worked perfectly for 2-3 hours. Then the site went down and I have not been able to get it back up. I can still access the files on the server, but nothing on the front-end is loading.
I have a question: could having installed and activated wordpress plugins designed to do https redirection conflict with this tutorial? The site I did this tutorial on had two plugins designed for https redirection, namely https-redirection and really-simple-ssl.
My hypothesis is that one of these two plugins has a cron-job that overrode the settings laid out in your tutorial, and caused some sort of conflict.
Any help diagnosing this is greatly appreciated.
The URL of the affected site is https://www.rawsynergies.com/
Leron Amin says
Hi Dan,
Yes – the plugins that you installed for re-direction would conflict with this tutorial.
I’d recommend deactivating those plugins (or deleting them from the backend, since the front-end is down). After that, restart your server and hopefully the redirect issue will be resolved.
Also check your server log for additional information:
Let me know if you have questions,
Joe
Jahangir says
Hi Dear,
i hope you are doing very well, recently i am facing this error after installing SSL on my site https://tabeerinfo.com
Syntax OK
/opt/bitnami/apache2/scripts/ctl.sh : httpd could not be started
Monitored apache
so please help me to resolve this issue?
Thanks
Leron Amin says
Hi Jahangir,
I’ve been well – thanks for asking!
Typically, Apache failures are due to config errors. In your case, I’d recommend checking your Apache error log by running the following command:
There could also be other issues at play. Bitnami has a useful guide on debugging Apache errors, which you can view here.
Let me know if you have questions,
Joe
Kaue Macruz says
Hey there. Thanks for this tutorial, it really works.
Im having an issue tho. I had it done for this website and worked fine, but then
i tried to change the domain name following the previous tutorials and create a new certificate with the new domain and now my website is completely broken. I have tried to erase all changes and start from scratch but couldnt not even use website with initial ip address. So im getting this error now.
This site can’t be reached
The connection was reset.
Try:
Checking the connection
Checking the proxy and the firewall
Running Windows Network Diagnostics
ERR_CONNECTION_RESET
Is there a way to reset everything without loosing the content of the website?
Thanks
Leron Amin says
Hi Kaue,
There are many issues that I can foresee if you try to switch domains on an existing WordPress website – especially on a live site.
In the future I’d recommend the following process when switching the domain of a WordPress website:
1. Create a snapshot of the existing WordPress website, and create a new VM from the snapshot (use the snapshot as the boot disk, and don’t use the old domain’s IP address for the new domain – use a new one instead. Using a new IP address will allow you to migrate the website without any downtime and will also prevent any DNS cache issues).
2. On the new VM that was created, configure the new domain, including SSL.
3. Next, use the All-in-One WP Migration plugin to create an export file of the original WordPress website. Make sure to use the find/replace functionality of the All-in-One WP Migration plugin in order to replace all instances of your old domain with the new domain name (for instance, you’d replace website1.com with website2.com).
4. Now import the export file into your new WordPress install.
5. Now you can safely STOP and DELETE the instance with the old WordPress website.
6. Voila – You’ve migrated your website to a new domain name with zero downtime!
Hope this helps, and let me know if you have any questions!
Joe
Osarodion says
Hello Leron
Thank you for the tutorial. I followed it like you explained. The problem i have is that the SSL padlock sign only shows on the homepage and other pages like about us, contact us etc. The SSL padlock sign does not show on all the posts. So if you click on any post on the site that you want to read, there will be no SSL padlock sign on it. The site is http://www.excel737.com Please help me fix this
Leron Amin says
Hi Osarodion,
From what I can see, the SSL padlock is displaying on all of the pages.
Typically when the padlock is only displaying on certain pages, it indicates that there’s ‘mixed content’ being loaded; that is, a resource being loaded via HTTP instead of HTTPS. You can check for these errors by following the steps outlined in step one of this tutorial on how to fix SSL errors.
Let me know if you have any questions,
Joe
Nickie Oakwood says
Still not working for me! Since I first set it up with you and it all worked then. Now so many changes!
# Default Virtual Host configuration.
<IfVersion
NameVirtualHost *:80
NameVirtualHost *:443
DocumentRoot “/opt/bitnami/apache2/htdocs”
ServerName http://www.thenakedwordpress.com
ServerAlias thenakedwordpress.com
Redirect permanent / https://www.thenakedwordpress.com/
RewriteEngine On
# BEGIN: Enable HTTP to HTTPS redirection
RewriteCond %{HTTPS} !=on
RewriteCond %{HTTP_HOST} !^(localhost|127.0.0.1)
RewriteCond %{REQUEST_URI} !^/\.well-known
RewriteRule ^/(.*) https://%{SERVER_NAME}/$1 [R,L]
# END: Enable HTTP to HTTPS redirection
# BEGIN: Enable non-www to www redirection
RewriteCond %{HTTP_HOST} !^www\. [NC]
RewriteCond %{HTTP_HOST} !^(localhost|127.0.0.1)
RewriteCond %{REQUEST_URI} !^/\.well-known
RewriteRule ^(.*)$ http://www.%{HTTP_HOST}%{REQUEST_URI} [R=permanent,L]
# END: Enable non-www to www redirection
Options Indexes FollowSymLinks
AllowOverride All
<IfVersion
Order allow,deny
Allow from all
= 2.3 >
Require all granted
As you can see in the above I am getting the usual where the certs won’t take. Is there not an easy eway to just delete the cert and start again? I have spent 2 days trying to sort this. In the world of compliance where I usually inhabit we have a thing called ‘The Risk Hierarchy’ which begins with eliminate! For instance, eliominate the corrupted SSL and start again. Simples.
Leron Amin says
Hi Nickie,
When you execute the certificate issuing command again, the old certificates are overwritten by the new ones; so in that sense, the certificates are deleted.
You can always roll-back to the default version of the config file before adding the certificates? Let me know if you need instructions on this process.
Talk to you soon,
Joe
Nickie Oakwood says
All Righty Joe when trying to renew a cert that was showing fine I now run in to trouble. Please see message below. Any idea dude?
hello@nwp-2:~$ ./certbot-auto certonly –webroot -w /opt/bitnami/apps/wordpress/htdocs/ -d thenakedwordpress.com -d http://www.thenakedwordpress.com
Requesting to rerun ./certbot-auto with root privileges…
./certbot-auto has insecure permissions!
To learn how to fix them, visit https://community.letsencrypt.org/t/certbot-auto-deployment-best-practices/91979/
Saving debug log to /var/log/letsencrypt/letsencrypt.log
Plugins selected: Authenticator webroot, Installer None
Obtaining a new certificate
Performing the following challenges:
http-01 challenge for thenakedwordpress.com
http-01 challenge for http://www.thenakedwordpress.com
Using the webroot path /opt/bitnami/apps/wordpress/htdocs for all unmatched domains.
Waiting for verification…
Challenge failed for domain thenakedwordpress.com
Challenge failed for domain http://www.thenakedwordpress.com
http-01 challenge for thenakedwordpress.com
http-01 challenge for http://www.thenakedwordpress.com
Cleaning up challenges
Some challenges have failed.
IMPORTANT NOTES:
– The following errors were reported by the server:
Domain: thenakedwordpress.com
Type: unauthorized
Detail: Invalid response from
http://thenakedwordpress.com/.well-known/acme-challenge/H4j3ufkDgp8eGxVW0JMm3gRT4wdgwgQhp-8VMcfOtD4
[35.225.107.116]: “\n\n404 Not
Found\n\nNot Found\n<p"
Domain: http://www.thenakedwordpress.com
Type: unauthorized
Detail: Invalid response from
http://www.thenakedwordpress.com/.well-known/acme-challenge/-_m3IjCendcVe5Ux8tayhFGFUJ4MBX8WpVgM4uCd0do
[35.225.107.116]: "\n\n404 Not
Found\n\nNot Found\n<p"
To fix these errors, please make sure that your domain name was
entered correctly and the DNS A/AAAA record(s) for that domain
contain(s) the right IP address.
hello@nwp-2:~$
Leron Amin says
Hi Nickie,
Certbot is trying to validate your domain in order to issue the certificate, but for whatever reason your website is responding with a 404. It’s possible that this is due to the current certificates being expired.
To fix the error, comment out the certificate paths in your Apache configuration file, and edit the Apache redirect rules at the top of your configuration file to direct traffic to the HTTP version of your site (instead of the HTTPS version). Lastly, change the WP_HOME and WP_SITEURL values in the wp-config.php file to the non-HTTPS version of your domain. Once you’ve completed these steps and your able to access your site via HTTP, try executing the certificate issuing command again.
Once the certificates have been issued, you can go ahead and revert back those settings.
Let me know if you need further instructions,
Joe
Santosh says
Hi I’m getting error when I try ./certbot-auto certonly –webroot -w /opt/bitnami/apps/wordpress/htdocs/ -d 1pagezen.com -d http://www.1pagezen.com this code it returns An unexpected error occurred:
The server experienced an internal error :: Error creating new order
Leron Amin says
Hey Santosh,
Hope you’re doing well!
The error that you’re encountering isn’t one that I’ve seen before. That being said, I did a Google search on the error and was able to find this resource.
If this doesn’t provide a solution to the problem, I’d recommend doing a Google search for “The server experienced an internal error :: Error creating new order” and checking out some of those resources.
Hope this helps and let me know if you have questions,
Joe
Phil Daum says
Hello,
I followed this tutorial except I did it on Azure. It worked well, however, now I need to remove the Let’s Encrypt certificate, because I uploaded another one into Azure. How can I remove the Let’s Encrypt Certificate only? It was not providing my site what it needed.
Leron Amin says
Hi Phil,
You can remove the Let’s Encrypt certificate file paths in your Apache configuration file, then add the paths to the new certificates in their place.
Let me know if you have any questions,
Joe
Muhammad Yamin Aslam says
Hi,
Thank you so much for helping out in setting up my website on the google platform. But I am having an issue in the end when I did the changes in PHP file. I can’t access my wp-admin panel now.
The website is http://www.longrunco.com/wp-admin/
I get this
This site can’t be reached127.0.0.1 refused to connect.
and the site is not working fine either.
Thanks again for such nice videos.
Regards
Leron Amin says
Hi Muhammad,
Which changes did you make in your PHP file? It seems to me like there could be a typo somewhere and it’s breaking your site.
I’d recommend checking your log files and seeing if there’s any data regarding a PHP error, additionally, I would paste whichever PHP file you edited into a PHP editor and see if it picks up any syntax errors.
Hope this helps and let me know if you have questions,
Joe
Benjamin Waller says
Hello Joe,
Hope you are good.
I am having trouble renewing a SSL certificates for one of my sites. So I would if you could help troubleshoot.
When I run the following commands, I get a message about the following error.
“`
sudo apachectl configtest
AH00526: Syntax error on line 53 of /opt/bitnami/apache2/conf/bitnami/bitnami.conf:
SSLCertificateFile: file ‘/etc/letsencrypt/live/vietnamesehacks.com/cert.pem’ does not exist or is empty
“`
If I take a step back, I first tried renewing the Certificate the following ways:
“`
sudo /opt/bitnami/letsencrypt/scripts/generate-certificate.sh -m ben@elearnvietnamese.com -d vietnamesehacks.com -d http://www.vietnamesehacks.com
“`
Then got the following message:
“`
It seems there is a valid certificate in the web server configuration folder. Please renew that certificate or generate new ones manually
Please check our documentation or open a ticket in our community forum, our team will be more than happy to help you!
“`
Then I tried creating new certificate the following way but got an error message:
“`
cd /opt/bitnami/letsencrypt/
sudo mv certificates certificates.bak
sudo ./lego –tls –email=”ben@elearnvietnamese.com” –domains=”vietnamesehacks.com” –domains=”www.vietnamesehacks.com” –path=”/opt/bitnami/letsencrypt” run
———
2019/09/03 12:31:14 You have to pass an account (email address) to the program using –email or -m
“`
I not sure what I should do now. Please suggest a course of action if possible.
Best regards,
Ben
Leron Amin says
Hi Ben,
It looks like you were able to resolve the issue – how did you end up fixing it?
I’ve seen these problems occur typically when there are incorrect permissions on the certificate files, and/or there are additional spacing characters around the file paths in your Apache server configuration file.
Hope you’ve been well, and talk to you soon!
Joe
Benjamin Waller says
Hi Joe,
Yes. It is a bit of a blur now…I was trying so many different things to solve the issue so I think I lost count in the end. From memory I had to uncomment the following two lines which and removed the other style .pem lines “` SSLCertificateFile “/opt/bitnami/apache2/conf/vietnamesehacks.com.crt”
SSLCertificateKeyFile “/opt/bitnami/apache2/conf/vietnamesehacks.com.key” “`…Also I don’t think I am using the Certbot now because in my crontab I am using the following command for renewals “`0 0 1 * * /opt/bitnami/letsencrypt/scripts/renew-certificate.sh 2> /dev/null“`
Anyways what ever I did it worked. I just hope it will renew next time round without an issue.
Thanks again.
Ben
Leron Amin says
Hi Ben,
I’m glad to hear you were able to get it working – and thanks for sharing the solution.
Hopefully it will renew on time. You might want to go through the testing steps at the end of this tutorial just to make sure.
As always, it’s great to hear from you!
Regards,
Joe
John says
Hi Leron, I love your site!
I made a mistake with the command certbot-auto command, leaving in your domain name, changing only the second, like so:
./certbot-auto certonly –webroot -w /opt/bitnami/apps/wordpress/htdocs/ -d 1pagezen.com -d http://www.invertedworld.org
In order to fix this problem, I corrected the error and ran the command a second time. Now when I run the ls command, it’s telling me that there are two certs: certbot-auto and certbot-auto.1
I’m not sure which is original, which is backup, or what to do next. I know that my site isn’t yet secure. I kept a copy of the entire sequence of steps if you willing to look at it.
John says
Correction, if it matters. I typed the command like this:
./certbot-auto certonly –webroot -w /opt/bitnami/apps/wordpress/htdocs/ -d 1pagezen.com -d invertedworld.org
And on my second attempt, I typed it correctly, with my domainname. As far as I can tell I installed a certificate successfully. But my site isn’t secure.
Leron Amin says
The certificate won’t work if it was issued for 1pagezen – this will prompt a security alert for users who visit your site.
Leron Amin says
Thanks for the feedback John!
Try re-running the certificate issuing command and see if it prompts you to overwrite the existing certificates. If it does, choose “Yes” and proceed to edit your bitnami.conf file and add the paths to your correct certificates.
Also, delete certbot-auto.1 – the certbot-auto script is generic and isn’t dependent on your existing configuration.
Let me know if you have questions,
Joe
John says
Thanks!
Tricia Mcphersonb says
Hi Leorin Amin
Hope you are doing great and fine!
I have lost my SSL paid certificate just for one-click on GoDaddy.
I have revoked it by mistakenly how I can get back?
Thank you for your opinion.
Leron Amin says
Hi Tricia,
You’ll have to provide more details – did the certificate expire?
Talk to you soon,
Joe
Leron Amin says
Please share the steps that you’ve taken so far and I will try me best to help…
sanson says
Great Worked thanks
Leron Amin says
Glad to hear it!
TB says
Thanks once again, I seem to keep finding your tutorials whenever I need to get something done.
I am having trouble with the Dry-run command:
Attempting to renew cert (humanitybeacon.com) from /etc/letsencrypt/renewal/humanitybeacon.com.conf produced an une
xpected error: Missing command line flag or config entry for this setting:
Select the webroot for humanitybeacon.com:
Choices: [‘Enter a new webroot’, ‘/opt/bitnami/apps/wordpress/htdocs’]
(You can set this with the –webroot-path flag). Skipping.
All renewal attempts failed. The following certs could not be renewed:
/etc/letsencrypt/live/humanitybeacon.com/fullchain.pem (failure)
I think it’s telling what to do, but it’s beyond my limited knowledge base. Any suggestions would be appreciated.
Otherwise, the rest of the tutorial seemed to work just fine.
Thank you,
TB
Leron Amin says
Hi TB,
Select the webroot for your website, which in your case is /opt/bitnami/apps/wordpress/htdocs. Based on your message, it appears as though it’s prompting you with this option in the terminal.
Hope this helps and let me know if you have questions,
Joe
Allie says
Thank you so so so so much!!!! I made it ! I had spent a lot time in solving this problem, but failed all the time.
Leron Amin says
Glad to hear you were able to get it working!
Santhosh Varghese says
I am getting warning
Connection not protected
The security of your connection is reduced. Criminals can attempt to steal your data from the website. You are advised to leave this website.
URL:
http://www.royalbluegraphics.com
Reason:
Self-signed certificate View certificate
I understand the risks and wish to continue
Leron Amin says
Hi Santhosh,
This means there is an error with your certificates.
Check out this troubleshooting tutorial for more information.
Let me know if you have questions,
Joe
Lynn says
I created a new vm instance from an existing one and used the last backup snapshot from the existing site so I would have a starting point for the new one that had many of the features that I wanted. I thought I had changed the domain everywhere that I needed to but when I got to setting up the ssl I ran into trouble. Every time I try to create the certificate it fails verification / challenges because it looks for the old domains :
IMPORTANT NOTES:
– The following errors were reported by the server:
Domain: newdomain.com
Type: unauthorized
Detail: Invalid response from
https://olddomain.com/.well-known/acme-challenge/8e6gQcDBTzrbu8fY4Kkx5RRGUoHAMpiKdm3HwGDLgWY
[35.188.60.212]: “\r\n\r\n\r\n\t\t\r\n\t<script src=\"https://olddomain"
I've triple checked .htaccess for redirects to the old domain. I've deleted the letsencrypt directory and started over. I'm not sure what else to do.
What is the correct way to change the domain and reinstall the certificates?
Thank you.
Leron Amin says
Hi Lynn,
You have to configure the redirect or rewrite in your Apache configuration file to temporarily direct traffic to the HTTP version of your domain. In this example, that file is bitnami.conf.
What’s happening is that the certbot client is attempting to validate your domain, but when it hits the HTTPS-version of your domain it gets hit with an ‘insecure content’ error.
Once you get your website working properly with HTTP, then try re-issuing the certificates and it should work fine.
Hope this helps and let me know if you have questions,
Joe
Talha says
I’m getting ERR_CERT_AUTHORITY_INVALID I’ve followed all the steps and I’ve also replaced domain where needed. My domain name is madnumber.org
Leron Amin says
Hi Talha,
The certificates are configured correctly, you just need to fix the insecure content errors.
Let me know if you have questions,
Joe
Rob says
i got an error
# Error Documents
ErrorDocument 503 /503.html
# Bitnami applications installed with a prefix URL (default)
Include “/opt/bitnami/apache2/conf/bitnami/bitnami-apps-prefix.conf”
# Default SSL Virtual Host configuration.
LoadModule ssl_module modules/mod_ssl.so
Listen 443
Leron Amin says
Hi Rob – when and where are you seeing this error?
Azurah says
I have the same error message. This happen, after I installed the cerbot (finished step 1 to 4) and after running set 6 (jumped to set 6 from 4). This message appears.
Please advise what to do
Leron Amin says
This error shows in the terminal?
Karl says
Have the same problem. Yes it shows in the terminal.
shivank says
hi,
getting error after installing
This site can’t be reached http://www.ovalkart.com’s server IP address could not be found.
Try running Windows Network Diagnostics.
DNS_PROBE_FINISHED_NXDOMAIN
Leron Amin says
Hi Shivank,
How is your DNS configured? Are you using Google Cloud DNS or are your just pointing your domain to your website’s IP on Google Cloud?
Let me know and I will see how I can help!
Joe
Timothy Wright says
Can you first tell me if you are updating the content of this (Bitnami SSL) page or are you just responding to comments?
Example: no mention of updating the Lego client.
source url: https://docs.bitnami.com/google/how-to/generate-install-lets-encrypt-ssl/
Note: i am trying update my SSL cert (again, cause cron cannot for whatever reason). Every time I come back to this issue it is a rabbit hole of confusion.
Leron Amin says
Hi Timothy,
Sorry to hear about the confusion!
Use this tutorial for auto-renewal instructions. If you end up using the Lego client, remember to configure the rewrite directives in your bitnami.conf file.
Good luck!
Joe
Paras says
I have made a very silly mistake while installing the ssl certificate. Web address still shows the connection is not secure. When I view the certificate, it shows that it is issued to example.com instead of my domain address. Now I am not sure what should I do. Should I re install the certificate or is there any way to change it?
Leron Amin says
Hi Paras,
A quick solution is to simple re-execute the certificate issuing command with the correct domain name. After doing this, a new certificate will be issued for your correct domain name.
Let me know if you have questions,
Joe
Anil Thapliyal says
Thanks for your video!!
I am getting below exception could you please tell me which step I have missed or implemented incorrectly.
Saving debug log to /var/log/letsencrypt/letsencrypt.log
Plugins selected: Authenticator webroot, Installer None
An unexpected error occurred:
ConnectionError: HTTPSConnectionPool(host=’acme-v02.api.letsencrypt.org’, port=443): Max retries exceeded with url: /directory (Caused by NewConnectionError(‘: Failed to establish a new connection: [Errno -3] Temporary failure in name resolution’,))
Please see the logfiles in /var/log/letsencrypt for more details.
Leron Amin says
Hi Anil,
You can check for errors in the letsencrypt.log file, which you can view if you SSH into your instance and execute the following command:
Let me know if you have questions,
Joe
Benoy says
Hi There,
Whenever GCP calls, I turn to you 🙂 Whole site up and running via your tutorials. Thanks. Just cropped up a small issue and thought I might ask the expert.
My site is working fine and no issues with SSL. I have a reserved static IP but when I click on the IP, it provides me an ssl version of the ip link, but isn’t secure and an error shows saying NET::ERR_CERT_COMMON_NAME_INVALID . However, non ssl ip directs it to my ssl site.
Just a bit confused. Hope you might extend a helping hand.
Thanks in advance!
Leron Amin says
Hi Benoy,
The error is happening because you can’t register SSL certificates for IP addresses – so when you access your instance via it’s IP, it’s throwing an error because your IP address is not listed in the SSL certificate. This is expected behavior.
You can configure a re-direct in Apache to forward traffic from your IP address to your domain name – see here.
Let me know if you have any questions – and I’m glad you’ve enjoyed the tutorials!
Joe
Nariman sheikh says
Hi, Thank you for your videos. I have done the tutorial and and I received this error when I tried to restart the apache.
Unmonitored apacheAH00526: Syntax error on line 53 of /opt/bitnami/apache2/conf/bitnami/bitnami.conf:SSLCertificateFile: file ‘/etc/letsencrypt/live/ nomadrepublic.tv /cert.pem’ does not exist or is emptyapache config test fails, abortingAH00526: Syntax error on line 53 of /opt/bitnami/apache2/conf/bitnami/bitnami.conf:SSLCertificateFile: file ‘/etc/letsencrypt/live/ nomadrepublic.tv /cert.pem’ does not exist or is emptyapache config test fails, abortingMonitored apache
Then I edit the line and update the config file. now I get :
Unmonitored apache
Syntax OK
/opt/bitnami/apache2/scripts/ctl.sh : httpd stopped
Syntax OK
/opt/bitnami/apache2/scripts/ctl.sh : httpd started at port 80
Monitored apache
Please help as the website is down now. Thanks
Leron Amin says
Hi Nariman,
There appears to be an empty ‘space’ character in your file paths before and after your domain name – this is illegal and will break your configuration. You need to remove the spaces and restart Apache in order for your server to function properly. See below:
Let me know if you have questions,
Joe
Manivannan says
Hi,
I followed all the steps. But post this update, my website is not loading. It is giving HTTP 500 error. On the 7th step, the code above and below “define” statements look little different for me than yours. I’m not sure if this is causing the problem. I’m seeing the define statements inside the if loops in my file. Whereas in your video, the define statements are above the if loop. Please let me know how to fix this error. Thank you.
Regards,
Manivannan Y
Leron Amin says
Hi Manivannan,
The ‘define’ statements were copied and pasted from the section of code a few lines above, and then uncommented (see the second screenshot from step 7).
If the ‘define’ statements are in a different location in your config file, then just go with it – it is unlikely that this is causing the 500 error, except in the case of a syntax error.
Let me know if you have questions,
Joe
Sah Alam says
cs@wordpress-1-vm:~$ ./certbot-auto certonly –webroot -w /opt/bitnami/apps/wordpress/htdocs/ -d homet.co.uk -d http://www.homet.co.uk
Requesting to rerun ./certbot-auto with root privileges…
Saving debug log to /var/log/letsencrypt/letsencrypt.log
Plugins selected: Authenticator webroot, Installer None
Enter email address (used for urgent renewal and security notices) (Enter ‘c’ to
cancel): c
Hello I got this error to install the ssl certificate. please take a look and I am waiting for your reply.
Thanks
Sah Alam
Leron Amin says
Hi Sah,
Don’t enter ‘c’ when it asks for an email address – that cancels the certificate issuing process. If you don’t want to provide an email address, just put in a placeholder address such as example@example.com.
Let me know if you have questions,
Joe
Girish says
Hello
When I try to install certificate get below error when installing python.
https://www.awesomescreenshot.com/image/3834858/def687655028314cf65b6640ccadd398
Can you please help?
Thanks in Adance
Leron Amin says
Hi Girish,
I don’t know what that error is about. There were multiple comments on January 23 from users who were experiencing a similar issue.
By the way, were you able to get the issue resolved?
Talk to you soon,
Joe
Girish says
Hello Joe
Its working fine now.
Thanks for your great support.
ajit says
superb thanks alot….
Pradeep sharma says
Hello sir after following all steps successfully apache server could not restart and get an error
(Unmonitored apache
AH00526: Syntax error on line 90 of /opt/bitnami/apache2/conf/bitnami/bitnami.conf:
ServerAlias only used in
apache config test fails, aborting
AH00526: Syntax error on line 90 of /opt/bitnami/apache2/conf/bitnami/bitnami.conf:
ServerAlias only used in
apache config test fails, aborting
Monitored apache)
this is the server error when I restart the apache server tell me, sir, how to solve this problem because my website is also down after installing ssl certificate
Leron Amin says
Hi Pradeep,
There appears to be an error on line 90 of your bitnami.conf file.
First, open the file by running the following command:
Then, jump to line 90 in the file by pressing the following key combination: CTRL + SHIFT + –
From there, look for the error. From my understanding, there should not be a ServerAlias directive in line 90 of the file (as the error message suggests) – it should be toward the top of the file under the opening tag.
Hope this helps and let me know if you have questions,
Joe
Tiji says
Thanks Leron, I was able to set up SSL on my site expressionbreak.com easily with the step by step guide you have posted. I would like to know how do I change the default user name that bitnami gives ? Couldn’t find a post on it.
Leron Amin says
Which username were you hoping to change? The WordPress username? PhpMyAdmin username? SSH username?
sudath says
Hi!
Thanks for this tutorial!
I have Followed the tut, but after that I got a Curl error: 56 (RECV_ERROR) when sharing to Facebook(Image is no sharing) how to resolve that issue?
Best Regards,Sudath
Isaac Suberu says
Greate tutorial! I followed the SSL cerification installation processes, and I also got the same last confirmation you got at the end of the tutorial. The problem I’m facing now is that, after I’ve installed the SSL to my website: http://www.onlinetradingmen.com, I’ve not been able to access my web webiste. whenever I typed the domain name (www.onlinetradingmen.com), It returns “this page isn’t working , http://www.onlinetradingmen.com is currently unable to handle this request. HTTP ERROR 500.”
The worst part of it is that I can’t even acess my admin dashboard. I’m using google cloud platform.
Leron Amin says
Hi Isaac,
Was your website working fine with your domain before you configured SSL?
What is the output of the following command when you execute it in the terminal:
Talk to you soon,
Joe
Isaac Suberu says
Yes, it was working fine before I configured SSL.
I don’t think I ran this command: sudo apachectl configtest. I think you didn’t run the command in the video, or did I skip a step in the video?
Thanks for quick reply
Leron Amin says
Hi Isaac,
The configtest is just to test for syntax errors – it’s only necessary for troubleshooting.
Were you able to get it working? Did you find the problem?
Talk to you soon,
Joe
Isaac Suberu says
Update:
I just ran: sudo apachectl configtest, and it shows “Syntax OK”
shanmuga says
sir after ssl certificate process done.
ip not working sir. I’ve Tried All Process, But Not Working
in kproxy.com its working.
website godparcel.com
When I tried to create another instance. No:of:certificates issued error came what to do ?
in browser not working, but in kproxy working.kindly check it manually yourself sir
Leron Amin says
Hi Shanmuga,
Please post your question in the WordPress Cloud Hosting Support group, as I’ve been unable to access your site.
Thanks and talk to you soon,
Joe
Harsh says
Hello,
Will this tutorial work for AWS EC2 Instance as well. I have used WordPress Bitnami Client for my site, issued the certificate but not able to connect with ELB or Cloudfront.
Please suggest some tips.
Thanks,
Leron Amin says
Hi Harsh,
Yes – the process is the same for configuring SSL on an AWS EC2 instance. However, configuring the certificates with ELB or Cloudfront is a completely separate process, and one that I don’t cover in this tutorial. I would check the AWS documentation for additional information.
Regards,
Joe
Vivek Kumar says
Error:
viv_kr_85@wordpresssemplice-vm:~$ ./certbot-auto certonly –webroot -w /opt/bitnami/apps/wordpress/htdocs/ -d nagrajviv.com -d http://www.nagrajviv.com
Requesting to rerun ./certbot-auto with root privileges…
/opt/bitnami/apps/wordpress/htdocs/ -d nagrajviv.com -d http://www.nagrajviv.com does not exist or is not a directory
Website – http://www.nagrajviv.com
Leron Amin says
Hi Vivek,
So the command you ran was:
Try re-running the command by copying the snippet I posted above and see if it works.
Also, you’re using Bitnami and not Click-to-deploy, correct?
Talk to you soon,
Joe
Vivek Kumar says
Thanks Joe.
It worked.
abhimanyu yadav says
i am facing this error
/ -d atharvajobs.com/ -d http://www.atharvajobs.com/
Requesting to rerun ./certbot-auto with root privileges…
Saving debug log to /var/log/letsencrypt/letsencrypt.log
Plugins selected: Authenticator webroot, Installer None
Obtaining a new certificate
An unexpected error occurred:
The request message was malformed :: Error creating new order :: Invalid character in DNS name
Please see the logfiles in /var/log/letsencrypt for more details.
Leron Amin says
Hi Abhimanyu,
Make sure you don’t have extra / characters in your command. The domain section of your command should look like this:
Let me know if you have any questions,
Joe
abhimanyu yadav says
thanks for your lovely support by you’re little of advice Now my SSL working
but I am getting one issue on SSL on a browser when I open browser then n showing me “Your connection to this site is not fully secure”
Leron Amin says
Hi Abhimanyu,
Those are insecure content errors, and I go over how to resolve them in this tutorial.
You might give this plugin a try. I’ve never tested it, but it has great reviews, so proceed at your own risk.
Talk to you soon,
Joe
abhimanyu yadav says
actually, my admin page showing full secure https://www.atharvajobs.com/wp-login.php
but my home page showing me not full secure
Leron Amin says
Hey Jeison – thanks for the feedback – I’m glad to hear it worked for you!
arjun says
Hi, I tried doing this and after everything is done, my site is not loading and it says http error 500, please advise ,how to fix this error and my site is theonlinecart.in
Leron Amin says
Hi Arjun,
Try restarting your Apache server and see if there are any error messages that print to the terminal.
Also, check your Apache error logs for any additional information that could pertain to the error, and make sure that your cloud DNS is configured properly and that your A record IP value matches the IP of the instance that is running your website.
Let me know if you have any questions,
Joe
ggrobot says
i will try these two options and let you know. thank you Joe for your help.
Kartik says
You Are really Awesome! You Become My Cloud Guru!
Leron Amin says
Thanks for the feedback Kartik! 🙂
ggrobot says
hi one page zen , thank you for your great help to all of us. i followed your steps precisely and it seems that all pages are secure except the homepage. is something i can do for it?
2. there are some redirects from the ip url to my domain name url , is there a way to cut them off as it lowers the loading time.
Leron Amin says
Hi ggrobot,
You can run a find and replace query in your WordPress database table, as shown here.
If it’s only a few images that are affected, for instance, then you can simply delete and re-upload them.
Regarding the homepage issue, check out this tutorial on diagnosing insecure content errors.
Talk to you soon,
Joe
ggrobot says
Hi Joe,
It seems that some parts of my page , pictures were the problem. they had ip instead of domain name, i changed it and it passed.
Leron Amin says
Glad to hear you were able to get the issue resolved! 😀
Atilla says
Hi Joe,
Thanks for another amazing tutorial. My installation went smooth thanks to your straightforward step-by-step instruction. I can see “The connection to this site is using a valid, trusted server certificate issued by Let’s Encrypt Authority X3” notification in Google Chrome therefore the SSL seems to be working fine. Whereas, via my SEO plugin in WordPress I’m getting 404 Errors from .well-known/acme-challenge/h-vsCtyrnRYOeV2kj0qlQy1V59b3aKouDu8P address. What do you think the potential issues related to this server message? Thanks in advance.
Leron Amin says
Hi Atilla,
The acme-challenge is created on your server to validate your ownership of the domain (that you’re securing with SSL) before a certificate can be issued. For instance, if you tried to issue a certificate for a domain that wasn’t validated/connected with your server, the acme-challenge would fail. I see this happen a lot when users copy and paste the certificate issuing command directly from the tutorial, and forget to replace 1pagezen.com with their own domain names.
That being said, if your plugin is showing a 404 from the ‘well-known’ directory, I wouldn’t pay any attention to it. It has no real value to your website aside from it’s role in domain validation for the Certbot client. Don’t delete the directory though, as you will need it when you run the command to renew the certificate later on.
Let me know if you have any questions,
Joe
Atilla says
Thanks for your reply. Actually I have recently changed the domain name and the old domain is (301) redirected to the new one. Should I suspect 301 redirection might cause this 404 behaviour since .conf files seems to be configured correctly.
Leron Amin says
Yes, the redirection could be causing the 404 error. You should at some point run a ‘dry-run’ (see the section of this tutorial titled ‘Basic Auto-Renew Testing’). After running the command, see if you get an error related to the Acme challenge – as this could be caused by the redirect. If not, don’t worry about the 404.
Atilla says
I’ve run the test and got “Congratulations, all renewals succeeded. The following certs have been renewed” message without any error. As you suggested earlier, I’d just ignore 404 now. Thanks for the support.
Hsu says
Hi!
Thanks for this tutorial!
I have Followed the tut, but at the last point I got a failure.
last step I write: sudo /opt/bitnami/ctlscript.sh restart apache
and show:
Unmonitored apache
AH00526: Syntax error on line 13 of /opt/bitnami/apache2/conf/bitnami/bitnami.conf:
Redirect takes one, two or three arguments, an optional status, then document to be redirected and destination URL
apache config test fails, aborting
AH00526: Syntax error on line 13 of /opt/bitnami/apache2/conf/bitnami/bitnami.conf:
Redirect takes one, two or three arguments, an optional status, then document to be redirected and destination URL
apache config test fails, aborting
Monitored apache
—-
So how could I do right now? Please help><
Leron Amin says
Hi Hsu,
As the error indicates, there is a syntax error on line 13 of your bitnami.conf file.
You will have to open the file, identify the error (jump to line 13), and fix it. Things to look for are extra spaces at the end of line 13 (these must be removed), and typos or missing spaces between words.
Let me know if you have any questions,
Joe
Tamir Davidoff says
You are the man. Thats all i got to say here.
But for the rest of the people here, worked like a charm! One Page Zen always provides!
Leron Amin says
Thanks for the feedback Tamir! 🙂
Arewapro says
hello!
I have Followed the tut, but at the last point I got a failure.
Please guick help.
./certbot-auto certonly –webroot -w /opt/bitnami/apps/wordpress/htdocs/ -d arewapro.com -d http://www.arewapro.com
-bash: root@cloudshell:/tmp/certbot$: No such file or directory
Leron Amin says
Hello Arewapro,
Don’t run the the certificate issuing command as root.
Before running the command, run the following command to navigate to your home directory:
Then, if you are using root user, type the following command to exit:
After verifying these two things, you’ll be able to run the certificate issuing command successfully.
Let me know if you have any questions,
Joe
Yejide Travis says
I have been using GSuite, since the program started as Google Apps. I decided to migrate to GCP in order to be able to create the site I really wanted and to learn as much as I could. Your tutorials have been my mind saving lifeline. I appreciate the time, effort and energy you put into creating these tutorials. You are a master educator and VERY good at what you do. For you, I am grateful. Thank you so much.
Leron Amin says
Thanks for the feedback Yejide! It makes me happy to know that you’ve found the tutorials helpful and have been able to benefit from them! 🙂
Walker says
You may already be aware, but your instructions say to use cert.pem, which will break apache2 on any reboot (requires manual passphrase entry, and if you’re using GCloud and bitnami over BASH SSH you won’t see the dialog (plus I don’t even know how to find the passphrase from certbot, which is my own fault for being a noob, but still ridiculously confusing). Should use fullchain.pem instead.
John L says
Thank you for the detailed steps. I’ll be contacting you soon to ask your assistance in cleaning up the mess I made ;).
I only needed one certificate for one site on my WordPress Multisite Bitnami to install on Google Cloud Platform. I was hoping this would still work. Needless to say, it’s created some problems. The good news is that my Google Search results from my old site are successfully redirected to the new WordPress site. The bad news is I can not log into my Multisite install to fix the mixed security issues.
I’m only posting the pubicly so others don’t make the same mistake I did, or at least know what will happen.
Leron Amin says
Hey John,
Thanks for the words of wisdom. I’m sorry to hear about the login problems, but hopefully this will be helpful to users who are going down the same route.
Looking forward to hearing from you!
Joe
Axel says
wget https://dl.eff.org/certbot-auto && chmod a+x certbot-auto not run
Leron Amin says
Hi Axel,
It looks like there’s a temporary issue with the download site. You can either wait for it to come online again, or download from an alternative location:
Hope this helps,
Joe
Amarin says
Hi Joe,
I’ve already commented on the earlier version of your SSL installation guide. Anyhow, I’m listing my issue here as well, in case you prefer to communicate via the updated installation guide thread.
I’ve tried
wget https://dl.eff.org/certbot-auto && chmod a+x certbot-auto
But i’ve got this response instead:
–2018-08-22 04:39:20– https://dl.eff.org/certbot-auto
Resolving dl.eff.org (dl.eff.org)… 151.101.0.201, 151.101.64.201, 151.101.128.201, …
Connecting to dl.eff.org (dl.eff.org)|151.101.0.201|:443… connected.
HTTP request sent, awaiting response… 503 certificate has expired
2018-08-22 04:39:21 ERROR 503: certificate has expired.
Am I doing anything wrong?
Thanks again Joe
Leron Amin says
Hi Amarin,
You didn’t do anything wrong – there is an issue with the Certbot download site that is currently being addressed by their team.
As a workaround, you can try downloading from the following location instead:
Let me know if you have any questions,
Joe
Chris says
Hi
Thank you for your tutorial, I followed all your instructions but then I am unable to see anything after installing the SSL as per four instructions, all I see is a white page now, I cannot even access the WP admin anymore. could you please help, sorry about this.
Thanks
Chris
Leron Amin says
Hi Chris,
If your website was working fine before the tutorial, then the problem is likely due to a syntax error.
Did you see any error notifications when you executed the following command (from step 8):
If so, what were they? If you don’t remember, try re-executing the restart command.
Talk to you soon,
Joe
Chris says
Hello Joe
Yes its fne now it was a syntax error, than you for your really helpful tutorial, appreciate it, will kee in touch
Best
Chris
Omar Cortes says
Hello Leron, tahnk you for your amazing work
i have a problem… i did this tutorial and it is working great, i had another page on wix which i replaced with this one. i have pointed my other domain to his page and when i try to go to a page from my other domain it says it is not secure.
working domain http://www.decen.com.mx
not working domain http://www.deccenmuebles.com
i would really apreciate your help!
Thanks!
Leron Amin says
Hi Omar,
All you need to do is configure domain forwarding through your domain name provider – you don’t need to add SSL to the secondary domain.
If you need to instructions on how to configure domain forwarding, do a google search for your domain name provider followed by ‘domain forwarding’. For instance, you would search for NameCheap domain forwarding or GoDaddy domain forwarding.
Hope this helps and talk to you soon,
Joe
Omar Cortes says
I already did that, I can’t configure much, only the cname to redirect as it was a wix site domain, is there any way to include it into the same ssl I already use?
Leron Amin says
Hi Omar,
I’m not aware of what types of restrictions Wix puts on their domain names.
Are you able to change the nameservers on the Wix domain to Google Cloud nameservers? If so, it will likely be possible to configure SSL on that domain. All you’d need to do is re-issue the certificates, making sure to include both domains when running the certificate issuing command. For example:
Talk to you soon,
Joe
Omar Cortes says
i used that code you provided and it seems that it the certificates are now generated for both domains, but i still get the not secure page when trying to go into http://www.decenmuebles.com, do i need to follow the hole tutorial again but with http://www.decenmuebles.com domain? i already made it with decen.com.mx
also it seems to show the not secure page only on safari
Leron Amin says
Hi Omar,
It appears to be working correctly. When I visit decenmuebles.com, I get a redirect to decen.com.mx.
Assuming decen.com.mx is your preferred domain – everything is working properly, and no – you don’t have to re-do the tutorial for decenmuebles.com.
Hope this answers your question,
Joe
Omar Didier Cortes Perez says
Hello! Yeah it works great with decenmuebles.com
But could you try with “www” http://www.decenmuebles.com in safari?
There is when I get the not secure thing
Leron Amin says
Hi Omar,
I just opened it on another device, using “www” and “http” – and it still redirected to https://decen.com.mx.
I think it might just be your Safari’s cache.
Hope this information helps,
Joe
Pablo says
Hello, how can I install an SSL certificate on lampstack?
Leron Amin says
Hi Pablo,
This is a tutorial for LAMP stack. I have 2 versions – the version you’re viewing now is the Bitnami version, and there is also a version for the Click-to-deploy version. Both of these tutorials are for LAMP stack (Linux, Apache, MySQL, PHP).
Hope this helps and let me know if you have any questions,
Joe
Pablo says
Hi, thanks for answering, when I’m in the apache restart step these errors are generated:
(It’s a php application I do not use wordpress
Unmonitored apache
AH00526: Syntax error on line 52 of /opt/bitnami/apache2/conf/bitnami/bitnami.conf:
SSLCertificateFile: file ‘/etc/letsencrypt/live/yakarei.com/cert.pem’ does not exist or is empty
apache config test fails, aborting
AH00526: Syntax error on line 52 of /opt/bitnami/apache2/conf/bitnami/bitnami.conf:
SSLCertificateFile: file ‘/etc/letsencrypt/live/yakarei.com/cert.pem’ does not exist or is empty
apache config test fails, aborting
Monitored apache
Leron Amin says
Hi Pablo,
Check out CJ’s solution that he posted here.
Hope this helps and let me know if you have any questions,
Joe
Ernesto Vences says
I have the same problem.
/
AH00526: Syntax error on line 54 of /opt/bitnami/apache2/conf/bitnami/bitnami.conf:
SSLCertificateFile: file ‘/etc/letsencrypt/live/sagadescrl.com/cert.pem’ does not exist or is empty
/
But I verified and it’s not a Syntax error. Actually, cert.pem does not exist.
I hoppe you can help me to solve.
Thanks
Ernesto
Leron Amin says
If you’ve verified that it’s not a syntax error and you’re 100% certain that the file doesn’t exist, then you will have to re-issue the certificates in order to create that file:
Jan says
Hello,great tutorials,but i have problem,when i add static address and domain and ssl,and in some point website don’t work.Installing order is next,add static ip,point domain,add ssl .Can’t figure where is mistake,can you advice me.Have other website,works fine with these steps.
Thanks
Ahesan says
Hi Joe,
Currently using aws wordpress bitnami.
I have tried so many times to install certificate according to your instructions but it’s not working.
In the 2nd step
./certbot-auto certonly –webroot -w /opt/bitnami/apps/wordpress/htdocs/ -d mydomain.com -d http://www.mydomin.com
gettig msg error
“does not exist or is not a directory”
Waiting for your reply.,,🤔🤔🤔
Leron Amin says
Hi Ahesan,
Are you using the correct tutorial?
/opt/bitnami/apps/wordpress/htdocs/ is the webroot for the Google Cloud Bitnami LAMP stack. The webroot for the Click-to-deploy version is /var/www/html and that tutorial can be found here.
Hope this helps!
Joe
Ahesan says
Thanks for your reply.
Actually I am using Amazon aws wordpress manage by bitnami.
Leron Amin says
Hi Ahesan,
The root directory for the AWS installation is the same, so there shouldn’t be any difference:
Try to navigate into that directory and see if it works:
Talk to you soon,
Joe
Yuri says
Hi Leron, I find you on YouTube video to configure my domain on Amazon. I start to use a Lighsail and you help me a lot! Thanks! Now I’m trying to configure a free SSL certificate on Lightsail. This is possible? Thanks!
Leron Amin says
Hi Yuri,
I have not used the AWS Lightsail service so I’m not sure whether or not it is possible.
I would recommend doing a Google search for “letsencrypt lightsail aws” and see what you find. I just ran the search myself, and there appears to be numerous tutorials on the subject.
Let me know if you have any questions,
Joe
Raphael says
Hello Leron,
I followed your tutorial and everything worked perfectly.
I did with a test page, my domain.tk, now I would like to implement my .com domain
Can I simply change the files that were pointing to domain.tk for domain.com?
What would be the best way?
Leron Amin says
Hi Raphael,
Unfortunately that won’t work. Because the certificate was issued for the .tk domain, it will only work for the .tk domain. If you try to use that certificate with another domain, you will see an SSL ‘mismatch’ error in the browser.
You will have to change all of your files to reflect the new domain name, and then re-issue the SSL certificate for the new domain name.
Easiest thing would be to start from scratch, but you can always work backwards if you feel you have a good grasp on how the configuration works.
Hope this helps and let me know if you have any other questions,
Joe
michael mills says
Hi thanks for posting the great tutorial I am fine with the setting this up now. I have the lock symbol on my site thanks to you. I wrote another message to say thanks and that there is no reason to respond to my earlier message but it does not seem to have posted, so I just wanted to let you know that the earlier issue is resolved and that I am working on other issues now with the ‘redirect chains’. Thanks, Mike
michael says
I got this error message at step 6 still :
sudo crontab -e
no crontab for root – using an empty one
crontab: installing new crontab
“/tmp/crontab.CclGhz/crontab”:0: bad minute
errors in crontab file, can’t install.
Do you want to retry the same edit? (y/n) y
crontab: installing new crontab
“/tmp/crontab.CclGhz/crontab”:0: bad minute
errors in crontab file, can’t install.
Do you want to retry the same edit? (y/n)
I picked no and got :
Do you want to retry the same edit? (y/n) n
crontab: edits left in /tmp/crontab.CclGhz/crontab
What should I read or do next if you have time to advise me. Thanks, Mike
Leron Amin says
Hi Michael,
The error means that there is an error in your crontab file. In this case, it appears to be a formatting issue (incorrect characters/formatting).
Go back through the cron section of the tutorial and verify that your crontab file is configured as shown in the example.
Also, please check out the following resource for additional information about the bad minute error, and this resource for a basic outline of cron and how it works.
Hope this helps,
Joe
michael says
sudo crontab -e is the command I got stuck on.
after that I get this output:
# Edit this file to introduce tasks to be run by cron.
#
# Each task to run has to be defined through a single line
# indicating with different fields when the task will be run
# and what command to run for the task
#
# To define the time you can provide concrete values for
# minute (m), hour (h), day of month (dom), month (mon),
# and day of week (dow) or use ‘*’ in these fields (for ‘any’).#
# Notice that tasks will be started based on the cron’s system
# daemon’s notion of time and timezones.
#
# Output of the crontab jobs (including errors) is sent through
# email to the user the crontab file belongs to (unless redirected).
Leron Amin says
Hey Michael,
When you run the
sudo crontab -ecommand, it opens your crontab file. The output that you pasted in your message is simply the default text contained in the crontab file. You will need to paste the auto-renew script at the bottom of the default text, and then save the file.Hope this provides some additional clarification and let me know if you have any questions,
Joe
Michael says
Hello,
I am trying to install the SSL on Google Cloud Bitnami WordPress Multi-Tier and I have the following questions:
1. Which of the two IP addresses generated my the deployment should I use is the one linked to the frontend or the one linked to the database and backend?
2. The installation on either IP addresses Aborts when I am generating the Certicate, specifically when I enter Y for yes for the installation to continue, the operation suddendly Aborts. How do I address this issue?
JL says
Hello, I followed the manual, and it works.
Although at the time of auto renew fails, and I have to rebuild the certificate.
I’m obviously in wordpress and bitnami.
why? And what code I have to implement to forget the certificate.
Leron Amin says
Hey JL,
You don’t need to create a new certificate.
Follow the instructions in this tutorial to configure auto-renewal for your certificate. If your certificate is already expired, execute the
./certbot-auto renewcommand from the directory where certbot is installed. For example, try executing the command right after you finish with step 2.Hope this helps and let me know if you have any questions,
Joe
JL says
Hi, I put the following code:
45 2 * * 6 cd /etc/letsencrypt/ && ./certbot-auto renew && /opt/bitnami/ctlscript.sh restart
to renew my certificate, but they tell me that it’s going to expire:
Your certificate (or certificates) for the names listed below will expire in 20 days (on 21 Dec 18 18:45 +0000). Please make sure to renew your certificate before then, or visitors to your website will encounter errors.
When I do a renewal test:
cd /etc/letsencrypt/ && ./certbot-auto renew –dry-run && /opt/bitnami/ctlscript.sh restart
he says: No such file or directory, but by FTP, I see the indicated folder and the indicated file
Seeing me forced to do the whole process again.
¿?
Thanks
Leron Amin says
Hi JL,
You should verify that you have certbot installed in the /etc/letsencrypt/ directory:
After navigating to that directory, you should see ‘certbot’ listed. If certbot isn’t listed, then that means it isn’t installed in that directory. While still in the /etc/letsencrypt/ directory, re-download the certbot client:
After doing this, try the auto-renew testing command again and see if it works.
Let me know if you have questions,
Joe
JL says
Hi,
I have performed the steps indicated to me, placed in the directory I installed cerbot in that directory.
Then run the test command, and perform a test, indicating syntax as ok and I indicate:
Congratulations, all renewals succeeded. The following certificates have been renewed:
/etc/letsencrypt/live/mydomai.com/fullchain.pem (success)
** DRY RUN: simulating ‘certbot renew’ close to cert expiry
** (The test certificates have not been saved.)
I have to assume, that now the certificate is correctly configured, and I do not have to worry about it anymore.
Thanks
Leron Amin says
Hi JL,
That looks good – the renewals should work just fine. Check back about 20 days before the certificates are due to expire to ensure that the auto-renewal script is working correctly.
Talk to you soon,
Joe
Gergely Csécsey says
Great tutorial, thanks! Worked like a charm! 🙂
Leron Amin says
Hi Gergely – I’m glad to hear it worked! Thanks for the feedback!
Scott says
Great tutorial! Thank you! I have setup my site with ssl. Now I’ve bought a new domain name which I also want to set up using SSL. What do I need to do? Do I need to repeat this tutorial again? Will both domain names work with us to sell after doing this? Thank you
Leron Amin says
Hey Scott,
Thanks for the feedback – I’m glad to hear the tutorial worked for you!
Did you want your new domain name to link to the same website as your other domain? Did you want it to link to a subdirectory of your website?
There are many, many different ways of configuring multiple domains for a single website. And as far as encryption, it is best to add all of the domains to a single certificate, so that all domains on your server are utilizing the same certificate.
The process of issuing multiple domains under a single certificate is similar to the process in step 3 of the tutorial, however, you would add additional -d flags for each of the additional domains that you wanted to secure under the certificate. For example, if you wanted to secure your original domain and your new domain, your certificate issuing command would looks something like the code below (assuming your domains are scottjones.com and scottjones2.com):
I think you’re allowed to add upwards of 100 domains to a single certificate.
I hope this answers your question. If not, please provide additional details about which type of configuration you’re going for and I will do my best to help.
Talk to you soon,
Joe
Scott says
Great. I’ve already setup ssl on one domain name on my WordPress setup using your tutorial. So, do I only need to run the code you provided for domain #2 (scottjones2.com in your example) and it will be added to what I’ve already setup?
Thank you!
Leron Amin says
Hey Scott,
Yes – that will add SSL to that domain, however you still need to configure it with your server.
Just like with configuring the first domain, you need to configure another Apache virtual host for your new domain. Check out this resource and this resource to get a general idea of the process.
Please reach out if you have any questions,
Joe
Albert says
Thanks for this tutorial! It helped.
May I ask how will I be able to access the private and public key as well as CSR of the SSL installed?
I am trying to set up a CDN in Google cloud and I was prompted by these questions.
Thanks for the reply
Leron Amin says
Glad to hear it Albert!
You can access them directly in the SSH terminal as root user, then copy and paste their contents.
Let me know if you have any questions,
Joe
Albert A says
Hi, Big thanks for getting back.
Can you help me with the path of where it is installed?
Leron Amin says
Hi Albert,
First execute the command
to swtich to root user.
Then, execute each of the following three commands to view each of the certificate files (you will need to copy the contents of all three):
Let me know if you have any questions,
Joe
Leron Amin says
Also – remember to replace example.com with your own domain name. For example:
Hope this helps,
Joe
sandeep pal says
in the third command it will be fullchain or chain only ?
Leron Amin says
Chain only.
Leron Amin says
The third command is chain only – not fullchain.
Jonathan Swart says
Hi Joe,
I have used this guide before and had no issues at all, but I just tried to configure SSL for my new website and I am having an issue. After restarting the server, my site was loading with no problem (however, “https://” was in grey and not green), and about 5 minutes later it will not load at all.
All I see now is the landing page for my domain name – https://www.urbanearth.co.za/
Any ideas?
Leron Amin says
Hi Jonathan,
The SSL is fine, it’s just that your website is serving insecure content (see part 1 of this tutorial) from your website’s IP address instead of it’s domain name.
Make sure that you update your WordPress site URL’s in your WP config file (step 7 of this tutorial). Then refresh your URLs by going to Settings > Permalinks – then selecting the post name option (click the save button twice again, even if it’s already set to post name setting).
Hope this helps and let me know if you have any questions,
Joe
Jonathan Swart says
Hi Joe,
Once again you have saved the day! The mixed content was the issue. I had to fixed the urls for all of my pictures and now every page is properly secured.
Thanks again.
Leron Amin says
Hi Jonathan,
I’m glad to hear you got it working! 🙂
Talk to you soon,
Joe
Jonathan Swart says
Hi Joe, sorry to bother you again.
After last night, the website was loading perfectly and with the green padlock. But this morning the same thing has happened, where the site is loading the domain host page and is also not secure.
My URL’s are correct, but I can’t get into my site to check mixed content and permalinks (even though these were working perfectly last night). Any ideas?
Leron Amin says
Hi Jonathan,
The website is loading without issue on my end.
Also, it appears to be configured properly based on this result from SSL checker. I’m assuming this means you were able to resolve the issue?
Hope this helps and let me know if you have any questions,
Joe
imdad hussain says
hi
recently i am facing this error after installing ssl
Syntax OK
/opt/bitnami/apache2/scripts/ctl.sh : httpd could not be started
Monitored apache
could you please help ?
Leron Amin says
Hi Imdad,
There is an issue with one of your files. Try checking the server logs at:
See if that displays the location of the error.
Talk to you soon, Joe
Vu says
Thank you so much. I did it
Leron Amin says
Hey Vu – I’m happy to hear that you were able to complete the tutorial!
Tom P says
Hello Leron,
Thank you for your outstanding tutorial video. It is very helpful.
Over 3 months ago, I followed your instruction to obtain a free SSL certificate and set auto renewal for trendyls.com. I wasn’t sure the auto renewal set up properly. However, the trendyls.com certificate was expired 3 days ago. I followed your instruction again, It granted the Certificate valid for the next 90 days but it fail the auto renew. I got the syntax error in bitnami.conf as described below, I have no luck so far to correct it. Please take a look and give me some instruction.
Thank you in advance.
tom@wordpress-1-vm:~$ sudo /opt/bitnami/ctlscript.sh restart apache
Unmonitored apache
AH00526: Syntax error on line 59 of /opt/bitnami/apache2/conf/bitnami/bitnami.conf:
SSLCertificateChainFile: file ‘/etc/letsencrypt/live/trendyls.com/chain.em’ does not exist or is empty
apache config test fails, aborting
AH00526: Syntax error on line 59 of /opt/bitnami/apache2/conf/bitnami/bitnami.conf:
SSLCertificateChainFile: file ‘/etc/letsencrypt/live/trendyls.com/chain.em’ does not exist or is empty
apache config test fails, aborting
Monitored apache
Leron Amin says
Hey Tom,
You have a typo. You typed your file path as /etc/letsencrypt/live/trendyls.com/chain.em, but it should be /etc/letsencrypt/live/trendyls.com/chain.pem
Make the suggested change, restart your server, and the problem should be fixed.
Let me know if you have any questions,
Joe
James NB says
Hi, is there any tutorials for wildcard domain configuration?
Leron Amin says
Hi James,
There are no Wildcard tutorials available as of now. However, it could be something that I will look into in the future.
Thanks,
Joe
Jhon says
Hello and thanks for this info, I love your blog!
I do all, but I use a SSL really simple pluguin and it not run.
yoast by seo not run.
All need write permision on wp-config.php
How can I enable it?
Thanks mate
Leron Amin says
Hi Jhon,
You will have to change the permission level of your wp-config.php file to 755, as shown in step 3 of this tutorial.
If that doesn’t work, you may have to use 777 instead of 755, or better: verify that the file has the proper owner. You can learn more about the chown command and Linux file ownership here.
Feel free to reach out if you have any questions,
Joe
Jhon says
Thanks 🙂 I will try to fix it today
You are the king 🙂
Arya Soni says
Mixed Content: The page at ‘https://www.printzx.com/’ was loaded over HTTPS, but requested an insecure image ‘http://demo.themeum.com/wordpress/wp-megamenu/wp-content/uploads/2017/07/brand-logo.png’. This content should also be served over HTTPS.
This is the error in my website when i upload free ssl certificate google cloud . Can you tell me how to solve this problem ?
Leron Amin says
Hey Arya,
Check out step 1 of this tutorial.
Let me know if you have any questions,
Joe
sami mäkelä says
Hi Leron
Beautiful job with the tutorials. really loving them.
Just to let you know + if you are able to suggest a way out of my troubles: I set up the ssl certificates according to your instruction – they worked but I didnt get the green lock yet – I came back a few hours later to continue with your tutorials and Google cloud was telling me I needed to resize my VM instance – I did it and.. Apache no longer starts.
I sourced info on the bitnami forum and there they requested an error log in similar cases – by running: /opt/apache2/logs/error.log
But I get: “-bash: /opt/apache2/logs/error.log: No such file or directory”
So I cant move forward there at the moment either.
Have you ever come across anything similar – its definitely the resizing that threw my set up off.
Leron Amin says
Hi Sami,
In most cases you won’t need to resize your VM – the micro machine is fine for 99% of WordPress websites.
Next, what is the error message you see when you try to restart Apache?
Also, to view your error log in the future, run the following command:
Talk to you soon,
Joe
sami mäkelä says
Hi Joe
Thanks for the reply – I reached out to someone on my inhouse my support team and they managed to get the apache back and running again – as soon as I get confirmation on what they did I will comment here for everyones benefit.
We had to upgrade as we are building a prestashop in addition to the wp site and even if we arent at the very limit now (google cloud was suggesting we upgrade) they idea was to get set up on the micro level and near launch upgrade.. Anyways Love your blog and the advice here, you are addressing a great niche and expect that if your business hasnt totally blown up yet it is ikely to do so, such quality is the material, sure to attract loads if traffic. Well done & thanks!
Leron Amin says
Hi Sami,
Thanks for the feedback. Also, I am glad to hear that you were able to get the issue resolved.
And I didn’t realize you were going to be running on online store, in which case a more robust machine would be appropriate.
Looking forward to hearing about the solution. 🙂
Talk to you soon,
Joe
sami mäkelä says
Hi Joe
Here is what our guy had done:
I disabled Debian’s default Apache with:
sudo update-rc.d apache2 disable
> >then restarted the server using
sudo reboot
(not sure if this is the recommended way to restart a google cloud instance)
> >and Bitnami’s Apache is now able to start
I now need to follow up with a few more of your tuts – thanks again, and if anyone has that same issue I experienced, the ommads here might work for you but try at your own risk
sami
Leron Amin says
Hi Sami,
Thanks for the update with the solution! I am happy to hear that you were able to get your system up and running again.
Talk to you soon,
Joe
Damien says
Hello,
Please I have an issue after following your tutorial. thank for the tutorial first.
After configuring my SSL cerftificates succssfully, I received a message from Certbot saying my certificates will expire in a few days. Thoug I set automatic renewal.
I dont understand why. I assure you, I went through your video tutorial, and you post, followed everything as you said but I still have that issue.
Leron Amin says
Hi Damien,
Follow this tutorial for updated instructions on how to configure auto-renewal for your certificates.
Let me know if you have any questions,
Joe
Reid Bangert says
Hello,
When I go to restart Apache, I’m getting the following:
AH00526: Syntax error on line 54 of /opt/bitnami/apache2/conf/bitnami/bitnami.conf:
SSLCertificateFile: file ‘/etc/letsencrypt/live/www.bella-vr.com/cert.pem\xe2\x80\x9d’ does not exist or is empty
root@bitnami-wordpress-dm-d806:/etc/letsencrypt# sudo /opt/bitnami/ctlscript.sh restart apache
Unmonitored apache
AH00526: Syntax error on line 54 of /opt/bitnami/apache2/conf/bitnami/bitnami.conf:f/bitnami/bitnami.conf
SSLCertificateFile: file ‘/etc/letsencrypt/live/www.bella-vr.com/cert.pem\xe2\x80\x9d’ does not exist or is empty
apache config test fails, aborting
AH00526: Syntax error on line 54 of /opt/bitnami/apache2/conf/bitnami/bitnami.conf:
SSLCertificateFile: file ‘/etc/letsencrypt/live/www.bella-vr.com/cert.pem\xe2\x80\x9d’ does not exist or is empty
apache config test fails, aborting
Monitored apache
Any help is appreciated!
Leron Amin says
Hi Reid,
Try CJ’s solution of changing the permissions of the letsencrypt directories. If that doesn’t work, go back to line 54 of your bitnami.conf file and make sure there are no spaces at the end of each line. Also, make sure sure there are no spelling errors on either of the 3 certificate paths (extra quotation marks, etc).
Let me know if you have any questions,
Joe
Andy says
You are awesome. Actually awesome! I’m working on a website. Following your tut, I just made it safe. Next step should be managing content in the site.
Do you have any related tutorials concerning customising WordPress website (bitnami) on GCP?
Thank you very much!
Leron Amin says
Hi Andy,
I’m glad you were able to get your website running on Google Cloud.
I don’t offer have any front-end tutorials for WordPress, but if you do a Google search, you will find thousands (if not millions).
Good luck and let me know if you have any questions,
Joe
Nishant Lamichhane says
Leron i am using lamp stack on my engine, therefore i changed wordpress to apache and apche2 as well but no luck resolving the error.
~$ ./certbot-auto certonly –webroot -w /op
t/bitnami/apps/apache/htdocs/ -d lamicane.com -d http://www.lamicane.com
Requesting to rerun ./certbot-auto with root privileges…
/opt/bitnami/apps/apache/htdocs/ does not exist or is not a directory
Leron Amin says
Hi Nishant,
The error message is saying that the directory
/opt/bitnami/apps/apache/htdocs/doesn’t exist.From my understanding, if you’re running your application on a standalone Bitnami LAMP stack your webroot is
/opt/bitnami/apache2/htdocs.If you’re using the pre-built WordPress LAMP stack, your webroot is
/opt/bitnami/apps/wordpress/htdocs/Hope this helps and please reach out if you have any questions,
Joe
Nishant Lamichhane says
Thanks Leron, this worked perfectly but now i am having trouble with this line
sudo nano /opt/bitnami/apps/wordpress/htdocs/wp-config.php. after changing it to sudo nano /opt/bitnami/apache2/htdocs/config.php blank screen appears.
Leron Amin says
Hi Nishant,
If a blank screen appears it means that the file does not exist, and therefor it created a new empty file at that location.
Word of advice: if in doubt about whether a file exists at a certain location, use the
cdcommand. For example, if there is in fact a wp-config.php at the location/opt/bitnami/apps/wordpress/htdocs/, then it will show up when you enter the commandcd /opt/bitnami/apps/wordpress/htdocs/. If not, it will show a file not found error.Get familiar with using this process as it will save you a great deal of hassle down the road from entering invalid file paths.
Also, check out this tutorial on Basic Linux Commands for Google Cloud – this will help you get comfortable with navigating the Linux Shell, and will help a lot in the future with configuring your websites in the cloud (the Linux Shell is universal across all cloud platforms).
Let me know if you have any questions,
Joe
OMK says
Hi thank you for your blog.
I have gone through all instruction and it works fine and perfect.
However I can’t login to phpmyadmin, do you know how to fix this issue?
Leron Amin says
Hi OMK,
For Bitnami stacks, you have to access phpMyAdmin via SSH tunnel, which I demonstrate in this tutorial.
Please have a look at the tutorial and let me know if you have any questions,
Joe
Dennis Kisilev says
First off VERY Clear & Great Videos!
Second so im getting an error on
AH00526: Syntax error on line 10 of /opt/bitnami/apache2/conf/bitnami/bitnami.conf:
ServerAlias only used in
apache config test fails, aborting
Monitored apache
Any Advice?
Domain- luxairhvac.com
Leron Amin says
Hi Dennis,
There is an error on line 10 of your bitnami.conf file, specifically on the line with the ServerAlias directive.
Go back to step 6 of the tutorial and make sure the three lines starting with ServerName are configured properly.
Let me know if you have any questions,
Joe
Track Killers says
Hey, Love your site and al your videos by the way. I recently setup the SSL for Bitnami on Google Cloud and My website does NOT always load the GREEN SSL LOCK. How do I fix this issue?
Leron Amin says
Hello Track,
Sounds like your website is serving mixed content, thereby causing a ‘mixed content’ error.
Try looking over this tutorial for a solution on how to fix ‘mixed content’ errors.
Let me know if you have any questions,
Joe
Aly says
Hello
How can i install Let’s Encrypt SSL on AWS AMAZON CLOUD
Leron Amin says
Hi Aly,
If you’re using a Bitnami stack on AWS, the instructions will be nearly identical.
Before starting, however, make sure that you have an external IP address assigned to your AWS WordPress instance.
Let me know if you have any questions,
Joe
Jack says
I am getting this error :
jay@omsai-wordpress-1-vm:~$ sudo /opt/bitnami/ctlscript.sh restart apache
Unmonitored apache
AH00526: Syntax error on line 51 of /opt/bitnami/apache2/conf/bitnami/bitnami.conf:
SSLCertificateFile takes one argument, SSL Server Certificate file (‘/path/to/file’ – PEM or DER encoded)
apache config test fails, aborting
Monitored apache
Leron Amin says
Hi Jack,
Make sure there aren’t any spaces at the end of the certificate path on line 51 (and for the other two certificate paths) – this is probably what is causing the error.
Let me know if you have any questions,
Joe
Jack says
Thanks a lot, Joe it works now,
Keep up the good work.
Miguel says
I’ve followed your tutorials for WordPress on AWS and it helped me alot. Thanks for the very detailed explanation.
Can you make a tutorial for installing SSL Certificate for Wordpess in AWS with bitnami just like this one?
Appreciate your effort, thanks.
Leron Amin says
Hi Miguel,
I will make an AWS SSL tutorial in the future. That being said, the configuration for the GCP and AWS Bitnami WordPress stacks are nearly identical, so you should be able to use this tutorial to configure SSL on AWS.
If you try it and run into any issues, let me know and I will see how I can help.
Joe
sikboyv says
sudo nano /opt/bitnami/apache2/conf/bitnami/bitnami.conf
file not
I can not do this because the file does not exist
Leron Amin says
Hello,
Try moving to the destination one level at a time and see what happens:
cd opt then cd bitnami then cd apache2 then cd conf then cd bitnami then sudo nano bitnami.conf
Let me know how it goes,
Joe
Mehran says
Leron, Thanks for this great tutorial. I already setup SSL successfully and everything is Ok except accessing to phpmyadmin since I’m using wordpress bitnami on GCP I have to get access to phpmyadmin through http://127.0.0.1:8888/phpmyadmin but it redirect s me to main domain e.g https://www.1pagezen.com. Just as a note After finishing tour tutorial to get access to phpmyadmin locally I followed https://docs.bitnami.com/google/components/phpmyadmin/ also I had access to phpmyadmin before setting up SSL on my website.
Any idea how to fix this?
Leron Amin says
Hi Mehran,
At the end of step 4.5, were you able to create the SSH tunnel (see the black terminal showing the Bitnami text)?
Mehran says
Yes.
Mehran says
In error_log:
localhost:443:0 server certificate does NOT include an ID which matches the server name
Command line: ‘/opt/bitnami/apache2/bin/httpd.bin -f /opt/bitnami/apache2/conf/httpd.conf’
client denied by server configuration: /opt/bitnami/apps/phpmyadmin/htdocs/import.php
Leron Amin says
Hi Mehran,
What is your domain? If you don’t want to provide it, make sure to run a check with an SSL Checker to make sure you have both the www-version and non www-version of the domain listed in your SSL certificate.
Let me know what you find out,
Joe
Mehran says
Leron, Thanks for reply but to clarify again I have no problem with SSL it means already setup successfully but not able to access to bitnami phpmyadmin as I mentioned. Please check the bitnami link I posted before for accepting to phpnyadmin which is only possible on localhost.
Leron Amin says
Hi Mehran,
Are you referencing your server logs? Try using Chrome browser and accessing localhost and choose the “proceed anyway” option when the browser warns that the SSL certificate is invalid.
This error is expected as localost is not listed in the SSL certificate, and therefor will show a security warning by default.
Talk to you soon,
Joe
Leron Amin says
Also Mehran – please create a new comment at the bottom of this tutorial page, and I will assist you there.
This tutorial page is for SSL certificate troubleshooting only.
Thanks, Joe
Jamaica says
I want to go to google cloud but i have it hard fining a cost for a simple wordpress website hosting, can you give me a rught idea the cost to host a site like yours?
Leron Amin says
Hi Jamaica,
You could run a website like onepagezen.com for around $2-5/month using the most basic settings. That being said, remember that this is not a data intensive website (no stored user account data or video), so the storage/networking costs are low.
Hope this information is helpful,
Joe
Jamaica says
Thanks for your response, so your saying i should just select the basic options when signing up? my site is under 500mb when i use all in one migration, so i beleve its very small.
Leron Amin says
What I would recommend is that you start with the most basic option, and then if you’re experiencing issues with performance, you can always upgrade (see the performance graphs at the top of your GCP dashboard).
Cristian Correa says
I have a problem when I try renew because the url “well-know” is incorrect with certbot
https://mydomain.com.well-known/acme-challenge without “/” before
IMPORTANT NOTES:
The following errors were reported by the server:
Domain: mydomain.com
Type: connection
Detail: Fetching
https:/mydomain.com.well-known/acme-challenge/d2YSErxL3DzgwoxIF-uJfj9M42YH8Qq01eKDkbe1Fo8:
Error getting validation data
Leron Amin says
Hi Christian,
Did you get the error resolved?
What is the full renew command that you’re executing?
Godson says
When you are done, follow this intructions to force redirection to https
Add the following to the top of the /opt/bitnami/apps/wordpress/conf/httpd-prefix.conf file:
RewriteEngine On
RewriteCond %{HTTPS} !=on
RewriteRule ^/(.*) https://%{SERVER_NAME}/$1 [R,L]
Godson says
It’s Quite simple to set it up for Multi- Site… with Sub Domains
Follow the tutorial here but skip the following:
ServerName www.1pagezen.comServerAlias 1pagezen.com
Redirect / https://www.1pagezen.com/
Don’t add that to your bitnami.conf file, you don’t want all your sub domains redirecting to the main one.
Skip adding this lines to your wp-config.php as well—
WITH THIS:
define('WP_HOME','https://www.1pagezen.com');define('WP_SITEURL','https://www.1pagezen.com');
You should install the cert like this
./certbot-auto certonly --webroot -w /opt/bitnami/apps/wordpress/htdocs/ -d 1pagezen.com -d www.1pagezen.com --d subdomain.1pagezen.com -d sub2.1pagezen.comIf you’ve installed it before it would notify you asking if it should expand the certificate. Just enter the code for yes… and you are done..
James says
Great tutorials – very clear and well documented.
I’m wondering if you could provide alternate instructions for Step 6 of the “Free SSL Certificate Setup for WordPress on Google Cloud (Bitnami)” tutorial specific to the nginx server rather than apache. I’ve deployed Bitnami’s “bitnami-wordpresspro-dm-fa11” which is WordPress with Nginx and SSL for Google Cloud Compute Engine. The settings for nginx will be a little different than those for apache. I’m trying to intuitively figure it out, but so far I haven’t successfully mapped the calls to the certificates to the correct location in /etc/letsencrypt/… so my site isn’t secure yet.
Thanks!
Leron Amin says
Hi James,
Thanks for the feedback!
Unfortunately I won’t be doing any Nginx tutorials because Apache is the default server for most of the stacks covered in these tutorials.
That being said, I would check StackOverflow for troubleshooting and Digital Ocean for some great Nginx tutorials.
Let me know if you have any questions!
Joe
Jared says
I had the exact same problem, I followed the Bitnami instruction here:
https://docs.bitnami.com/google/apps/wordpress-pro/#how-to-auto-configure-a-lets-encrypt-certificate-in-your-stack
and had mine up and running.
Cheers,
Jared
Rafael says
Hi Jared,
Ive followed this bitnami tutorial but it didn’t work for me.
would you have any other tutorial stetp by step?
Very Thank you
Jared says
I encountered other problems so I went back to using Apache servers.
Cheers,
Jared
Marina Ficcio says
Hi Leo,
Thanks for this tutorial, I did this a few months ago and today I receive an email from
Let’s Encrypt Expiry Bot, is it normal? Is it going to renew automatically?
Thank you very much.
“Hello,
Your certificate (or certificates) for the names listed below will expire in
20 days (on 04 Mar 18 13:03 +0000). Please make sure to renew
your certificate before then, or visitors to your website will encounter errors.
….”
Leron Amin says
Hi Marina,
The auto-renew script from the first version of the tutorial didn’t seem to work for most people. For this reason, I created an updated tutorial that focuses specifically on how to configure auto-renewal for Let’s Encrypt SSL certificates, and you can view that tutorial here.
Please reach out to me if you have any questions or encounter any issues while going through the tutorial.
Talk to you soon,
Joe
Marina Ficcio says
Hi Joe*,
I will try this other tutorial!
thank you very much!
regards,
Marina.
Leron Amin says
Sounds good – let me know if you have any questions!
Tejeshwar says
Hi, thanks for the great tutorial. I found the solutions before you approving my comment.
please tell me can I use the below code. I have static IP address in order to eliminate duplicate code I wrote code like this. As of now everthing working perfectly.
RewriteEngine On
RewriteCond %{HTTP_HOST} ^XX\.XXX\.XXX\.XX$ [NC,OR]
RewriteCond %{HTTP_HOST} ^example\.com
RewriteRule ^(.*)$ https://example.com$1 [L,R=301]
I have placed this code to force https in bitnami.conf file.
And I also found this code but It doesn’t redirecting to my ip address to domain.
RewriteEngine On
RewriteCond %{HTTPS} off
RewriteRule ^(.*)$ https://%{HTTP_HOST}%{REQUEST_URI} [L,R=301]
Leron Amin says
Hi Tejeshawar,
If it is working for you, then go ahead with it!
Also – You shouldn’t run into issues with Google Crawling your website’s external IP.
If your DNS records are configured properly (according to the tutorial), your browser will automatically redirect from your IP to your domain.
Let me know if you have any questions!
Mi says
I think there were character missing errors on my latest post.
Each <> step remarks on the post right below, respectively,
3. Generate Certificates step
4. Test Certificate Renewal step
6. Configure the Certificates step
7. Update Domain URLs Step
8. Restart your Apache Server step.
Mi says
Hi, Joe
Thank you for your good introductions.
I had success of the SSL Certificate Setup on my MAIN domain.
Then when I tried the process again on my SUB domain, I got the SSL Certified SUB domain.
But unfortunately, my SSL Certified MAIN domain came back to Non-Certificate state, instead.
I will show you partly what I did on my SUB domain procedure. The rest was same with that of MAIN domain steps
following your example , 1pagezen.com (MAIN domain) with subzen.1pagezen.com (SUB domain),
Please, answer to me what point was wrong and should be modified when I try again the SSL Certificate Setup
for both my MAIN and SUB domains.
What I did :
<<>> step
(prompt)$ ./certbot-auto certonly –webroot -w /opt/bitnami/apps/wordpress/htdocs/ -d subzen.1pagezen.com -d http://www.subzen.1pagezen.com
….
IMPORTANT NOTES:
– Congratulations! Your certificate and chain have been saved at:
/etc/letsencrypt/live/subzen.1pagezen.com/fullchain.pem
Your key file has been saved at:
/etc/letsencrypt/live/subzen.1pagezen.com/privkey.pem
…
<<>> step
(prompt)$ ./certbot-auto renew –dry-run
…
Processing /etc/letsencrypt/renewal/subzen.1pagezen.com.conf
…
new certificate deployed without reload, fullchain is
/etc/letsencrypt/live/subzen.1pagezen.com/fullchain.pem
…
Processing /etc/letsencrypt/renewal/1pagezen.com.conf
…
new certificate deployed without reload, fullchain is
/etc/letsencrypt/live/1pagezen.com/fullchain.pem
Congratulations, all renewals succeeded. The following certs have been renewed:
/etc/letsencrypt/live/subzen.1pagezen.com/fullchain.pem (success)
/etc/letsencrypt/live/1pagezen.com/fullchain.pem (success)
…
<<>> step
(prompt)$ sudo nano /opt/bitnami/apache2/conf/bitnami/bitnami.conf
************In bitnami.conf file*****************
…
ServerName http://www.1pagezen.com
ServerAlias 1pagezen.com
Redirect / https://www.1pagezen.com/
ServerName http://www.subzen.1pagezen.com
ServerAlias subzen.1pagezen.com
Redirect / https://www.subzen.1pagezen.com/
SSLCertificateFile “/etc/letsencrypt/live/1pagezen.com/cert.pem”
SSLCertificateKeyFile “/etc/letsencrypt/live/1pagezen.com/privkey.pem”
SSLCertificateChainFile “/etc/letsencrypt/live/1pagezen.com/chain.pem”
SSLCertificateFile “/etc/letsencrypt/live/subzen.1pagezen.com/cert.pem”
SSLCertificateKeyFile “/etc/letsencrypt/live/subzen.1pagezen.com/privkey.pem”
SSLCertificateChainFile “/etc/letsencrypt/live/subzen.1pagezen.com/chain.pem”
…
**********************************************
<<>> step
(prompt)$ sudo nano /opt/bitnami/apps/wordpress/htdocs/wp-config.php
************In wp-config.php file*****************
…
define(‘WP_HOME’, ‘https://www.1pagezen.com ‘);
define(‘WP_SITEURL’, ‘https://www.1pagezen.com ‘);
define(‘WP_HOME’, ‘https://www.subzen.1pagezen.com ‘);
define(‘WP_SITEURL’, ‘https://www.subzen.1pagezen.com ‘);
…
define( ‘DOMAIN_CURRENT_SITE’, ‘1pagezen.com’ );
define( ‘DOMAIN_CURRENT_SITE’, ‘subzen.1pagezen.com’ );
define( ‘PATH_CURRENT_SITE’, ‘/’ );
define( ‘SITE_ID_CURRENT_SITE’, 1 );
define( ‘BLOG_ID_CURRENT_SITE’, 1 );
/* That’s all, stop editing! Happy blogging. */
…
**************************************************
<<>> step
(prompt)$ sudo /opt/bitnami/ctlscript.sh restart apache
————-
The end. Thank you.
Leron Amin says
Hi Mi,
You should only have one certificate – and in this certificate, it should include every domain and sub-domain you will be using for your website (maximum 100).
Let me know if you have any other questions,
Joe
Mi says
Thank you for your answer.
Then how can I apply the only one certificate of main domain to a sub-domain.
For example, when I already have a SSL certificate for a main domain, 1pagezen.com,
how can I apply it to a sub-domain, subzen.1pagezen.com ?
Can you answer the steps in detail for the procedure?
Leron Amin says
Hi Mi,
Configuring sub-domains is not a simple process. DigitalOcean has great tutorials on the subject if you would like to look into it.
Also, if you’re going to be configuring multiple WordPress websites on individual subdomains, I would recommend using Bitnami’s WordPress Multisite stack. Check out their documentation here.
Good luck and let me know if you have any questions. 🙂
Rachel says
Hi Joe
Thanks again for your fab tutorials.
I have a bit of a problem with this one – I went throug the tutorial step by step and all seemed to be successful until I viewed my site after completion and realised all of my images were missing from my website. I have the Really Simple SSL plugin installed which came back with the following error:
System detection encountered issues
A definition of a siteurl or homeurl was detected in your wp-config.php, but the file is not writable.
Set your wp-config.php to writable and reload this page.
Any help of how to do this would be appreciated?
Thanks!
Rachel
Rachel says
Also forgot to ask is this the reason the images are missing?
Leron Amin says
Hi Rachel,
The image problem could be related to insecure content errors, see this tutorial.
If you can’t figure out the issue send me your site URL and I will take a look.
Joe
Leron Amin says
Hi Rachel,
Thanks for the feedback – I am glad the tutorials have helped you. 🙂
In order to use a plugin such as Really Simple SSL, you would have to change the default permissions of your wp-config.php file to writable.
You can change these permissions by running the following command:
Although this isn’t a recommended practice for security reasons, it will in fact allow the plugin to write to your wp-config.php file.
Please let me know if you have any questions,
Joe
Isabel Da Guerra says
Leron/Rachel hi,
Saw this and not sure if this helps… After Rachel has done the previous steps of course.
But great fast (smart) way to fix for SEO audit purposes is the Broken Link Checker plugin (By Janis Elsts, Vladimir Prelovac) that runs on my website.
You may find/have a similar one but this is what I use.
1. Inside WordPress dashboard > Settings > Link Checker
– I have kept it at default 72 hour run settings
– Custom select your choice of inside – Look for links in (Tab) and Which Links To Check (Tab)
2. Inside WordPress dashboard > Tools > Broken Links
All (454) |Broken (0) |Warnings (0) |Redirects (100) |Dismissed (0)
It helps me see if there are any broken links on my website and I also check the redirect list of links its brought back. In it you can go in directly and fix some links (including website’s image links that are still reading hht instead of https)
Cheers 😉
Rachel says
Thanks Isabel I’ll give that a go 🙂
Rachel says
Great thanks Joe, I had a feeling that was the case. Not sure if i’m comfortable doing that. Thank you again. Rachel.
Chris says
Hi Joe,
My certificate recently expired–I was getting warnings that it was about to expire, but I thought the auto-renew process would take over. I had set up the auto-renew process as you recommended. I’ve re-run the process you recommend in the tutorial.
Is there a way to test the auto-renew process?
Thanks for all of your education!
Chris
Leron Amin says
Hi Chris,
I’m sorry the script isn’t working for you – it hasn’t worked for some other people so I will look into it.
In the meantime run the following command to renew your certificate:
I will notify you when the script it updated.
Talk to you soon,
Joe
MC says
Hi Joe,
Same issue for me as well. Did not auto-renew, and was throwing security warnings to users until I noticed. The command above fixed it, but I too would love to be notified of updated auto-renew cron. Thanks again!
Leron Amin says
Hi MC,
I am aware of the issue and am currently working on a solution.
I will send out on update via mailing list and will update the code on the tutorial.
In the meantime, to manually renew your certificate, you can run:
./certbot-auto renew
Let me know if you have any questions! 🙂
Eduardo Raymundo says
Thanks, all perfect!
Leron Amin says
Great to hear! Congratulations on completing the tutorial successfully! 😀
Isabel Da Guerra says
Okay thanks Joe, I see the differnce from previous SSL certificate install (Bitnami). Clearly it starts with installing git vs direct link to https://dl.eff.org/ and extras (chmod a+x certbot-auto).
Question I have here is, what if I want to change my website to run through this SSL certificate channel via https://dl.eff.org/ as per your tutorial here… How do I uninstall git via the ‘apt-get install git-all’ command, installed previously ? Or/And if there are any other further steps I need to do?
Also, can you briefly explain what the two differences are between the two previous/current. Obviously the latter is better but why? (just out of curiosity and for anyone who installed it via git and is reading this he he he) I know I’m a pain, sorry.
Have a successful 2018 buddy 😉
Leron Amin says
Hi Isabel,
The idea behind the second tutorial was simply to make it more ‘streamlined’, and to clear up some of the inefficiencies found in the first edition.
Also, there was a mistake in the first edition of the tutorial, wherein the Certbot repository was being saved to the /tmp directory, which automatically clears over time.
And you’re not a pain! – I am sure several other people have had this same question, however, you’re the only one who mustered the courage to ask.
In the first edition of the tutorial, Git is downloaded to your home directory so you should be able to access the files by entering ls after connecting to your instance via SSH.
I hope this answers your question (and thanks for asking it!)
Wishing you a wonderful 2018 as well!
Cheers, 🙂
Joe
Isabel Da Guerra says
Thank you Leron… I’m busy updating my domains and my clients, and all good he he 😉
Leron Amin says
Well I hope you don’t have too many sites to update… O_O
And on the bright side you will know SSL configuration inside and out after doing it a million times! 😉
Benjamin says
Hello Joe,
I got an error when trying to restart at step 8. Restart your Apache Server
AH00526: Syntax error on line 51 of /opt/bitnami/apache2/conf/bitnami/bitnami.conf:
SSLCertificateFile takes one argument, SSL Server Certificate file (‘/path/to/file’ – PEM or DER encoded)
apache config test fails, aborting
I’m not sure why because I added the 3 paths as per your example but is looks like something to do with the SSL certificate file paths.
Pls let me know what you think and any possible direction for a solution.
Best regards,
Ben
Leron Amin says
Hi Benjamin,
Contact me through the OnePageZen Facebook page and send me a screenshot of your 3 lines as they are listed in your bitnami.conf file.
Talk to you soon,
Joe
12/29/17 UPDATE: To fix this problem, make sure there is not spaces after either of your three certificate paths listed in your bitnami.conf file.
Benjamin says
Hello Joe,
Have installed a moodle (bitnami) instance on CGP, reserved a static ip address, and transfered a domain name so all going good so far!
I have a question at 3. Generate Certificates. of your tutorial.
What would the command look like when creating a certificate for a moodle (bitnami) instance?
I just realise that the following command in your example is going to be incorrect!
./certbot-auto certonly –webroot -w /opt/bitnami/apps/wordpress/htdocs/ -d hocvietngu.com -d www.hocvietngu.com
However when I look at the following site (see link below) they are using an OpenSSL example, I think,
>How To Create An SSL Certificate? > Create a certificate:
The example code is:
sudo openssl req -new -key /opt/bitnami/apache2/conf/server.key -out /opt/bitnami/apache2/conf/cert.csr
https://docs.bitnami.com/google/apps/moodle/
So I am confused. Could you please help me out a little here?
Would i just need to replace the text “wordpress” to “moodle” in the first command snippet above?
Best regards,
Ben
Leron Amin says
Hi Ben,
Exactly like you said – run the command but replace wordpress with moodle. The directory path should be:
/opt/bitnami/apps/moodle/htdocs/ instead of /opt/bitnami/apps/wordpress/htdocs/
Also, don’t run the Open SSL command; that’s for issuing self-signed certificates and is irrelevant to this tutorial.
You are on the right path! Let me know if this answer doesn’t make sense to you or if you have any questions!
Talk to you soon,
Joe
Benjamin says
Hello Joe,
Everything going well…and up to Step 7 Update Domain URLs but have hit an issue!
The following config file is wordpress specific i think. So i can’t us
sudo nano /opt/bitnami/apps/moodle/htdocs/wp-config.php
So I just removed the “wp-” extension and left the config.php file as seen below.
sudo nano /opt/bitnami/apps/moodle/htdocs/config.php
That’s gets me into a file with the following lines:
But I don’t see the define example listed but I do see similar code for the domain. if i added my domain here “www.hocvietngu.com” which part of the line would i need to remove?
‘https://’ . $_SERVER[‘HTTP_HOST’];
dbtype = ‘mysqli’;
$CFG->dblibrary = ‘native’;
$CFG->dbhost = ‘localhost’;
$CFG->dbname = ‘bitnami_moodle’;
$CFG->dbuser = ‘bn_moodle’;
$CFG->dbpass = ‘0bfd904c0a’;
$CFG->prefix = ‘mdl_’;
$CFG->dboptions = array (
‘dbpersist’ => 0,
‘dbport’ => 3306,
‘dbsocket’ => ‘/opt/bitnami/mysql/tmp/mysql.sock’,
‘dbcollation’ => ‘utf8_general_ci’,
);
if (empty($_SERVER[‘HTTP_HOST’])) {
$_SERVER[‘HTTP_HOST’] = ‘127.0.0.1:80’;
};
if (isset($_SERVER[‘HTTPS’]) && $_SERVER[‘HTTPS’] == ‘on’) {
$CFG->wwwroot = ‘https://’ . $_SERVER[‘HTTP_HOST’];
} else {
$CFG->wwwroot = ‘http://’ . $_SERVER[‘HTTP_HOST’];
};
$CFG->dataroot = ‘/opt/bitnami/apps/moodle/moodledata’;
$CFG->admin = ‘admin’;
$CFG->directorypermissions = 02775;
$CFG->passwordsaltalt1 = ‘ba43a08e2f3577bf6b434c1229b33238187fd4457d1ca29dc37a6fcfd2093349’;
$CFG->passwordsaltmain = ‘493f919255f39b4f1b5f9c2f7af9d588628b04e26df41d84c4f008900b3e93cd’;
require_once(__DIR__ . ‘/lib/setup.php’);
// There is no php closing tag in this file,
// it is intentional because it prevents trailing whitespace problems!
Benjamin says
Hey Joe,
Would this line be correct? with apostrophe and semicolon?
$CFG->wwwroot = ‘https:www.hocvietngu.com’;
} else {
$CFG->wwwroot = ‘http:www.hocvietngu.com’;
Leron Amin says
Hi Benjamin,
Use the following code, however, make sure to use the ‘ character by your escape button on your keyboard, not the ‘ by your enter key.
My WP theme for some reason will automatically convert ` to ‘ so make sure that you don’t just copy and paste the code below. But this is what the code should look like:
Let me know if this works.
Talk to you soon,
Joe
astheboy says
Good morning
You are installing SSL according to the tutorial you have created. However, it can not be executed in the steps below.
What is the problem?
astheboy@wordpress-vm:~$ ./certbot-auto certonly –webroot -w /opt/bitnami/apps/wordpress/htdocs/ -d cslab.me
Requesting to rerun ./certbot-auto with root privileges…
Usage: certbot-auto [OPTIONS]
A self-updating wrapper script for the Certbot ACME client. When run, updates
to both this script and certbot will be downloaded and installed. After
ensuring you have the latest versions installed, certbot will be invoked with
all arguments you have provided.
Help for certbot itself cannot be provided until it is installed.
–debug attempt experimental installation
-h, –help print this help
-n, –non-interactive, –noninteractive run without asking for user input
–no-bootstrap do not install OS dependencies
–no-self-upgrade do not download updates
–os-packages-only install OS dependencies and exit
-v, –verbose provide more output
-q, –quiet provide only update/error output;
implies –non-interactive
All arguments are accepted and forwarded to the Certbot client when run.
Leron Amin says
Hi Astheboy,
This is not an error that I have come across before.
What you should do is open a support ticket on the LetsEncrypt forums and see if one of their developers can help you.
Talk to you soon,
Joe
rajender says
rajender_rajotia@pilibangan-vm:~$ sudo /opt/bitnami/ctlscript.sh restart apache
Unmonitored apache
AH00526: Syntax error on line 68 of /opt/bitnami/apache2/conf/bitnami/bitnami.conf:
Invalid command ‘OB’, perhaps misspelled or defined by a module not included in the server configuration
apache config test fails, aborting
AH00526: Syntax error on line 68 of /opt/bitnami/apache2/conf/bitnami/bitnami.conf:
Invalid command ‘OB’, perhaps misspelled or defined by a module not included in the server configuration
apache config test fails, aborting
Monitored apache
rajender_rajotia@pilibangan-vm:~$
help sir in the last step i get this message
Leron Amin says
Hi Rajender,
This means there is an error in your bitnami.conf file on line 68.
So you will need to open the file and check line 68 for an error.
Use CTRL + SHIFT + – in order to jump to a specific line once you’ve opened the file in Nano.
Let me know if you have any other questions,
Joe
Mi says
Hi, Joe
I have a question about Free SSL Certificate Setup for Subdomains
instead a main domain.
If I replace the domain name with a subdomain name,
following your example , 1pagezen.com (main domain) with subzen.1pagezen.com (sub domain),
the rest procedure is exactly same with that of the main domain steps except for the domain name ??
If it is different, can you introduce it for subdomains in detail like this website(for main domain) ?
Thanks.
Leron Amin says
Hi Mi,
That is correct. 🙂 You just need to list the subdomains in the certificate, just like you would list your primary domain.
You are allowed to list up to 100 domains / subdomains in a single certificate.
Please let me know if you have any other questions,
Joe
Lee says
Thanks for the good tutorial. One question is,
can I use the Free SSL Certificate in your tutorial, including the auto-renewing,
for WordPress websites(domain and sub-domains) of a small “commercial enterprise” on Google Cloud Platform ??
In addition, if there is a license website on that, can you let us know or link it ??
Thank you again.
Leron Amin says
Hi Lee,
You will have to look over the policies and legal repository for Let’s Encrypt and also the Certbot license conditions.
I hope this answers your question, 🙂
Joe
Steve says
Hi Joe,
Thank you very much for your kindness support, I would not able to do anything if I did not see your video and tutorials. Yesterday I moved my site to Google Cloud and it takes over one day to do that. It was really tired.
But I still have two more question, it would be great if you could help me and everybody
1. My site after setup the SSL certificate, it still appears the sign that is not secure 100% (images..) How can I fix that?
You could see from here: https://www.hienthaoshop.com/
2. I was built the Bitnami WordPress, but that platform seems to conflict with the W3 Total Cache, so now my site speed on Google Speed Check even a litter bit slower. Is there any way I can fix it? Or can I remove the Bitnami Speed Check on my site?
Thank you for your kindness sharing!
Best Regards
Steve
Leron Amin says
Hey Steve,
You website is serving insecure HTTP images – this is a very common problem with SSL, and is easy to fix.
Check out this tutorial to learn how to fix the problem.
Also, either W3 Total Cache or WP Super Cache works better than the other on Bitnami installs – but I forget which one it is. If W3 isn’t working for you, I would give WP Super Cache a try, or else check out the section of Bitnami’s documentation dedicated to configuring W3 Total Cache.
Let me know if you have any questions, 🙂
Joe
Steve Vu says
Hi Joe,
Thank you very much for your time and your advice yesterday.
I follow your instruction and I already fixed the insecure HTTP image. Again, thank you very much for that.
I still have only one problem that I could not install W3 total Cache nor WP Super Cache properly. Both of the caches plugin requires the configuration in wp-cofig.php and htacess
For example, below is the warning when I installed W3 Total Cache.
” FTP credentials don’t allow to write to file /opt/bitnami/apps/wordpress/htdocs/wp-config.php”
W3 Total Cache Error: Files and directories could not be automatically created to complete the installation.
Please execute commands manually
Edit file /opt/bitnami/apps/wordpress/htdocs/wp-config.php and add next lines:
/** Enable W3 Total Cache */
define(‘WP_CACHE’, true); // Added by W3 Total Cache
W3 Total Cache error: It appears Minify URL rewriting is not working. Please verify that the server configuration allows .htaccess
Unfortunately, minification will not function without custom rewrite rules. Please ask your server administrator for assistance. Also, refer to the install page for the rules for your server.”
I read the instruction from https://docs.bitnami.com/google/apps/wordpress/ but I cannot edit because simply I do not know how to do it.
Could you give me some advice on how to access and modify the /opt/bitnami/apps/wordpress/htdocs/wp-config.php
If you could make a tutorial about this, I think many viewers will see. Because I searched on the internet, this matter has a very poor instruction.
I am very sorry for taking your time. And I really looking forward your support
Thanks & Regards
Steve
https://www.hienthaoshop.com/
Leron Amin says
Hey Steve,
In Google Cloud, you will need to click on the SSH button next to the instance that is running your website in order to connect to it.
Next, enter the command sudo nano /opt/bitnami/apps/wordpress/htdocs/wp-config.php to open up your wp-config.php file.
Next, paste the following at the bottom of your wp-config.php file:
/** Enable W3 Total Cache */
define(‘WP_CACHE’, true); // Added by W3 Total Cache
Next, press CTRL + X at the same time, then press Y to save changes, then press “Enter”.
Finally, run the restart command:
sudo /opt/bitnami/ctlscript.sh restart
Let me know if you have any questions. 🙂
Joe
Steve says
Hi Joe,
Thank you so much for your support. I follow your instruction, it appears the below request:
W3 Total Cache error: It appears Page Cache URL rewriting is not working. Please verify that the server configuration allows .htaccess
Unfortunately disk enhanced page caching will not function without custom rewrite rules. Please ask your server administrator for assistance. Also refer to the install page for the rules for your server.
In fact, before that, I had to set the command: sudo chmod 777 /opt/bitnami/wordpress/wp-content
And the error above is the only one problem left. I read the info from Bitnami, they try to hide the .htaccess file and they require to change the new .htaccess.conf
The problem is I do not know how to change it.
Could you help me, please?
Thanks & Regards
Steve
Leron Amin says
Hey Steve,
It seems that there are multiple issues at play.
What you should do is open a support ticket at the Bitnami Community forums, and describe your issue in detail. The Bitnami engineers will know exactly how to fix the problem.
In the meantime, the solution you’re looking for is probably something similar to Beltran’s response in this thread.
Good luck and let me know if you have any questions! 🙂
Joe
Steve says
Hi Joe,
I would like to describle again what I did for the setting of W3 Total Cache:
Before installing the W3 Total Cache, I run the command:
sudo chmod 777 /opt/bitnami/wordpress/wp-content
After that, I created the fie: sudo nano /opt/bitnami/apps/wordpress/htdocs/wp-config.php as your advice
And I paste the code: /** Enable W3 Total Cache */
define(‘WP_CACHE’, true); // Added by W3 Total Cache
And I save it and I restart Apache: sudo /opt/bitnami/ctlscript.sh restart
But the W3 Total Cache still requests me as below:
W3 Total Cache error: It appears Page Cache URL rewriting is not working. Please verify that the server configuration allows .htaccess
Unfortunately disk enhanced page caching will not function without custom rewrite rules. Please ask your server administrator for assistance. Also refer to the install page for the rules for your server.
I know Bitnami disable .htacceess file and allow us to create or modify the .htaccess.conf in stead
However, I don’t know how to FIND and SHOW the .htacceess.conf file for the modification
Can you instruct to me some commands to find show the .htaccesss.conf on SSH mode?
Also, what code I should use to insert into that file in order to allow .htaccess.conf work properly with W3 Total Cache? (allow rewriting matter)
Looking your reply soon and many thanks for your kindness help
Thanks & Regards
Steve
http://www.hienthaoshop.com
Amit Kachere says
Hey there,
Thanks for this valuable article.
I got free SSL for my site with this method.
Once again thanks for this!!!!!!!!!
Leron Amin says
Hi Amit,
I am glad to hear the tutorial was helpful to you!
Thanks for taking the time to leave feedback. 🙂
Joe
Dev says
Hi Leron is there no requirement to make changes to /etc/apache2/sites-available/default-ssl.conf in bitnami wordpress?
Leron Amin says
Hi Dev,
You don’t need to do anything with the default-ssl.conf.
Talk to you soon, 🙂
Joe
Bimbimz says
Hello bro,
I done install it, but i want change that will comodo.
and How to Uninstall it ?
Thx
Leron Amin says
Hi Bimbimz,
Just put a # sign next to the certificate file paths in the .conf file, or delete them.
You can delete the Certbot and LetsEncrypt files and directories by using the commands from the Linux commands list.
I hope this answers your question.
Joe
Bimbimz says
yes it helps,
I have another question:
I tried to use SSL from comodo, and I have trouble setting it up in:
sudo nano /opt/bitnami/apache2/conf/bitnami/bitnami.conf
sudo nano /opt/bitnami/apps/wordpress/htdocs/wp-config.php
and this is my setting:
SSLCertificateFile “/opt/bitnami/apache2/conf/comodo/server.crt”
SSLCertificateKeyFile “/opt/bitnami/apache2/conf/comodo/server.key”
SSLCertificateChainFile “/opt/bitnami/apache2/conf/comodo/mydomain.ca-bundle”
can you help me master?
Leron Amin says
Hi Bimbimz,
I only offer support for configuring Let’s Encrypt certificates as shown in this tutorial.
If you’re curious on how to install Comodo certificates, check out this tutorial.
Hope this helps,
Joe
Leron Amin says
Hi,
Just put a # sign next to the certificate file paths in the .conf file, or delete them.
You can delete the Certbot and LetsEncrypt files and directories by using the commands from the Linux commands list.
I hope this answers your question.
Joe
Jonathan says
Worked perfectly, thank you so so much!
Leron Amin says
Hi Jonathan,
I’m glad to hear it worked for you!
Thanks,
Joe
Anthony says
Hi Joe,
Great tutorial! I got the SSL to work on my main site. Just wondering how I go about setting up SSL to work on subdomains and mapped domains that exist now and in future when I add more mapped domains?
This is my setup:
In wordpress:
rocketwebber.com is my main domain running on multisite.
example1.rocketwebber.com is a subdomain mapped to example1.com
In google:
I have zone name rocketwebber.com and example1.com
example1.com has an A record that points to the IP for rocketwebber.com
rocketwebber.com has an A record: example1.rocketwebber.com that points to the IP for rocketwebber.
Please help
Leron Amin says
Hi Anthony,
For securing multiple top-level and subdomains in a multisite installation, you will have to install the Domain Mapping plugin. Also, check out the Bitnami Multisite documentation about how to properly configure SSL.
Configuring multiple domains with SSL on single virtual machines is complicated and usually takes some trial and error. Anyways, check out the link above, it should point you in the right direction. Let me know if you have any questions.
Talk to you soon, 🙂
Joe
Conor says
Hey Folks,
So followed the tutorial, everything seemed to work perfectly. It shows in wordpress, https:// mydomain.com secure.
However, when I do an ssl checker on it I get the following warnings below:
1. The certificate is self-signed. Users will receive a warning when accessing this site unless the certificate is manually added as a trusted certificate to their web browser. You can fix this error by buying a trusted SSL certificate
2. None of the common names in the certificate match the name that was entered (www.mydomain.com). You may receive an error when accessing this site in a web browser. Learn more about name mismatch errors.
As it shows the cert has been created but it still shows up in the browser that it url is insecure.
Wondering if anyone has had the same problems before?
Thanks very much 🙂
Conor says
Hey guys,
Awesome tutorial! I would like to add subdomains to my domain and get the certbot to issue a cert for both the domain and the subdomains. Is the easiest way to just add the domains after directory like so: -d domain.com, subdomain1.domain.com, subdomain2.com and so?
Thanks very much
Leron Amin says
Hey Conor,
The format would be -d one.example.com -d two.example.com -d three.example.com
Hope this answers your question!
Joe
Conor says
Thanks Leron, spot on!
Shadman Alam says
Hey Leron,
I follow your step but unfortunately my website is totally down and not opening while i try to install ssl certificate.
I follow your each step but when in i use this command nly –webroot -w /opt/bitnami/apps/wordpress/htdocs/ -d teh1one.com -d http://www.tech1one.com
I found error NXDOMAIN
Please help me out i totally helpless. I try my best to resolve my issue always facing same issue that create A/AAA record i already created all the records but i unable to install ssl certificate and also unable to open my website.
Please help me out this.
Leron Amin says
Hi Shadman,
You have misspelled tech1one in your certificate issuing command.
Fix that and you likely won’t see that error anymore.
Let me know if you have any other questions.
Thanks,
Joe
Shadman Alam says
Actually misspelled only here on my comment but when i write the code on VM Console i write exactly my domain name.
While issuing certificate always give same error message.
Please help me out.
Leron Amin says
Hi Shadman,
The causes of the error are likely that your DNS is not configured properly, that your Domain hasn’t resolved to your new website on GCP, or that the certificate issuing command isn’t being executed properly. What I would do is go over the links at the top of the tutorial page and make sure that you completed each of the 3 pre-requisite tutorials successfully. Check for any errors etc.
You may also have to do some troubleshooting on StackOverflow and Google.
Hope this information is helpful! 😀
Talk to you soon,
Joe
M Clouds says
I would love to see these tutorials continue with setting up Google Cloud CDN!
Leron Amin says
Hi M Clouds,
That tutorial will be published soon – stay tuned! 😀
Joe
Matheus Santana says
Hello Leron,
I change the domain of my site, and I’m getting troubles to install a new ssl cert because the older domain cert.. How I remove this to install a new cert??
The new domain is empregobahia.com
Leron Amin says
Hey Matheus,
You can simply redo the tutorial: the Certbot client will ask if you want to overwrite your old certificates – choose “Yes”.
Also – make sure that when you re-do each step, you use your new domain name and not your old one.
Let me know if you have any questions 😀
Joe
Matheus Santana says
I’m getting this error when I try install the certificate in new domain…
What I’ve to do?
IMPORTANT NOTES:
– The following errors were reported by the server:
Domain: empregobahia.com
Type: connection
Detail: Fetching
http://www.empregobahia.com/.well-known/acme-challenge/ndukTUUaegNI7gmVgtwMv7L_u-6fN0Xuzf4qgjRpU_w:
Error getting validation data
Domain: http://www.empregobahia.com
Type: connection
Detail: Fetching
http://www.empregobahia.com/.well-known/acme-challenge/fGhD_SXVCPhLV5egw-4rhWGz5RA0Zr8S2nBP4H8vqIw:
Error getting validation data
To fix these errors, please make sure that your domain name was
entered correctly and the DNS A/AAAA record(s) for that domain
contain(s) the right IP address. Additionally, please check that
your computer has a publicly routable IP address and that no
firewalls are preventing the server from communicating with the
client. If you’re using the webroot plugin, you should also verify
that you are serving files from the webroot path you provided.
Leron Amin says
Hi Matheus,
Are you using the right tutorial?
Remember there are both Bitnami and Click-to-Deploy tutorials. If you are using Click-to-Deploy, you need to make sure that all future tutorials are designed for Click-to-Deploy. The same goes for Bitnami.
Talk to you soon, 🙂
Joe
Matheus Santana says
Good News!! I found the error
Was the line
ServerName http://www.mydomain.com
ServerAlias mydomain.com
Redirect / https://www.mydomaincom/
I removed this line and installed the new cert…
Everything is normal now…. Buuuut at /wp-admin appear not secure.
What can it be?
Joe!
Leron Amin says
Hi Matheus,
It is usually caused by an insecure content error, as shown in step 1 of this tutorial. As the tutorial shows, you will have to inspect the page and see which element is causing the error.
Hope this helps! 😀
Joe
Peter says
This is the full step i go through. Please take a look and see which step i go wrong.
1, Install CertBot Client
2, Generate Certificates
3, Test Certificate Renewal
& i got the result like this:
IMPORTANT NOTES: – Congratulations! Your certificate and chain have been saved at: /etc/letsencrypt/live/badmintonvillage.com/fullchain.pem Your key file has been saved at: /etc/letsencrypt/live/badmintonvillage.com/privkey.pem Your cert will expire on 2018-01-01.
5, Setup Auto-Renewal
& i got the result like this:
Congratulations, all renewals succeeded. The following certs have been renewed
6, Configure the Certificates
I have added servername, serverAlias, Redirect (my actual domain)
DocumentRoot “/opt/bitnami/apache2/htdocs”
ServerName http://www.mydomain.com
ServerAlias mydomain.com
Redirect / https://www.domain.com/
& I have added # sign next to each of the two placeholder certificates & paste the path to your three SSL certificate files
#SSLCertificateFile “/opt/bitnami/apache2/conf/server.crt”
#SSLCertificateKeyFile “/opt/bitnami/apache2/conf/server.key”
SSLCertificateFile “/etc/letsencrypt/live/mydomain.com/cert.pem”
SSLCertificateKeyFile “/etc/letsencrypt/live/mydomain.com/privkey.pem”
SSLCertificateChainFile “/etc/letsencrypt/live/mydomain.com/chain.pem”
7, Update Domain URLs
Then i REPLACE THIS:
define(‘WP_SITEURL’, ‘http://’ . $_SERVER[‘HTTP_HOST’] . ‘/’);
define(‘WP_HOME’, ‘http://’ . $_SERVER[‘HTTP_HOST’] . ‘/’);
WITH THIS:
define(‘WP_HOME’,’https://www.mydomain.com’);
define(‘WP_SITEURL’,’https://www.mydomain.com’);
8, Restart Apache Server by this code: sudo /opt/bitnami/ctlscript.sh restart apache
Result:
restart apacheUnmonitored apacheAH00526: Syntax error on line 53 of /opt/bitnami/apache2/conf/bitnami/bitnami.conf:SSLCertificateFile: file ‘/etc/letsencrypt/live/ badmintonvillage.com/cert.pem’ does not exist or is emptyapache config test fails, abortingAH00526: Syntax error on line 53 of /opt/bitnami/apache2/conf/bitnami/bitnami.conf:SSLCertificateFile: file ‘/etc/letsencrypt/live/ badmintonvillage.com/cert.pem’ does not exist or is emptyapache config test fails, abortingMonitored apache
But Eventually couldn’t Work properly. It mentioned that letsencrypt/live/ badmintonvillage.com/cert.pem’ does not exist.
Thank You Very Much!
Leron Amin says
Hey Peter,
All of the text that says mydomain.com needed to be replaced with you own domain name, which in this case is badmintonvillage.com.
You will need to go back through the tutorial and fix steps 6 & 7 and make sure badmintonvillage is listed in the place of mydomain.
Also, make sure a cert.pem was actually generated. You can check by executing the following command in your SSH terminal:
ls /etc/letsencrypt/live/badmintonvillage.com/
The folder should show around 4 certificate files, one of them being cert.pem.
Let me know if you have any questions, 🙂
Joe
Peter says
Dear Joe,
Thanks for your reply,
I have updated the domain to badmintonvillage.com & redo configuring the certificates & update the domain URL.
However, when i put the command: ls /etc/letsencrypt/live/badmintonvillage.com/
The result shows:
ls: cannot access /etc/letsencrypt/live/badmintonvillage.com/: Pe
rmission denied
Leron Amin says
Hey Peter – my bad… try running the command as sudo:
sudo ls /etc/letsencrypt/live/badmintonvillage.com/
Talk to you soon, 🙂
Joe
Peter says
Thanks for your reply!
After typing the command: sudo ls /etc/letsencrypt/live/badmintonvillage.com/
The Result:
~$ sudo ls /etc/letsencrypt/live/
badmintonvillage.com/
cert.pem chain.pem fullchain.pem privkey.pem README
starwargift@badmintonvillage-vm:~$
Still not successfully get the SSL
Leron Amin says
Hey Peter,
I need you to copy some text and send me it to me.
Will you please open your bitnami.conf folder using the following command:
sudo nano /opt/bitnami/apache2/conf/bitnami/bitnami.conf
Next, copy the 3 lines at the top of the page that look similar to this: (Important: DO NOT type CTRL+C in nano, to copy, simply highlight the text and it will copy automatically)
ServerName http://www.1pagezen.com
ServerAlias 1pagezen.com
Redirect / https://www.1pagezen.com/
Next, scroll down the page, and copy the three lines of code that look similar to this:
SSLCertificateFile “/etc/letsencrypt/live/1pagezen.com/cert.pem”
SSLCertificateKeyFile “/etc/letsencrypt/live/1pagezen.com/privkey.pem”
SSLCertificateChainFile “/etc/letsencrypt/live/1pagezen.com/chain.pem”
Please send me all of the 6 lines of code as they appear in your file.
I will look over the code and make a recommendation from there.
Talk to you soon, 😀
Joe
Peter says
Dear Joe,
The situation now is my web will auto show https, but the green lock doesn’t show up.
The 3 lines at the top of the page of this command: sudo nano /opt/bitnami/apache2/conf/bitnami/bitnami.conf
ServerName http://www.badmintonvillage.com
ServerAlias badmintonvillage.com
Redirect / https://www.badmintonvillage.com/# Default Virtual Host configuration.
The 3 line at the middle:
SSLCertificateFile “/etc/letsencrypt/live/badmintonvillage.com/cert.pem”
SSLCertificateKeyFile “/etc/letsencrypt/live/badmintonvillage.com/privkey.pem”
SSLCertificateChainFile “/etc/letsencrypt/live/badmintonvillage.com/chain.pem”
Leron Amin says
Hey Peter,
That looks good.
I ran an SSL report on your certificates, and it’s showing that your certificates were issued for example.com.
You will likely need to re-issue the certificates using the following command:
./certbot-auto certonly –webroot -w /opt/bitnami/apps/wordpress/htdocs/ -d badmintonvillage.com -d http://www.badmintonvillage.com
The above command is from step 3 of the tutorial – it’s the only step you need to repeat.
You won’t need to change anything in your bitnami.conf since the file paths will remain the unchanged.
Let me know once you’ve done this.
Talk to you soon, 🙂
Joe
Peter says
Dear Joe,
Thanks for your reply!
Still cant connect to SSL. The result shows:
Connected, host fingerprint: ssh-rsa 2048 A3:B3:9A:E2:2E:7B:A3:96:DC:21:C4:D0:E7:72:71:99:87:1B:4F:AC
The programs included with the Debian GNU/Linux system are free software;
the exact distribution terms for each program are described in the
individual files in /usr/share/doc/*/copyright.
Debian GNU/Linux comes with ABSOLUTELY NO WARRANTY, to the extent
permitted by applicable law.
___ _ _ _
| _ |_) |_ _ _ __ _ _ __ (_)
| _ \ | _| ‘ \/ _` | ‘ \| |
|___/_|\__|_|_|\__,_|_|_|_|_|
*** Welcome to the Bitnami WordPress 4.8.2-0 ***
*** Documentation: https://docs.bitnami.com/google/apps/wordpress/ ***
*** https://docs.bitnami.com/google/ ***
*** Bitnami Forums: https://community.bitnami.com/ ***
starwargift@badmintonvillage-vm:~$ ./certbot-auto certonly –webroot -w /opt/bitnami/apps/wordpress/htdocs/ -d badmintonvillage.com -d http://www.badmintonvillage.com
Requesting to rerun ./certbot-auto with root privileges…
Requested name http://www.badmintonvillage.com appears to be a URL, not a FQDN. Try again without the leading “http://”.
starwargift@badmintonvillage-vm:~$
Leron Amin says
Hey Peter,
The domains in the command that I sent you SHOULD NOT have an http or https in front of them.
Annoyingly, the http and https prefixes are added automatically when posting comments on WordPress.
Try re-issuing the command but make sure the commands after each -d DO NOT include http or https, simply with www or without www.
./certbot-auto certonly –webroot -w /opt/bitnami/apps/wordpress/htdocs/ -d badmintonvillage.com -d http://www.badmintonvillage.com
Talk to you soon, 😀
Joe
Peter says
Dear Joe,
I have removed the HTTP / HTTPS on the command.
The web still cant access SSL while the result said that Certbot can obtain and install HTTPS/TLS/SSL certificates.
The result:
Certbot can obtain and install HTTPS/TLS/SSL certificates. By default,
it will attempt to use a webserver both for obtaining and installing the
certificate.
certbot: error: unrecognized arguments: –webroot
starwargift@badmintonvillage-vm:~$ ./certbot-auto certonly –webroot -w /opt/bitnami/apps/wordpress/htdocs/ -d badmintonvillage.com -d http://www.badmintonvillage.com
Requesting to rerun ./certbot-auto with root privileges…
usage:
certbot-auto [SUBCOMMAND] [options] [-d DOMAIN] [-d DOMAIN] …
Certbot can obtain and install HTTPS/TLS/SSL certificates. By default,
it will attempt to use a webserver both for obtaining and installing the
certificate.
certbot: error: unrecognized arguments: –webroot
starwargift@badmintonvillage-vm:~$
Leron Amin says
Hey Peter,
Try again, but this time copy and paste the command from the tutorial itself, don’t copy and paste it from my comments.
The comments on WordPress aren’t formatted as standard HTML (which is what is in the grey boxes in the tutorial); that’s why the “-” symbol in front of webroot isn’t being recognized by your SSH terminal.
Talk to you soon, 🙂
Joe
Peter says
Dear Joe,
I type the command: ./certbot-auto certonly –webroot -w /opt/bitnami/apps/wordpress/htdocs/ -d badmintonvillage.com -d http://www.badmintonvillage.com and it required me to reset the certificate, and i click yes. However, still not works for getting the SSL.
The Result shows :
– Congratulations! Your certificate and chain have been saved at
:
/etc/letsencrypt/live/badmintonvillage.com/fullchain.pem
Your key file has been saved at:
/etc/letsencrypt/live/badmintonvillage.com/privkey.pem
Your cert will expire on 2018-01-02. To obtain a new or tweake
d
version of this certificate in the future, simply run certbot-
auto
Leron Amin says
Peter,
Did you restart your server? Run the following command in the terminal:
sudo /opt/bitnami/ctlscript.sh restart apache
Talk to you soon, 😀
Joe
Peter says
Dear Joe,
After putting the restart command, i put the step 3 command again. And then restart again. Still cant access SSL.
The result:
– Congratulations! Your certificate and chain have been saved at:
/etc/letsencrypt/live/badmintonvillage.com/fullchain.pem
Your key file has been saved at:
/etc/letsencrypt/live/badmintonvillage.com/privkey.pem
Your cert will expire on 2018-01-02. To obtain a new or tweaked
Leron Amin says
Hey Peter,
Your certificates are still not showing up as configured properly, but I know that isn’t the case because I’ve ruled that out.
For this reason, this points to an error in your Apache configuration, possibly in your bitnami.conf file.
If you’d still like support, please send me the entire contents of your bitnami.conf file and I will take a look at it.
Please send it to support@onepagezen.com.
Talk to you soon,
Joe
Peter says
When i Restart Apache Server
It shown up:
Unmonitored apache
AH00526: Syntax error on line 53 of /opt/bitnami/apache2/conf/bit
nami/bitnami.conf:
SSLCertificateFile: file ‘/etc/letsencrypt/live/ badmintonvillage
.com/cert.pem’ does not exist or is empty
apache config test fails, aborting
AH00526: Syntax error on line 53 of /opt/bitnami/apache2/conf/bit
nami/bitnami.conf:
SSLCertificateFile: file ‘/etc/letsencrypt/live/ badmintonvillage
.com/cert.pem’ does not exist or is empty
apache config test fails, aborting
Monitored apache
starwargift@badmintonvillage-vm:~$
Rob says
Hi Leron, I am having the same issue as Peter on all my sites I try to do this with. Are you sure its not an error with the tutorial?
Leron Amin says
Hi Rob,
I’ve worked through this tutorial several times, and it works fine. However, the last time I ran through the tutorial I encountered the issue that you described and the way I solved it was by changing the permission level on the certificate directory. I will run through the tutorial again and see if I can reproduce the issue to give you a more thorough documentation on how to avoid/fix it.
Thanks for pointing this out. 🙂
Joe
CJ says
What permission level did you set the certificate directory to? I’m currently having this issue.
Results from running apachectl configtest:
AH00526: Syntax error on line 58 of /opt/bitnami/apache2/conf/bitnami/bitnami.conf:
SSLCertificateFile: file ‘/etc/letsencrypt/live/mydomain.com/cert.pem’ does not exist or is empty
It does exist and it’s not empty because I checked running :
sudo nano /etc/letsencrypt/live/mydomain.com/cert.pem
While using FTP I’m unable to open the /etc/letsencrypt/live folder as bitnami user. Current permissions are:
700 root root
Would love to get this solved.
Thanks,
CJ
CJ says
Figured it out.
I ran:
sudo chmod 755 /etc/letsencrypt/live
sudo chmod 755 /etc/letsencrypt/archive
apachectl configtest
sudo /opt/bitnami/ctlscript.sh restart apache
My SSL is now active. Hope this helps someone.
Let me know if this looks okay, Leron.
Peace
Leron Amin says
Hi CJ,
Looks good – I am glad you were able to get the issue resolved.
Did you change the file permissions initially? I’m interested because this isn’t an issue that I see regularly.
Talk to you soon,
Joe
Leron Amin says
Hi CJ,
This syntax error is usually caused by there being extra ‘spaces’ after your file paths.
So go to line 58, where each of your 3 certificate file paths are listed, and make sure there are no extra spaces after each of the 3 file paths.
Let me know if you have any questions,
Joe
CJ says
Not that I recall, haven’t changed anything since I originally set it up.
Leron Amin says
Thanks for letting me know CJ!
Chris says
Hi, thanks very much for the helpful tutorial! When trying to obtain a new certificate, I got the following error. Any help is appreciated.
Chris
Obtaining a new certificate
Performing the following challenges:
http-01 challenge for globalgocare.com
http-01 challenge for http://www.globalgocare.com
Using the webroot path /opt/bitnami/apps/wordpress/htdocs for all unmatched domains.
Waiting for verification…
Cleaning up challenges
Failed authorization procedure. http://www.globalgocare.com (http-01): urn:acme:error:unauthorized :: The client lacks sufficien
t authorization :: Invalid response from http://www.globalgocare.com/.well-known/acme-challenge/JnaGPMHqkk2puEIPHBtnhHtsy
OxwuxbIJA6jbSuTwyc: ”
<meta name="viewport" content="width="
IMPORTANT NOTES:
– The following errors were reported by the server:
Domain: http://www.globalgocare.com
Type: unauthorized
Detail: Invalid response from
http://www.globalgocare.com/.well-known/acme-challenge/JnaGPMHqkk2puEIPHBtnhHtsyOxwuxbIJA6jbSuTwyc:
"
<meta name="viewport" content="width="
To fix these errors, please make sure that your domain name was
entered correctly and the DNS A/AAAA record(s) for that domain
Chris says
above should end with “contain(s) the right IP address.”
Chris says
Joe, I also did your tutorial on domain name configuration and did that work and everything went fine. I’m noticing a thread there “From Google Cloud Platform dashboard, go to cloud DNS. Check your IP address of your A record. Go to your VM instance page, look at the IP address of the VM instance that is running your WordPress website. Do they match?” I’m using the Bitnami click to deploy app. I don’t have a cloud DNS zone. Let me know if that’s part of my problem. Thanks.
Chris says
My domain registrar is Google.
Leron Amin says
Hi Chris,
You need to have a DNS zone that is managing the IP/domain that is running your instance, as shown in this tutorial. What the certbot error is essentially saying is, “the nameservers of this domain aren’t connected to your Google Cloud Platform account, so for that reason you don’t have permission to issue certificates for that domain”.
Take a look at the tutorial that I sent you in the link, and after you’ve completed that let me know if you have any questions.
Best regards, 🙂
Joe
Chris says
You’re very kind, and I’m pretty inexperienced in this! I followed your directions for transferring the domain name and reserving a static IP address. But my site isn’t available now. I assume it’s related to the following: when I change the name servers at Google Domains, I get the message, “It looks like you’ve changed your name servers. All settings for your domain (including website, email, synthetic records and resource records) are currently disabled. To enable these settings, you will need to restore the Google Domains name servers. ” Thanks for any help. Chris
Leron Amin says
Hi Chris,
When you changed your name servers on Google, you basically opted to manage your domain name through Google Cloud DNS instead of through Google domains.
I think the issue with your website not loading likely has to do with your nameservers and DNS not being configured properly. In addition, make sure your WordPress domain name URLs are set to globalcare.com or http://www.globalcare.com. StackOverflow is also a great resource to use when troubleshooting a DNS configuration.
Good luck, and let me know if I can be of further assistance. 🙂
Joe
Chris says
Joe, the site is up again, but with the “not secure” warning in the address bar, and the changes seem to have taken out my G-Suite email, which may be part of the coordination problem. I don’t want to take advantage of your good will here, and would be OK paying you to go through my settings with me and get everything on track. Let me know. Thanks, Chris
Leron Amin says
Hi Chris,
I sent you an email requesting images from your Cloud DNS, Google Domains DNS, and Cloud VM instances page. I will take a look at the images to see if there are any basic issues that can be quickly and easily resolved.
Talk to you soon,
Joe
Chris says
All set up with a SSL Cert and G Suite functioning well. Thanks for all the help!
Leron Amin says
Hey Chris,
I am glad to hear that everything is working well! 🙂
Let me know if you ever have questions or suggestions for future tutorials!
Best,
Joe
Georgi says
Hi Leron
Thanks for your reply.
I have connection via sftp but the problem is probably permissions. I can see the files but I am able to download only some of them but not the keys.
I am afrate if I change the permissions to sub files and folders they may be different permissions in each of them. I am afrate to not mestup all of them.
Best regards
Leron Amin says
Hey Georgi,
What you could do is just change only the permissions of the file that you want to edit, within the SSH terminal as shown in this tutorial. Change permissions to 777, download and edit the file (or whatever you want to do with it), and then change the permissions back.
Hope this answers your question! 🙂
Joe
Raj says
Where ssl certificate store in google compute wordpress Bitnami. I want installed ssl certificate but I don’t know where is save certificate. I’m installing certificate suggested step by you. please Email me root name where ssl store.
Raj says
and please suggest how to enable google cdn for compute engine (wordpress by Bitnami) & setup Load balancing…….
Thanks for very helpful articles
Leron Amin says
Hey Raj,
The load balancing and CDN tutorials are in the making.
They’ve been difficult tutorials to simplify, so that’s why they are taking awhile to make.
Stay tuned, and make sure to join the mailing list to be notified when the tutorials are released!
Talk to you soon,
Joe
Leron Amin says
Hey Raj,
All of your SSL certificates are located in the folder located at: /etc/letsencrypt/live/YOURDOMAIN.com/
You can view each of the certificate files by executing the command: ls /etc/letsencrypt/live/YOURDOMAIN.com/
Remember to replace YOURDOMAIN.com with your own domain name.
If you want to download the certificates, you can use an FTP client such as FileZilla to locate and download the certificate files (see this tutorial).
Let me know if this answers your question.
Talk to you soon, 😀
Joe
Georgi says
Hi Leron
thank you for you great tutorials! Everything works just fine! Thank you for you quick responds as well!
I have just one question regarding ssl on google cloud. I can not backup the ssl key as I suppose to do following the tutorials for some premision reasons I guess. Can you help out with that?
Thank you in advance
Best regards
Leron Amin says
Hey Georgi,
I am glad everything is working fine!
Are you looking to backup your SSL certificate files?
You can open up the files and and copy and paste the contents in to a text editor – then save the file with the correct file extension (.pem).
The other thing you can do is download the files via FTP, which I set up in this tutorial.
Let me know if this answers you question. 😀
Talk to you soon,
Joe
Benjamin Waller says
Hello Joe,
Thanks for this tutorial. It is really helpful and I will try this out. There were a few decisions that you made that prompted some questions. Such as why do you prefer to use ‘www’ when setting up your wp-config.php file? Also, should I upload all images to the site before setting up the ssl certificate or doesn’t it matter ? Sorry if I have asked you this one before but I am still a unsure how images are treated for ssl.
Thanks for your help.
Ben
Leron Amin says
Hey Benjamin,
I hope you’ve been well! I was happy to see your name popup in the comment feed. 🙂
Regarding your first question – I just personally prefer to use www. with my domains, but you can find a million arguments on the internet arguing that www is better than non-www for SEO, and vise versa. Honestly, I don’t think it matters one way or the other as long as you choose one and stick with it.
As far as uploading images is concerned, I would recommend uploading your pictures after you’ve completed the tutorial, as this will save you from having to change your image URLs later on.
Also, before starting the tutorial, I would recommend taking a snapshot of your instance as a backup, according to step 1 only of this tutorial.
Let me know if you run into any issues with the tutorial, as I would be more than happy to help you through them.
Talk to you soon!
Joe
Leron Amin says
What did you think of this revised version of the Bitnami SSL certificate tutorial?
Did you find it easier, more challenging, not much different?
Please share your questions and comments below!
Thanks,
Joe
Daniel says
I found it perfect. Helped me a lot just when I almost gave up. I was thinking that I would need to change back to HTTP and had no idea how to do that with this bitnami installation. When I found your tutorials it changed my day to great. Truly thanks
Leron Amin says
Glad it helped you, Daniel! 😀
Thanks for sharing your experience!