In this tutorial you will learn how to quickly transfer an exact copy of an existing WordPress website to another WordPress installation. This tutorial will be helpful to you if you are planning to move your WordPress website to a cloud platform such as Azure, GCP, or AWS.
Using a WordPress Migration plugin is a great time saver when transferring your WordPress website between hosting providers.
To get started, follow along with the video above. If you get stuck, check below to see the steps listed individually with images.
Before starting this tutorial, you should have already deployed a new WordPress installation on the hosting provider (Azure, GCP, AWS) where you would like to migrate your existing WordPress website to.
There are 4 steps in this tutorial:
1. Download WP Migration Plugin
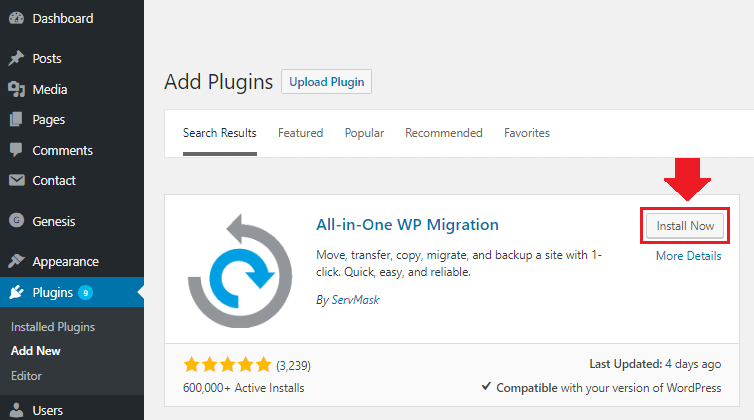
NOTE: The free version of All-in-One WP Migration plugin limits the WordPress upload file size to 512MB. If your WordPress file size is greater than 512MB, download the unlimited version of the plugin and upload it to your WordPress plugins library.
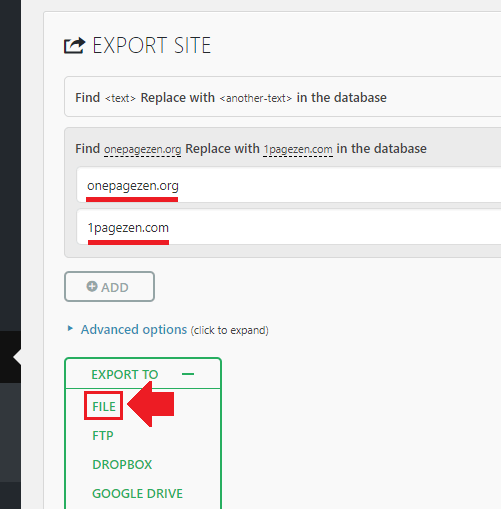
2. Export Website File
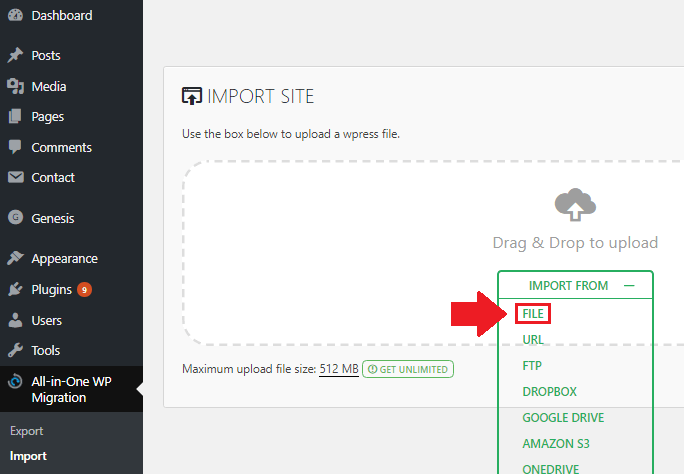
3. Import Website File
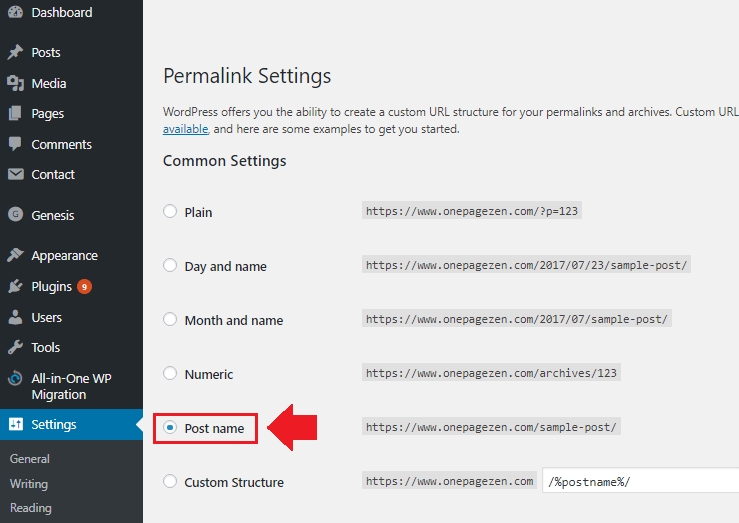
4. Change Permalink Structure
NOTE: After finishing with the WordPress migration, you can uninstall or deactivate the All-in-One WP Migration plugin.
Did it work?
If you have general questions or comments about this tutorial, please feel free to leave them below.
If you benefited from this tutorial, and would like to support One Page Zen, please like our Facebook page and subscribe to our YouTube channel.
Thanks,
![]()
Govind Singh says
Thank you for this tutorial. I have installed the wordpress to azure.
but now i want to install the lets encrypt ssl to it. can you please guide me how can i install SSL on this wordpress by bitnami
Leron Amin says
Check out this new Azure WordPress tutorial, which includes the steps for adding SSL certificates.
Sash says
Hello.
Thank you for the video.
How does it work if you are not changing domain names? You are transferring your site from .org to .com. What if you are just looking to migrate your .com site to be hosted on AWS?
Thank you,
Sasha
Leron Amin says
Hi Sash,
If that’s the case, then generate the All-in-One WP Migration export file without using the find and replace feature.
Let me know if you have other questions,
Joe
Rod says
Hello I’m trying to migrate a site from a multisite on a shared hosting to a new multisite on GCP. This plugin is not cheap for a multisite migration. Do you have any other options?
Leron Amin says
Hi Rod,
Multisite migrations are significantly more complex, and as of now I’m not sure of an ‘easy’ way to handle Multisite migrations.
If you find a good resource, please share it!
Thanks,
Joe
Carlos Gil says
Thanks for the tutorial! For me, it worked almost flawlessly. However, after the import was ready, I wasn’t able to log in to my site using either the bitnami generated username or the old username and password combination from the old site.
Leron Amin says
Hi Carlos,
You should be able to login using the credentials of the WordPress installation that you imported.
Were you using an email address for the login name? If so, this could be causing the issue.
Talk to you soon,
Joe
Bernard says
Great tutorial here. I am particular about migrating your WordPress website from a normal host to Google cloud platform host and using the all in one wp migration plugin. At the section were one enter your existing website URL in the Find field, and your new website URL in the Replace with field get me confuse. I have a website with example.com and I want to migrate to gcp, what do I do? If am using the all in one wp migration when I get to that section I pointed out ealier since I am still using the old domain name example.com. In additon,Is there also a video were to migrate your files and database manually. Thanks
Leron Amin says
Hi Bernard,
The find/replace functionality would be used in a situation where you were switching the domain name of a site. It could also be used in cases where you need to switch your website’s URLs from HTTP to HTTPS.
Also, I don’t currently have a tutorial on performing migrations manually.
Hope this helps and let me know if you have questions,
Joe
monscomp says
Thank you very much for the post leron, been looking for this from a long time. I’ve been reading your previous posts about the Google Cloud setup and installing the free SSL certificate and found them pretty useful. I could get free web hosting for 1 year and the server is performing pretty good. I’ve created a blog recently and been wondering what security policies I should apply to improve the Blog’s security. Any ideas?
Pushp Sood says
i followed all the instruction however now after adding dns setting and changing the ip to my website i.e. infoherd.com half of the settings in my WordPress in still showing the ip as my web address so tell me how can i fix this issue and replace the ip with my website name!
Thanks in advance
Leron Amin says
Hi Pushp,
If your WordPress URLs are showing your IP address instead of your domain name, you will have to connect to phpmyadmin and run the following UPDATE queries:
Also, remember to replace each instance of http://www.oldurl and http://www.newurl with the IP address and desired domain name, respectively.
See this post here for more information.
Hope this helps,
Joe
Pushp Sood says
yeah it worked but after the process completed onlu default permalink is working or the homepage..Plese provide a afix
Leron Amin says
Hi Pushp,
Please check out this resource and let me know if you’re able to resolve the issue.
Thanks,
Joe
Pushp Sood says
There are no steps to follow in the given link they are just giving different opinion but no one has defined how to acheive that
Pushp Sood says
Yes it worked… Thanks for sharing
Leron Amin says
Awesome glad to hear it worked! Which steps did you follow – I’m curious to know!
Thanks and talk to you soon,
Joe
Pushp Sood says
When to the file mentioned in the forum you sent and set it to all I guess
aki says
Good tutorial, i have just managed to migrate my WP website upon aws-ec2 which is reguz[dot]in but then earlier i did have SSL installed, is there any way to activate via SSH {Putty} to change.
P.S. i had skip the step “sudo nano /opt/bitnami/apache2/cpnf/bitnami/bitnami.conf”
Appreciate your work
Thanks!
Leron Amin says
Hi Aki,
Do you already have the certificates uploaded to your server?
If so, you should be able to add them to your bitnami.conf file, as showm in the SSL tutorial for Google Cloud. (see step 6 onwards of this tutorial).
Let me know if you have questions,
Joe
Mark Wattchow says
Hi,
Your tutorials are excellent – clear and step-by-step. Many thanks.
Over a year ago I set up a vm instance with Google WordPress Click to Deploy (Debian 8, PHP 5 etc.) and also set it up with the SSL certificate via Let’s Encrypt. The latest Click to Deploy uses updated software (Debian 9, PHP 7 etc). Rather than trying to update the software in my current instance, I’m thinking it may be easier to create a new instance and use the All-in-One plugin to migrate my WordPress website to the new instance, and then delete the old one.
Are there any specific things I need to watch for or do to make sure all the links and URLs remain the same after the transition? For example, I gather I will need to reassign the old external IP address to the new instance? And change the WordPress Address URL and Site Address URL in General Settings in the new instance? And set up a new SSL certificate again? Should I stop the first instance while I set up the new one? Anything else that might cause problems?
Any help would be appreciated.
Leron Amin says
Hi Mark,
This is a common practice, and one that I use frequently when my software components are out of date.
The most important thing to remember is to keep your IP address the same – so yes, as you mentioned, you will reassign the old IP to the new instance. This is a good practice to ensure your search engine rankings don’t take a hit after the upgrade.
And you shouldn’t have to change the WordPress site URLs if using the All-in-one WP Migration plugin – it should handle this for you.
Lastly, I don’t recommend stopping the old instance while you’re setting up the new one, as there is no reason to. If a no-downtime migration is essential for your project, you can simply copy the SSL certificates to the new instance. Otherwise, I would recommend just re-issuing the certificates with Certbot.
Let me know if you have any questions,
Joe
Bob says
Im facing a problem while importing.. it’s stuck at 96% while restoring.. it’s a 2GBs website, it’s stuck because I left it at 96% for 24 hours, after I closed the web tab, the site no longer available and is always down, I had to delete the instance and make a new one! Can you help please ?
Leron Amin says
Hi Bob,
In the past I’ve had problems using the All-in-One WP Migration plugin to migrate websites that are around 2GB in size, and have had to do the migration manually. Also migrating from a PHP5 to PHP7 installation can cause errors. What I would do is either reduce the size of your website (delete plugins/images/videos etc.) and then try again. The alternative is to do the migration manually.
Let me know if you have any questions,
Joe
Ernest Akpos says
Thanks Leron for this tutorial. I tried this and it worked without any problem. The only thing i noticed is that the new website loads slower than the old one. What could be the reason? As it is the same server spec
Leron Amin says
Hi Ernest,
I’m not sure what could be causing the issue. First I would make sure that your virtual machine is in a zone that is close to the majority of your website visitors, and also I’d make sure that you’re using SSD for storage and not HDD.
Let me know if you have any questions,
Joe
Josh says
Thanks for this awesome lesson, definitely will try this plugin, it seems very quick as to what you said.
Leron Amin says
Yea it’s a great plugin! Give it a try and let me know if you have any questions!
Fikistiqlal says
Hi,
I’ve read your all your tutorials about installing wordpress on Google Cloud. Thank you so much for sharing great stuffs!
I am planning to move all my sites to google cloud.
Do you have any tutorial on how to install multi wordpress on VM Instances ( 1 project). So I don’t have to create another project.
And also tutorial how to setup the second, third, or maybe four wordpress websites that being installed on one project.
Really great tutorials you have.
Leron Amin says
Hello,
Thanks for the feedback!
As far as installing WordPress on a single VM, the best solution is to use multisite.
I will be doing a tutorial on how to configure this in the near future.
I will post a link on the One Page ZenFacebook page when the tutorial is released!
Thanks,
Joe
Leron Amin says
Did this tutorial work for you?
Please share your questions and comments below!