In this tutorial you will learn how to setup Cloudflare CDN for your WordPress website on Google Cloud. When configured correctly, Cloudflare CDN can provide huge performance and security benefits for your website.
Serving your website’s content from CloudFlare’s CDN will lead to huge performance benefits, including shorter load times and protection from DDOS attacks.
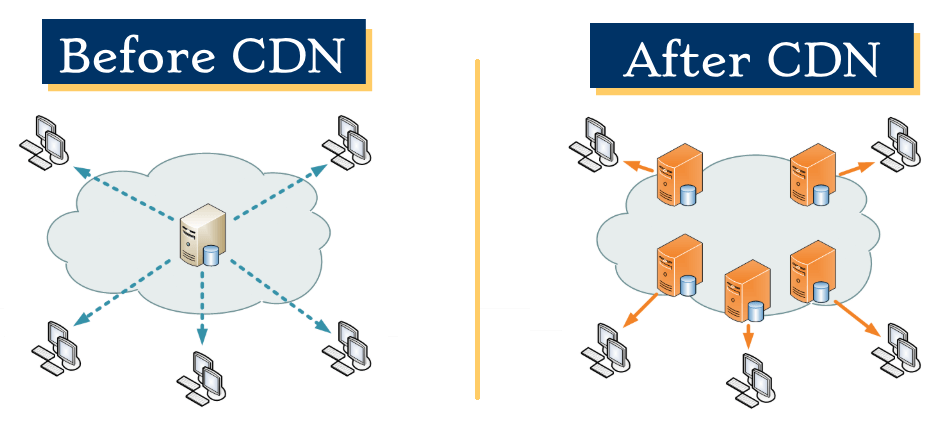
Benefits of using a CDN
A CDN is a network of globally distributed servers that store and distribute your website’s content.
With a CDN configured, your website’s content will load quickly for all users, regardless of their geographic location.
Getting Started
Before getting started with this tutorial, you should have already:
- Installed WordPress on Google Cloud
- Setup a Domain Name for your website
- Reserved a Static IP Address for your website.
- Configured SSL for your website (optional).
Keep in mind, if you don’t have SSL configured, you’ll have the option to apply Cloudflare SSL certificates step 3 of this tutorial. Learn more about the advantages and disadvantages of using Cloudflare’s SSL service with your CDN by clicking here.
There are 6 steps in this tutorial:
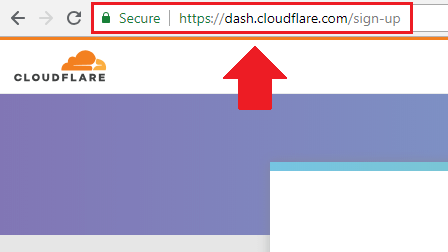
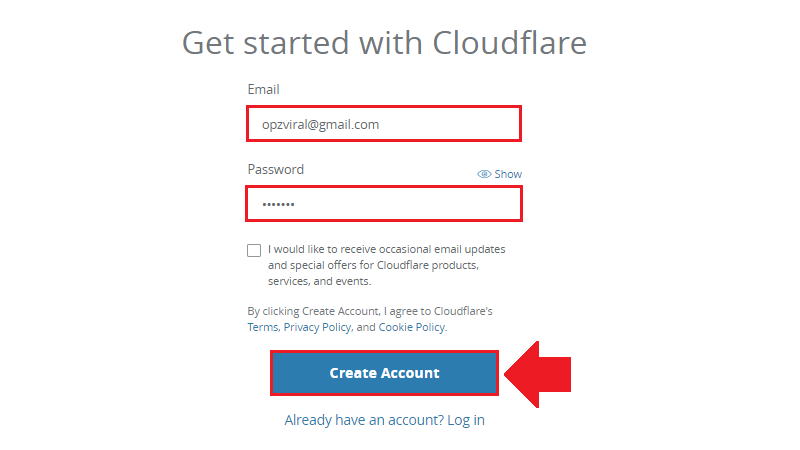
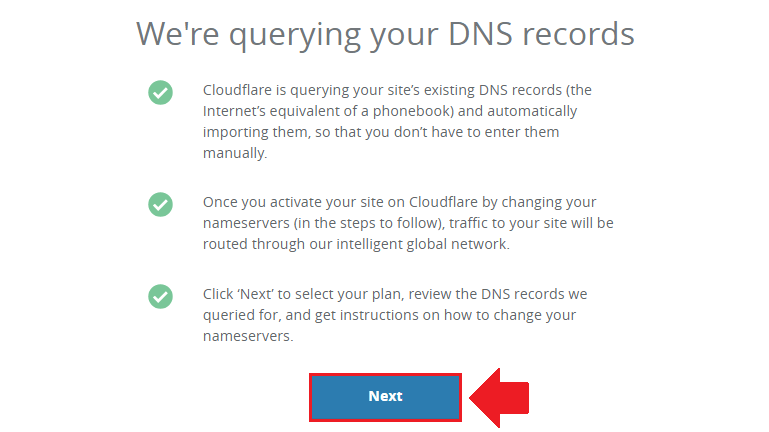
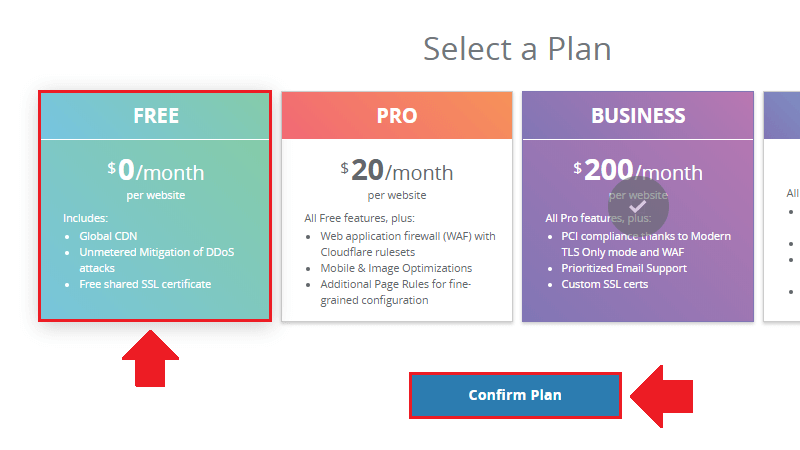
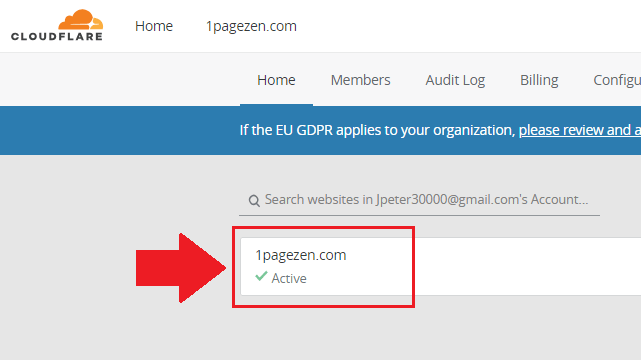
1. Create a Cloudflare account
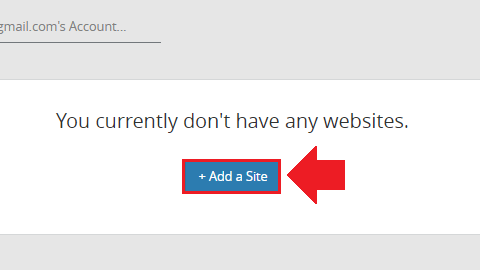

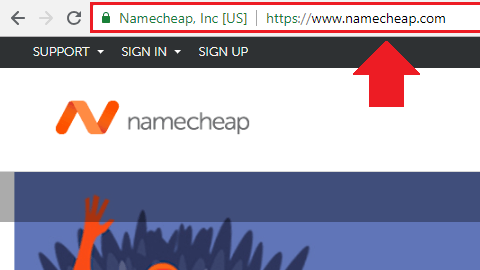
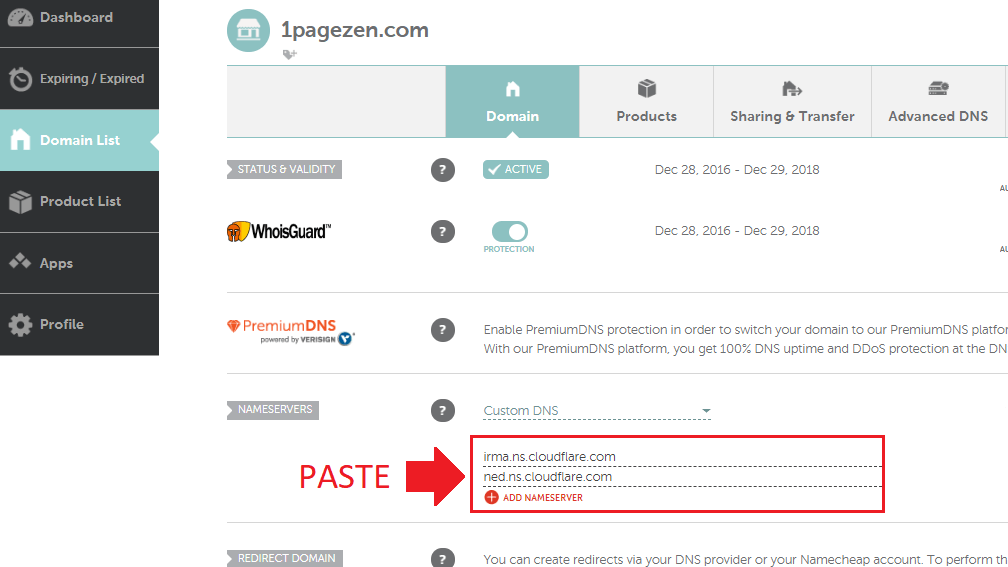
2. Change domain nameservers
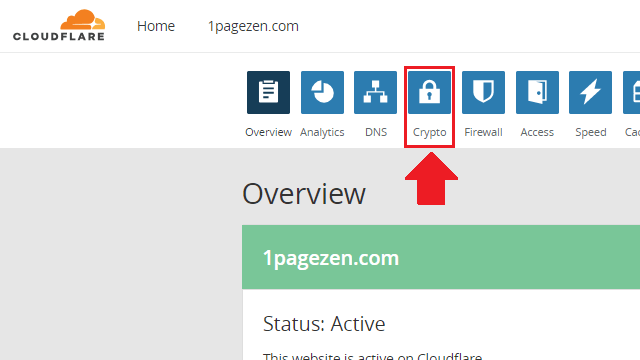
3. Configure Cloudflare SSL settings

Click here to learn more about the different SSL settings.
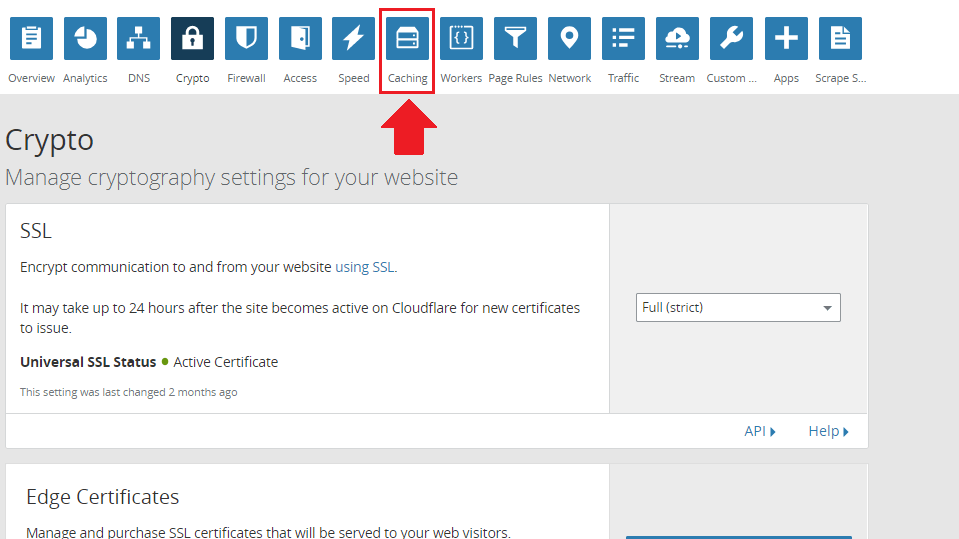
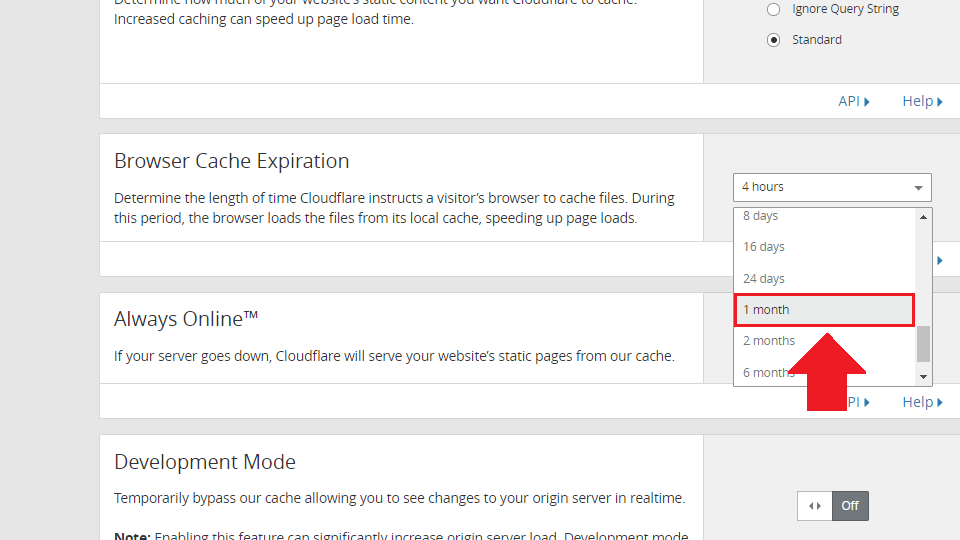
4. Configure Cloudflare caching settings
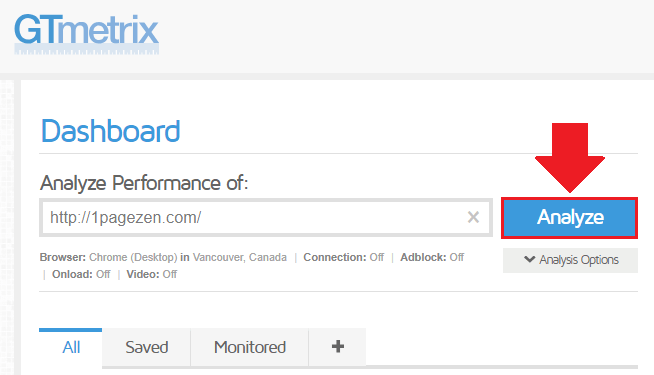
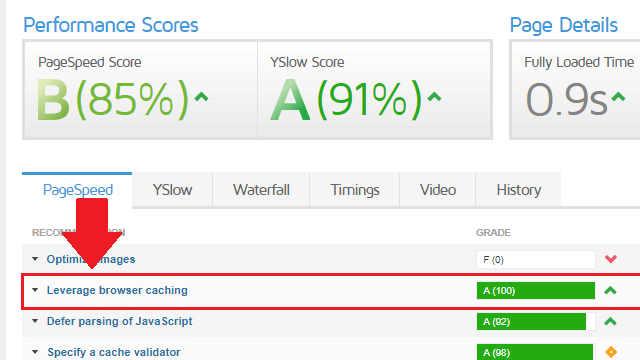
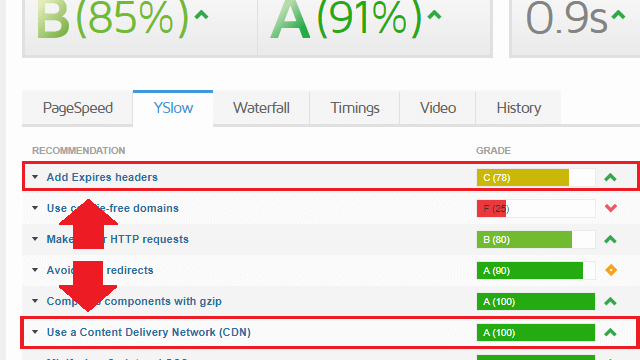
5. Test website performance
6. Additional considerations
Combining Cloudflare CDN and SSL
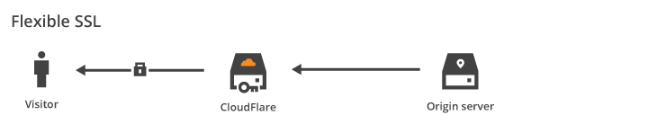
Cloudflare offers three separate settings for handling your website’s encryption with SSL. The three settings are Flexible SSL, Full SSL, and Full SSL (Strict).
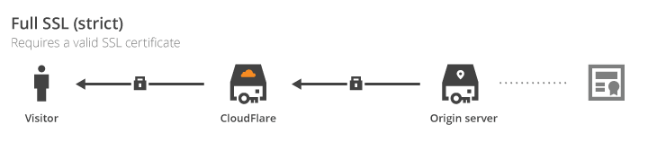
Full SSL (Strict) provides the highest level of SSL security, however, it requires that you setup SSL on your origin server beforehand.
-
1. Flexible SSL
-
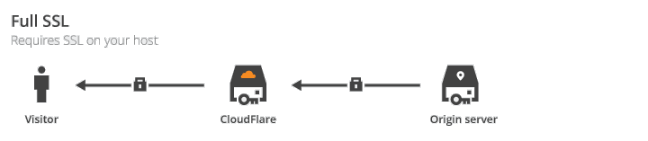
2. Full SSL
-
3. Full SSL (Strict)
Flexible SSL is the easiest setting for configuring Cloudflare’s SSL with your website, but unfortunately does not encrypt the connection between your website’s server and Cloudflare (your website will still show the green padlock).
Unlike Flexible SSL, the Full SSL setting provides encryption between your server and Cloudflare. The only drawback is that your connection between your server and Cloudflare isn’t authenticated.
Out of the three available settings, Full SSL (Strict) provides the highest level of security. Unlike Full SSL, the Full SSL (Strict) setting ensures than the connection between your website’s server and cloudflare is authenticated with a signed SSL certificate.
Which setting should you choose?
Try to avoid using the Flexible SSL setting. If you’re running any of the ‘pre-configured’ stacks from the Google Cloud solutions library, then it’s likely your server came pre-configured with self-signed SSL certificates. This means that the Full SSL setting is available to you by default.
We strongly suggest that people use Strict mode with a valid cert on their origin. –Nick Sullivan, Head of Cryptography, Cloudflare Inc.
However, if you want to take your security a bit further, you can use the Full SSL (Strict) setting. This setting requires that you already have SSL configured on your server (with valid certificates).
If you plan to use the Full SSL (Strict) setting but haven’t yet configured SSL certificates on your server, check out the SSL tutorials for the Click-to-deploy or Bitnami Google Cloud LAMP stacks.
References
- Recommended first steps for Cloudflare users
- How does Cloudflare work?
- Universal SSL: Encryption all the way to the origin, for free
- My TLS conundrum and why I decided to leave CloudFlare
- How to get your SSL for free on a Shared Azure website with CloudFlare
- Cloudflare’s great new features and why I won’t use them
- Why should I install mod_cloudflare?
- What are the disadvantages of using Cloudflare?
- Content Delivery Network (CDN) image provided via Privacy Canada
Troubleshooting
If you have any questions or comments, please leave them in the comment field below.
For troubleshooting support, be sure to check out the WordPress Cloud Hosting Support Group on Facebook.
![]()
Jon Samuel says
Hey great post – is cloudflare free?
Leron Amin says
Yes it is!
wpidn says
One tip, don’t forget about CF’s developer mode when you’re making changes. I’ve bashed my head against the wall for some time when my CSS changes weren’t showing up — CF was serving a cached page!
Leron Amin says
That’s a great tip wpidn – thanks for sharing!
Andrew says
Hi Joe,
I am trying to setup Cloudflare CDN with my GCP since GCP CDN keeps giving me 502 server error.
According to your video, I just need to replace NS of Registrar, which is Google Domain. Do I have to replace my NS of GCP DNS record too?
I am trying to find the answers, but could not find it anywhere.
Thank you
Andrew
Leron Amin says
Hi Andrew,
You need to change your nameservers at your registrar so that they point to Cloudflare.
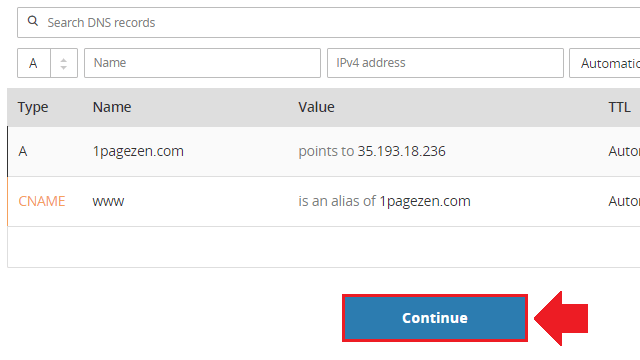
Once this is done, you’ll be using Cloudflare DNS. Keep in mind, you’ll still need to ensure that Cloudflare has an A record configured that points to your VM instance’s external IP address, and a CNAME record to handle the www. version of your domain. The good news is that Cloudflare will typically create these two records for you automatically, but you should still confirm that they exist. You can configure these settings by navigating to the DNS section of the Cloudflare dashboard.
Let me know if you have other questions,
Joe
Andrew says
Hi Joe,
I have changed the NS of Registar (which is Google Domain). Do I need to change NS on GCP too?
Thank you
Leron Amin says
Hi Andrew,
Leave your DNS records in Google Cloud as they are. You will however need to point your domain nameservers at your registrar to point to cloudflare’s nameservers.
Let me know if you have other questions,
Joe
Andrew says
Is there a reason using Cladflare over Google Cloud CDN? I am a newbie to this area please advise me!
Thank you
Leron Amin says
Hi Andrew,
Cloudflare offers advanced configuration options for your site, as well as DDoS protection – all as a free service.
You can still store and serve your images from Google Cloud multi-regional storage if you’re looking to take advantage of Google’s network for serving content.
Let me know if you have questions,
Joe
Jame Petchin says
I think this worked very well for me for the leverage browser catching now I got an image optimiser error how can I get this solved? will be very grateful for your help.
Leron Amin says
Hi Jame,
You should compress your images before uploading them to your site. One site you can use to achieve this is tinypng.
Keep in mind that you’ll never get the photos perfectly optimized, as doing so would mean sacrificing image quality. Your goal is to find a good balance between image quality and image file size.
With that said, don’t focus too much on your GTMetrix score – it’s simply meant to be used as a guide for improving your site’s performance.
Let me know if you have questions,
Joe
Bhupendra says
I have started using cloudflare on my website but now loading time of website increased.
Here is my website : https://htips.in
Before cloudflare laoding time was 0.7 Second but now I am using cloudflare and laoding time More then 5 Second
Check and let me know how can I reduce it.
Leron Amin says
Hi Bhupendra,
If your website load time increased that significantly, there may be an issue with your configuration.
Load your website in GTmetrix and check the waterfall tab – see which resources and/or bottlenecks are responsible for causing the increased load time.
Please reach out with any questions,
Joe
snachit says
I got a problem. I have installed WHM /CPanel on Google cloud and after 15days it is asking me to get the cpanel license. can it is possible to shift the entire cpanel thing to file zilla without loosing any data ?
Leron Amin says
Hi Snachit,
What exactly are you trying to accomplish? Are you trying to get your WordPress files off of cPanel?
If you’re no longer going to use cPanel, I’d recommend starting fresh and migrating your application to a new VM.
Let me know if you have questions,
Joe
Sajad Quadir says
This isn’t working for me. Levrage browser caching is showing same score 0 and header score also shows 0
Leron Amin says
Hi Sajad,
Did you restart your server after making the changes?
Let me know and I will help you troubleshoot!
Joe
Ayavuya Klaas says
Hey,
This is confusing me. When I change my nameservers to Cloudflare from GCP, which means I will be hosting with on Cloudflare. I wish to continue to host with GCP. But In need to fix this same problem.
Leron Amin says
Hi Ayavuya,
Your website is still hosted on Google Cloud even though you’re using Cloudflare’s nameservers. The only difference is that your website’s traffic is now routed through Cloudflare’s servers before arriving at your origin server.
Keep in mind that, within Cloudflare, you will configure an A record with the public IP of your VM instance.
Please reach out if you have further questions,
Joe
vaibhav says
great tutorial .. thanks for taking the time to share as well as keep the comments an interesting read
Leron Amin says
Happy to help – thanks for the feedback!
Abdullah Ali Abbasi says
Hi, Thanks for your great work dear.
I want to know that when I am using my godaddy domain on google cloud for Free Hosting, I have to use google name servers, Now if i want to use cloudflare, how can I use them together? As it will require me to change my name servers to cloudflare and I am already bound to keep them with google cloud.
Please help!
Leron Amin says
Hi Abdullah,
You don’t have to use Google’s nameservers, although I recommend it. If you want to use GoDaddy’s nameservers, you can simply point your domain to your Google Cloud instance’s IP.
Let me know if you have questions,
Joe
Nickie Oakwood says
Well am in a bit of a pickle now Joe haha. So swapped over to Cloudflare and now I get a 526 error when visiting the site. Allow me to explain:
Within GCP my static IP address is 35.232.98.85, my VM Instance also 35.232.98.85. All of this DNS worked fine and resolved to the site. Might I add I learned my way to get hosted on gcp with your site (top Banana).
So now when I check my SSL with SSL Shopper it all resolves ok to thenakedwordpress.com resolves to 104.28.26.170. So again I am seeing that my IP Address has now changed from 35.232.98.85 to 104.28.26.170.
Within GCP I can’t see anyway how to change the static ip address therefore I have left it as 35.232.98.85.
Do you have any idea how cloudflare has changed my IP Address? All of this through trying to simply renew a cert 🙁
In Cloudflare DNS the A Record shows 35.232.98.85 and makes no mention of 104.28.26.170. When I check website from IP Address my site resolves to 104.28.26.170.
Where 104.28.26.170 has come from and where to change it is driving me mad. I can’t change it all in GCP DNS because the static IP Address is locked to 35.232.98.85. Is there a way to change this?
When I tried to redo the cert in SSH I got message: It seems there is a valid certificate in the web server configuration folder. Please renew that certificate or generate new ones manually
For the life of me I can’t find how to.
And now after typing out all of this email (and doing loads of screensnips to create new topic in cloudflare community) it has gone and bloody worked. RESULT (don’t actually know what I did to fix it but it works).
Nickie Oakwood says
Hi Joe
Was looking at this and have a couple of questions
I have set up my site on GCP. I have also set up GCS and WP Stateless. I have set up a https Load Balancer for my bucket. So my images are served from Google CDN. If I move the site over to cloudflare does this mean that my images will also go so stateless will stop working and my images won’t appear?
Also, if Cloudflare are hosting my site do I still need to pay GCP?
Quality videos and site dude.
Leron Amin says
Hi Nickie,
Cloudflare isn’t hosting your website, it’s simply acting as a reverse proxy.
If your images are being served using the bucket’s default URL structure, then it shouldn’t be an issue. If you’re replacing the default URL structure with your custom domain, you may into issues that require additional configuration.
Have you tried implementing it yet? If so, how did it go?
Talk to you soon,
Joe
Denis says
Hello.
I think this is very helpful, my only issue is the cloud-flare, I keep getting error after connecting cloud-flare to my site until i got to take it off but i really need cloud-flare running on my site. If you can help me on this, i will be grateful.
Leron Amin says
Hi Dennis,
Provide details of the error and I will see how I can help.
Talk to you soon,
Joe
Brian says
I followed the click to deploy guide for implementing SSL with certbot using the guide you wrote up. Thanks for writing that up!
I enabled cloudflare with this guide on click to deploy on top of my certificate and enabled Full (Strict).
I also migrated my DNSSEC to cloudflare from Google Cloud. Everything is resolving properly when navigating to the URL of my website.
The problem I am encountering is when I type in the IP address of my website directly it bypasses cloudflare and shows that my site is not secure. Is it possible that my Let’s Encrypt certificate has been invalidated?
I can think of two solutions, but I am not sure if they are correct.
1. Implement Cloudflare Origin Pull, Adjust setting to Full (instead of full strict), possibly disable Let’s Encrypt Certificate for the new Cloudflare certificate?
2. Migrate DNSSEC back to Google, because there may be a problem with my DNSSEC on Cloudflare.
3. Is it possible my DNSSEC for Cloudflare did not require me to disable DNSSEC on Google Cloud?
I notice that their site indicates that I should have “Full” selected for origin pull, if I choose to set it up.
Thanks for any insight you might have.
Leron Amin says
Hi Brian,
Disable DNSSEC on Google Cloud and also on Cloudflare (if possible).
See if that fixes the issue, and let me know if you have questions.
Joe
Ivan says
Great !
But sometimes Cloudfare will actually slow down your website loading pages ..
Leron Amin says
Hi Ivan,
It’s possible that the system they use for checking bots may make result in slightly longer load times. However, the benefit to this is that your website is protected from DDoS attacks.
If you’re referring to something else, please provide more information/sources.
Thanks and talk to you soon,
Joe
Jay says
Hi,
Great tutorial!
I used this tutorial for my previous site and it worked great but on my new site I’m having a few issues,
After completing the steps my website no longer loads up. I keep getting page cannot be reached and I cannot get to wp dashboard.
The site is (www.uacademy.co.uk)
Any help would be appreciated.
Thanks
Leron Amin says
Hey Jay,
Were you able to get the issue resolved? If so – what was the issue?
Thanks and talk to you soon,
Joe
Jason says
Hi Leron,
Many thanks for your easy tuto.
However, I have an issue with cloudflare. Once the new servers configured on my domain name all emails sending to my domain name emails were lost in the nature :-)-)
So I remove the cloudfare dns and got restored the google originals DNS (my domain name as been registered with google domain).
But unfortunately, my wordpress website has disappeared now from the net. My browser can’t detect any IP address.
Help please.
Best,
Leron Amin says
Hi Jason,
If you opt to use Cloudflare, you will have to import all of your existing DNS records (for email, this would be your MX, SPF, and DKIM records) into Cloudflare in order for your configuration to continue to work correctly.
Let me know if you have any questions,
Joe
Leron is very awesome says
Can I have a tutorial request: how to setup multi country subdomain between cloudflare and gcp separate VMs?
I plan to build separate wordpress on separate VM for each subdomain or country:
Domain: leroniscool.com
VM01: Canada – ca.leroniscool.com
VM02: USA – us.leroniscool.com
IP Geolocate visitors if outside of these two options, go to leroniscool.com
Thank you so much in advance. Your website is cool, I am your die-hard fan!!!
Leron Iscool says
Do I still need to set up wordpress cache (W3TotalCache) or nginx cache?
Leron Amin says
No – you can handle these configuration settings in your Cloudflare dashboard.
Leron's die-hard fan says
I haven’t done this. But, is there option to not cache some pages on cloudflare (e.g. carts, checkout, wpadmin, etc.)?
Leron Amin says
Cloudflare provides free accounts with a few page rules which you can use for advanced caching configurations.
Ale says
Please help, I get this error every time “ERR_SSL_VERSION_OR_CIPHER_MISMATCH”. I’ve followed the video and I have a ssl aldrey active.
Leron Amin says
Hi Ale,
This is a common error with Cloudflare. Check out this resource for more information.
Let me know if you have any questions,
Joe
Jack says
Hi Joe,
first of all i would like to thank you a lot for your tutorials, it´s amazing how much i learned in the last weeks setting up my first WordPress site on google cloud host!
Since i installed the CDN i can see an improvement in siteload speed from different countries, but still not the speed i wish to get. Many people here are requesting a tutorial on google cloud CDN and I would also really appreciate that one too 🙂
But in general, is it possible to run a website on google cloud on two machines?
In my case: I want to target customers in Germany and in the USA. I chose a machine in Frankfurt, which gets me a decent siteload time for tests from Germany, if i try from the US its still way to long, even with the CDN. I would not mind paying for a second machine in the US, if it gets me the same speed. Do you know if this is possible?
Kind regards,
Jack
Leron Amin says
Hi Jack,
If you have shared website traffic between USA and Germany, then running instances in both of these regions would definitely improve your website’s performance. To do this, you could create an HTTPS cross-region load balancer to direct traffic to either your USA or Germany instances, depending on your user’s proximity. With the load balancer configured, you could then enable Google Cloud CDN.
Other ideas to consider are using Cloud SQL as your database solution and configuring the WP Stateless plugin to serve your WordPress static content from multi-regional storage; this would therefor serve as your [very fast] CDN.
You should note that these types of configurations are expensive, which is why it’s important to factor cost/performance. Google Cloud has a tutorial covering the basic load balancing concepts in the documentation if you’re interested.
Also, check out this resource for more information on Google Cloud CDN.
Hope this is helpful, and let me know if you have any questions.
Joe
Mukesh Rana says
Hey Jo, Can you please make a video on google cloud cdn. Thank You.
Leron Amin says
Yes – will do in the future! Thanks for the suggestion Mukesh!
Andrew says
I’m trying to get this working with a Google Compute VM Instance – WordPress Click to Deploy, but I’m getting a cloudflare 521 error trying to connect to the google static IP. Any ideas on how to get this working?
I’ve gone back to using our old host for the time being until I can get this google vm working.
Leron Amin says
Hi Andrew,
Since you’re using your old host in the meantime, here is how I would approach the problem:
1. Get a cheap domain for testing purposes.
2. Launch a WordPress install on a new VM.
3. Make sure the domain and URL are configured properly with Google Cloud, then migrate to Cloudflare.
Although it is recommended to have SSL configured before migrating to Cloudflare, you could migrate to Cloudflare and then use Cloudflare’s SSL service, as this will save you a step and simplify the process.
Let me know if you have any questions,
Joe
ali says
sir i have question i am using google cloud wordpress hosting and dns i i add in godaddy dns server if i remove and i put cloudflare dns there then my website still work or no becuse my google cloud dns removed. please answer me fast brother.
Leron Amin says
Hi Ali,
Before configuring Cloudflare and changing your GoDaddy namerserver to point to Cloudflare, you need to ensure that your website is working properly on it’s own, either with or without SSL configured.
Let me know if this answers your question!
William says
Hello,
I changed mydomain’s nameservers to Cloudflare’s and I enabled Flexible SSL (Didn’t set up SSL with “Let’s Encrypt” or anything before that). After a few hours it said the SSL certificate was active so I browsed my website and it wasn’t redirecting to HTTPS so I went into WordPress settings and changed both link from http://oneprivateip.com to https://oneprivateip.com.
Right after clicking “save” the page doesn’t load.
Firefox: “The page isn’t redirecting properly. An error occurred during a connection to oneprivateip.com. This problem can sometimes be caused by disabling or refusing to accept cookies.”
Chrome: “This page isn’t working. oneprivateip.com redirected you too many times.”
Internet Explorer: “Hmmm…can’t reach this page. Make sure you’ve got the right web address: https://oneprivateip.com”
It seems what’s happening to me was covered by an article from cloudflare (https://goo.gl/AXQGtk)
“Additionally, please ensure that there is no redirect set up at your origin from http to https, as this specifically would cause the redirect loop.”
I want to switch back the links to HTTP in WordPress settings but because of the above I have no way to access the admin page. Is there a way to do it with SSH or any other solution?
Thank you for everything you do!
Leron Amin says
Hi William,
You can force change your domain by following the instructions in this article here.
Depending on which WordPress stack you’re using, you will have to navigate to the WordPress directory that is housing all of your files, then edit your current theme’s functions.php file (the second method from the link above).
Alternatively, try fixing the redirect loop, which is likely in your wordpress.conf file (Click-to-deploy) or bitnami.conf file (Bitnami), and it looks like this:
Delete those lines, save the file, restart Apache, and it should (hopefully) fix the problem.
Let me know if you have any questions,
Joe
Bruno A. Jimenez Reyes says
Hi,
great tutorial, although I have my doubts that adding an extra layer of complexity to the excellent Google Cloud Infrastructure could add perceived benefits.
For now I won’t implement the excellent Cloudflare into my project, since I’m pretty sure it will mess up with other things (like page cache, AMP, CDNSEC, etc…) and the marginal (over Google Cloud Hosting) speed and security improvements doesn’t really worth it.
Enargo says
Hi. Have a question… If nothing is changed in YSlow Score where i can do something wrong… your tutorial is pretty straightforward. Maybe i can hire you to setup it for me or… i don’t know.
Leron Amin says
Hi Enargo,
Unfortunately you won’t notice any improvement right away, as CloudFlare needs time to identify where to cache your content.
That being said, you also won’t notice any improvement if your’re running a test from a server that is located close to your origin server (aka the primary server location where your website is hosted). For instance, if your Google Cloud instance is being hosted at a US West region data center, and you run a GTMetrix test from the GTMetrix default location in Vancouver, then your load time will be extremely fast regardless of whether or not a CDN is enabled. The real purpose of a CDN is to cache your website’s content in locations that are far from your origin server – say in Japan, or Europe. As Cloudflare monitors the location of your website’s traffic over time, you will notice that your content is being cached and served from locations closer to these ‘international’ users.
So – my advice is to wait a week or two, then test your website using a website tool that checks your website’s load times from multiple servers across the globe. I recommend this tool.
It won’t be long before you notice your website’s load times decreasing for your international visitors!
Please reach out to me if you have any questions,
Joe
Deepak Jangra says
It was a bit more complicated step than other guides! But all THANKS TO YOU LERON AMIN..!
Leron Amin says
Thanks for the feedback Deepak! 😀
Mark says
Hi Leron,
Thank you for doing a great job with the whole tutorial. I was able to do the hard part from installing wordpress all the way to setting up SSL correctly.
With setting up the CDN, when I add my domain to cloudfare, it is giving me “This zone is banned and cannot be added to Cloudfare at this time.” What’s causing this?
Thanks,
Mark
Leron Amin says
Hi Mark,
I did a Google search for the issue, and it doesn’t look like there is a simple fix.
From what I’ve read, you’ll need to contact CloudFlare support.
Let me know if you have any questions,
Joe
Ay says
Hello My Friend
I waiting for this tutorial for a long time
what is your opinion in using google cloud CDN or Cloudflare CDN?
I am still waiting also for the tutorial of using google cloud CDN
Great Work Leron your are working in the right way
Leron Amin says
Hey Ay,
I’m glad to hear you were anticipating the tutorial.
Both CloudFlare and Google Cloud CDN have incredibly advanced and expansive networks. So between the two, it really comes down to specific use cases, because their performance metrics will be comparable.
Now the reason I really like CloudFlare CDN is because it’s a free service and is easy to set up. It also comes packaged with additional features such as cache configuration, one-click SSL, Always Online, and DDos protection – to name a few. On the other hand, Google Cloud CDN offers more flexibility than CloudFlare – but is also significantly more difficult to configure. For that reason, it’s a service that should be ‘grown into’ only when necessary. On One Page Zen, most of the tutorials center around using persistent disk images to host static content – this makes it easier for beginners to get started in the cloud, but also doesn’t fit the CI/CD model that Google Cloud CDN was built to support.
In the future I will do a load-balancing tutorial on running WordPress in an environment where you’re pushing code changes to multiple VM’s, as this would be a use case that would fit best with using Google Cloud CDN over CloudFlare.
Hope this information was helpful, and let me know if you have any questions.
Joe
Alvin says
Dear Joe,
Thanks for the blog!
I am really interested in the load-balancing tutorial where you push code changes to multiple VMs
Leron Amin says
Hi Alvin,
This is a great idea for a future tutorial, and is something I will look into!
Thanks for the suggestion,
Joe
luis says
After setting all this up, Gtmetrix tells me to avoid landing page redirects – how is that corrected in bitnami wordpress?
Leron Amin says
Hi Luis,
Landing page redirects will occur whenever you set a preferred version of your domain.
For instance, if you set your preferred domain to the non-www version of your domain, then your users will be redirected to this version of the domain whenever they visit your website with the www prefix.
The GTMetrix notification is simply a making a point that these redirects slow down your page load time – which they do – but there’s not much that you can do about them. The only workaround I can think of would be to run identical instances of your website from both the www and non-www versions of your domain.
Hope this answers your question,
Joe
Mark says
Hi Leron,
Thank you for this another very detailed and useful tutorial.
Yay! I successfully installed CDN on my website for free.
Leron Amin says
Hey Mark,
Thanks for the feedback – I’m glad to hear the tutorial worked for you!
Joe
Leron Amin says
What did you think of this tutorial?
Share your questions and comments below!
Sohanlal Kushwaha says
I changed name server but can not load my site..
Leron Amin says
Hi Sohanlal,
What have you you done so far to troubleshoot? What type of error do you see when trying to access your website?
Talk to you soon,
Joe