WordPress runs great on Google Cloud Platform, however, choosing between the two available options for installing WordPress on Google Cloud Platform can be difficult.
Choosing which version of WordPress to run on Google Cloud is a decision that should be considered carefully.
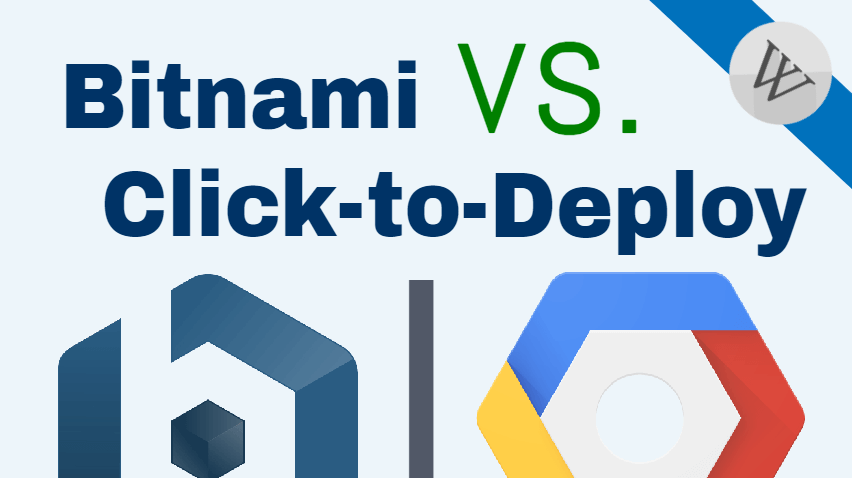
Your first option is the WordPress stack configured by Bitnami, and your second option is Google Cloud’s default Click-to-Deploy WordPress Stack.
In this post, we will compare the Bitnami vs. Click-to-Deploy versions of WordPress on Google Cloud Platform side-by-side, so that you can choose the option that will work best for you.
In this comparison, we will examine:
- 1. Software Stacks
- 2. User Experience
- 3. Default Pricing
- 4. Final Thoughts
1. Software Stacks
Although the Bitnami and Click-to-Deploy WordPress stacks are very similar, you’ve probably noticed a few key differences. As you can see from the comparison, the Bitnami WordPress stack includes additional software components that aren’t included in the Click-to-Deploy version.
Unlike the Click-to-Deploy version of WordPress on Google Cloud Platform, the Bitnami version comes equipped with some additional software including SQLite, Varnish, and OpenSSL.
![]()
SQLite
As the name implies, SQLite serves as a simple database solution for small to medium size websites. It’s simple to use, lightweight, and can be used as a standalone option on most platforms.
Check out these resources to learn more about SQLite:
Database comparison: SQLite vs MySQL vs PostgreSQL

Varnish
Varnish is an HTTP cache server solution that is used by website and hosting companies due to it’s powerful features and flexibility. It offers increased functionality as an HTTP cache solution over the built-in web server HTTP cache solution.
Check out these resources to learn more about Varnish:
The role of Varnish in a WordPress server stack
Using Varnish: a comprehensive tutorial
![]()
OpenSSL
OpenSSL is an open source software package that implements SSL and TLS protocols for conducting secure communication over digital networks.
Check out these resources to learn more about OpenSSL:
2. User Experience
Although both stacks offer a similar user experience, there a couple of key differences regarding accessing phpMyAdmin and configuring WordPress settings.
Accessing phpMyAdmin
In the Bitnami version, phpMyAdmin is only accessible locally via SSH tunnel. Although this requires additional work to configure, it provides an extra layer of security for your website.
With the Click-to-Deploy version, phpMyAdmin is accessible directly from your domain by default. This potentially leaves your website more vulnerable to Brute Force Attacks, since there is no limit to the amount of times a user can attempt to login via the phpMyAdmin dashboard.
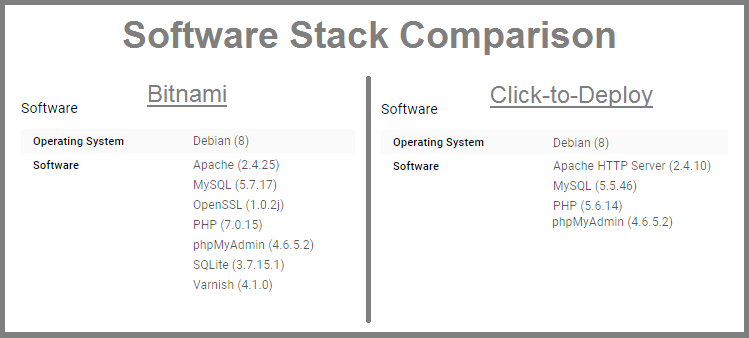
Configuring WordPress settings
By default, changing your website’s URL via the WordPress settings page is not enabled in the Bitnami version of WordPress on Google Cloud.
The recommended method to change your site’s URLs is to edit the default settings within your wp-config.php file.
In the Click-to-Deploy version, you can change your website’s URLs directly via your WordPress General Settings page, which is standard in most WordPress configurations.
3. Default Pricing
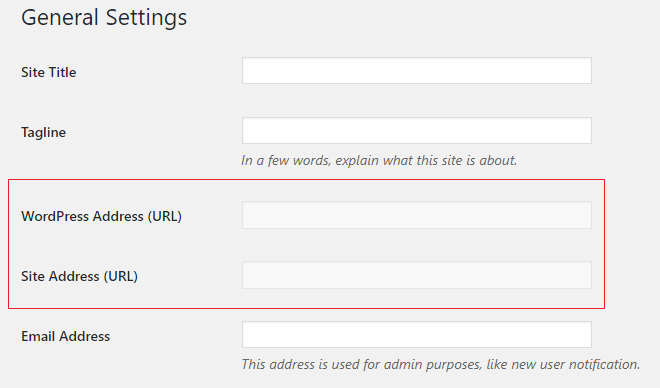
Both the Bitnami and Click-to-Deploy versions of WordPress can be configured to operate at a cost of around $6/month. However, the default configurations are different:
The recommended machine configuration for WordPress on Google Cloud would be a 1 vCPU + 3.75 GB memory machine, as configured in the Click-to-deploy version.
If you run WordPress with a 1 shared vCPU + 0.6 GB memory machine, you will likely receive a message that your machine is being over-utilized.
4. Final Thoughts
In conclusion, both the Bitnami and Click-to-Deploy versions are are suitable options for deploying WordPress on Google Cloud Platform. However, both options are configured differently, and choosing the right one depends on your particular situation.
![]()
Why choose Bitnami?
The great thing about using Bitnami is that their configurations are nearly identical across most of their stacks. So once you’ve learned how to deploy their version of WordPress on Google Cloud, you could just as easily deploy their Moodle or Drupal stacks.
Another great thing about using Bitnami’s stacks is that they offer free technical and extensive documentation for all of their stacks. Unfortunately, Google Click-to-Deploy offers neither of these great features.
Finally, if you’re new to the cloud, Bitnami might not be the best option for you. The Bitnami version requires more back-end configuration than the Click-to-Deploy version and therefor takes more time and technical know-how to set-up.
Click here to get started with the Bitnami version.
![]()
Why choose Click-to-Deploy?
The great thing about using Click-to-Deploy is it’s simplicity. You can have a WordPress site up and running in a matter of minutes, without ever having to configure your site from the back-end.
The main drawback to using the Click-to-Deploy version is that Google doesn’t provide any documentation for it’s Click-to-Deploy solution, nor does it offer free technical support.
Click here to get started with the Click-to-Deploy version.
Conclusion
If you’re new to Google Cloud and are looking for a simple option for deploying your WordPress website, choose Click-to-Deploy. Over time, you will inevitably be required to learn how to configure your website from the back-end as your website grows.
If you have grand ambitions for your WordPress website and want to harness the full power of cloud computing from the beginning, choose the Bitnami option. However, this option requires a significant time investment to learn how to configure your site from the back-end.
Dave Holmes says
Thanks for this. I am looking to move from Shopify to either AWS or GCP with WordPress/Woocommerce. I had spun up a click-to-deploy and a Lightsail and was looking for the best options, I am trying to favour GCP. Bitnami name came up a lot so I wanted to see what they offered in this space, your insight into the differences on GCP was just what I was after.
Leron Amin says
Hey Dave,
Thanks for the great feedback! I’m glad to hear the article helped you in making a decision.
Good luck with the migration, and please reach out if you have questions,
Joe
Amit Manna says
Thank you for the Great article. I recently migrated my WordPress site in google cloud. I use Bitnami for WordPress website. Its amazing speed.
Leron Amin says
I’m glad you’re seeing the performance benefits from migrating to the cloud!
Mark Rayney says
Hi Joe. Thanks for all the google cloud tutorials much appreciated, I have a website with 200k posts and its running super slow on a vps. Do you offer a transfer a website to the google cloud service where you set it up and then transfer the website to the cloud and if so how much?. Many thanks
Leron Amin says
Hi Mark,
I don’t offer migration services, but I know a lot of the managed hosting providers will do migrations for free if you move to their service.
Good luck and let me know if you have questions,
Joe
Mark Lambert says
Heh… as an alumni of the C2D team this was a really interesting read. Extremely cool to see this particular comparo from an external perspective!
Leron Amin says
Awesome to hear feedback from an actual member of the C2D team – thanks for sharing!
Osha says
Thank you Joe for your wonderful work. I wish I c Magento set up on your website soon
Leron Amin says
Thanks for the feedback Osha – this is something I will look into!
Alvin says
Dear Joe,
Thanks for the blog. Will you suggest bitnami compared to click-to-deploy as a more complete solution for beginners?
Leron Amin says
Hi Alvin,
Great question!
I find that Click-to-deploy is a better option for getting up and running quickly. Overall, I would probably recommend Click-to-deploy over Bitnami, simply because the process of upgrading individual components with Bitnami (PHP for example) is such a huge headache.
That being said, if you’re trying to create a highly performant solution with many built-in tools, then Bitnami might be a better solution. They also have a friendly community-support forum.
Hope this helpful and let me know if you have any questions,
Joe
Edu Raymundo says
Dear Friends
I want to congratulate you for the great work you do in favor of the thousands of users who venture into new technologies. Thank you very very much.
I am writing to know if it is possible to connect remotely to the mysql database of a wordpress installation, I have tried to access from my pc creating a user and giving total privileges to it for access, not being able to.
I’m sorry to steal a bit of your time, and please ask them if they could help me out
Leron Amin says
Hi Edu,
You can use the gcloud command line tool to connect to remote instances from your local machine. To use the gcloud command line tool, you must first install the Google Cloud SDK.
After you’ve installed the Google Cloud SDK, open the terminal on your local machine, and enter the following command to authenticate your machine with your Google Cloud project:
gcloud auth login
After authenticating, run the following command to connect to your vm instance, remembering to replace [instance-name] with the name of your instance:
gcloud compute ssh [instance-name]
Once connected to your instance, run the following command to connect to your MySQL database:
mysql -u root -p
Let me know if you have any questions!
Joe
John Mejia says
Joe
thanks for the tutorials.
Do you have a tutorial for Bitnami multisite version running on the Google Cloud Platform?
Thanks
Leron Amin says
Hi John,
I don’t have one yet but will soon – I’ve had a lot of requests to make one!
Thanks,
Joe
Jo Osler-lane says
Hi Joe
I have to say that most of the documentation on Google Cloud Platform had me baffled but your tutorials have made me look at more difficult solutions and miraculously understand most of it. Though I do have to walk away sometimes and come back to it. My problem is I have to build the website quickly then upload it to the web. I did start to build using HTM, CSS and PHP but got confused with a registration form verification so sought out advice from another developer who suggested WordPress. I’m glad I did as there is a lot out there to help, especially yours on GCP.
I will have to use Click-to-deploy but move to Bitnami when I have more time to learn. My problem is; I need to use a Google domain name on a secondary domain platform ie: example1.com onto example2.com platform. Do I need access to the first domain name DNS?
I’m sorry this is so long winded but I had to congratulate you first on the great tutorials before asking a mundane question.
Jo
Leron Amin says
Hey Jo,
Thanks for the feedback – I’m glad to hear the tutorials have been helpful to you.
If I understand your question correctly, then yes – you will need the first domain name DNS.
Let me know if you have any questions,
Joe
remmelkemp says
” If you run WordPress with a 1 shared vCPU + 0.6 GB memory machine, you will likely receive a message that your machine being over-utilized. ”
I used bitnami for my site and I got this message. My site has less than 10 visitors a day. Should I upgrade ?
Leron Amin says
Hey Remmel,
I wouldn’t worry about it. You can check your machine CPU and other statistics from the GCP dashboard. If all of those metrics look good, I wouldn’t bother upgrading. That being said, make sure to execute the
dfcommand in your terminal ocassionally, in order to ensure that your VM has an adequate amount of disk space available to it.Talk to you soon,
Joe
remmelkemp says
Thanks for a quick reply. I am not a technical person. Will you please tell step by step instructions for doing above ?
Leron Amin says
Hi Remmel,
No problem!
From your Google Cloud dashboard click the hamburger menu in the upper-left corner of the screen. Then scroll down the sidebar menu to Compute Engine > VM Instances. This will take you to your VM instance dashboard which shows all of the virtual machines running in your project.
Next, click on the virtual machine that is running your website, then at the top of the page that loads, you will notice two tabs at the top of the page – one of them says “Details” and the other says “Monitoring”. Click on the tab that says “Monitoring”, and that will load the screen with all the graphs/metrics which represent your virtual machine’s performance.
Regarding the
dfcommand – execute the command in your terminal as you would any other command. Look at step 1 of this tutorial for instructions on how to execute commands in the SSH terminal.Let me know if you have any questions,
Joe
Veena Lee says
Hello Joe,
Thank you very much for creating onepagezen.com
The guide is excellent and I could not even find a close substitute to it.
Do you know why is there such a vast difference between the recommended machine configuration between Google click to deploy and Bitnami?
How do I prevent being bruteforce on the phpmyadmin if I use Google click to deploy?
Leron Amin says
Hey Veena,
I am not sure why the default machine recommendations are different. The Click-to-deploy suggestion is overkill for most WordPress websites, so I would recommend going with the Bitnami suggestion (which is closer to $5-6 dollars per month).
To prevent brute force, try using a product such as Fail2Ban [1][2].
Let me know if you have any questions,
Joe
Yudi says
Hi Joe.
I must say that it is great tutorial. I ask many people to develop my business website in Google cloud but they rejected and suggest me another managed hosting. So it forced me to develop by my self. I’m completely new about build a website, even WordPress. And you’re right at point “Learning how to configure websites on Google Cloud takes a lot of time and can be frustrating”. Luckly Google give $300 credit on free trial so I take that as “free learning cost”. Now, I’m ready to launch my first website on one click deploy Google cloud. Next I’ll learn about deploy on bitnami. Thanks Joe. I’m really motivated. I hope I can contact you personally, just for sharing and learn.
Leron Amin says
Hi Yudi,
I’m glad to hear that you’ve learned a lot! And I know it can be frustrating at times, but once you get a grasp on how to host your websites in the cloud, you will have lots of options available to you – so I’m glad to hear that you’ve persevered.
As always, feel free to reach out to me if you ever have any questions!
Thanks,
Joe
Swapan Kumar Manna says
Hello,
I have installed WordPress in Click-to-Deploy. Is there any way I can move it to Bitnami without hurting the live visitors?
Leron Amin says
Hi Swapan,
Create a separate Bitnami instance and migrate the WordPress database from the Click-to-Deploy instance to the Bitnami instance. Then, in your Cloud DNS, change the A record IP address to the IP address of the Bitnami instance instead of the Click-to-deploy instance; this will result in only a couple of minutes of downtime.
Hope this helps,
Joe
Luis says
Hi,
Would you kindly post a list of your existing tutorials that a beginner on Bitnami for GCP needs to follow to launch a wordpress site or multisite?
Leron Amin says
Hi Luis,
Here is a guide for configuring WordPress on Google Cloud (Click-to-Deploy).
You can use the same framework alongside the Bitnami tutorials if you choose; tutorials 1 and 6 are the only ones that will be different. 🙂
Talk to you soon,
Joe
Rob McDonald says
Hey Joe, first time here. Looks like you are doing some great things with these tutorials for Google Cloud.
As I am new to Google Cloud, it took me a couple of minutes to understand what you were talking about with “click to deploy” I was confusing it with the Bitnami launcher vs the Google launcher.
I am not sure why anyone would use the Chick to deploy options as it appears to install the older versions of the software, whereas the bitnami option installs the new versions.
Having said that, what are your views on installing with the Bitnami cloud launcher, verses the Google cloud launcher. I have tried both ways, and it seems that the bitnami launcher is easier to use, but you do have to have a bitnami account for this. And your credentials are in the bitnami account. Are there any drawbacks to either way??
Thanks,
–Rob
Leron Amin says
Hi Rob,
I prefer the Bitnami stack. They have in-depth documentation and also provide top-notch customer support. The Bitnami version, however, requires more back-end configuration than the Click-to-Deploy version to setup initially. Check out this article that I published about the significant differences between the Bitnami and Click-to-Deploy stacks. Also, I don’t believe you need a Bitnami account to install their WordPress solution – you can install it directly from the Cloud Launcher menu.
Let me know what you think!
Best regards,
Joe
Joseph Abraham says
Great article. Love what you guys are doing. Keep it up.
Leron Amin says
Hey Joe,
Thanks for taking the time to comment – I appreciate the feedback!
Let me know if you have ideas for future tutorials or ever have any GCP-related questions!
Thanks,
Joe
Benjamin Waller says
Hello Joe,
Thanks for this excellent article. It is very useful and interesting reading. I think the Bitnami is probably the better way to go for me for 3 main reasons; the community support and documentation plus the added security you mentioned because phpMyAdmin is only accessible locally via SSH tunnel. Although there might be a steeper learning curve I don’t think it would be unachievable particularly when there are a few avenues to get help when troubleshooting.
It was good to point out the other features of the Bitnami stack such as the additional software with links to more information. But one things I don’t really understand at the moment is whether these apps are being used automatically such as the Varnish Cahe or they are included but would need to be configued in order to make use of them?
For instance in your tutorial on SSL Certificate setup for WordPress on Google Cloud Bitnami https://onepagezen.com/ssl-certificate-setup-for-wordpress-on-google-cloud-bitnami/ are you using the capabilities of OpenSSL app?
Overall, you have offered an excellent article which has helped me to understand the differences between these two Stacks.
Leron Amin says
Hey Benjamin,
Thanks for commenting!
You raise some good questions. I think that varnish has to be configured separately – and I honestly haven’t worked with it before. I know it offers a great deal of functionality though, which would probably be more valuable as a cache option for enterprise-level websites with heavy traffic that demand greater control.
As far as the SSL certificates, the Bitnami DOC recommends OpenSSL for certificate generation, but in the SSL tutorials that I published I use Let’s Encrypt in it’s place. There is no reason anyone should have to pay anything for basic SSL encryption.
Also – I checked out your site and I really like the clean design; well done!
I like how you connected the teacher profiles with maps, it worked really well and reflected a great deal of legitimacy and professionalism for your organization.
Thanks again for commenting and talk to you soon!
Joe
Benjamin Waller says
Hi Joe,
Thanks for replying. Appreciate your comments. I have just used WordPress theme (X Theme) and added some small modifications so it’s ok and clean but to be honest I think some of the context could be a little better organised, and imagery rethought to make it really schmick so I will do a revamp fairly soon. And, I will try out building it on the Bitnami GCP 🙂 When I do I’ll share a link so you can check it out.
Thanks again for these excellent tutorials. I noticed you posted another today! Keep up the great work.
Regards,
Ben
Leron Amin says
Hi Benjamin,
It looks like a good theme! I’ve never worked with it before but it looks really clean and simple.
Good luck building it out on Bitnami GCP – let me know if you have any questions and I will see how I can help.
Who knows, you may want to integrate their Moodle stack with your website at some point. The great thing is once you’ve learned to configure one stack on Bitnami, you can pretty much configure them all.
Talk to you soon,
Joe
Dieuseul Lorgeat says
Great, great tutorial, I pretty new at Google cloud but not afraid to learn. I have a video website where people can either paste from youtube or upload their video file, right now I’m building it on Namecheap but something tells me that I might need more space and processing power in the future, do you think I should transfer it to the Google cloud? thk you.
Leron Amin says
Hi Dieuseul,
Learning how to configure websites on Google Cloud takes a lot of time and can be frustrating, but you’ll be amazed at how much you learn!
What I would recommend is building your existing website on NameCheap, and then building another website on the side using Google Cloud. This will help you to get comfortable with the platform without putting your site in jeopardy, as it’s easy to “screw things up” when you’re starting out on Google Cloud. Either way – feel free to get in touch if you ever have any questions, I’m always happy to help!
Best of luck!
Joe
Dieuseul Lorgeat says
Thank ou for answering so quickly, yeah I think you’re right, I’m gonna launch the site on Namecheap for now.
If you don’t mind let me ask what is the main benefit to deploy a site from a cloud like Google platform and a usual host let say Namecheap for example?
Leron Amin says
Hi Dieuseul,
If you’re just running a basic website, it’s best to go with a managed hosting provider like Namecheap. As you develop your website further, you will find that managed hosting is limited, and does not offer the level of control that you will find on a cloud platform (such as AWS, GCP, or AZURE).
Take for example your video website. If you were serving the media files from your own servers, you would very quickly outgrow managed hosting, and would either need to look into dedicated servers or moving your website to the cloud.
Some people choose to learn how to configure websites on a cloud platform while there website is still small, that way they know how to deploy and configure them on the cloud when the time comes.
Let me know if this helps answer your question, or if you have any other questions!
Thanks,
Joe
Leron Amin says
What did you think of this tutorial?
Please share your questions and comments!
Thanks,
Joe