After you’ve installed WordPress and pointed your domain name to Google Cloud, there are additional steps required to configure your domain name so that it works properly with your WordPress website.
Taking the time to properly configure your domain name is an easy way to prevent search engine indexing issues from occuring.
In this two-part tutorial, I will show you step-by-step how to change your WordPress settings to point to your new domain name.
It is also recommended that you reserve a static IP address for your WordPress website on Google Cloud before starting this tutorial.
There are 2 options in this tutorial:
1. WordPress Bitnami instructions
If you’re using the Bitnami version of WordPress on Google Cloud, changing your website URLs via Settings > General is disabled. Instead, you should change your URLs by editing your wp-config.php file.
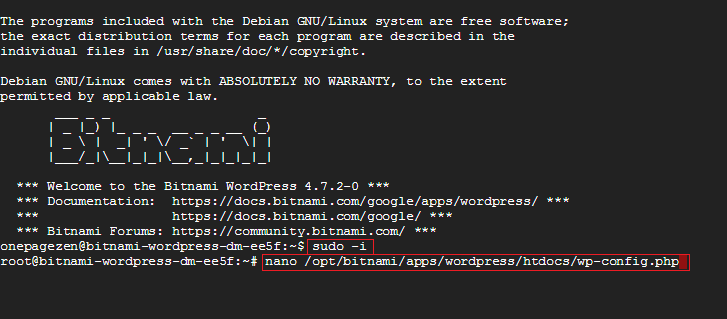
sudo -i
 nano /opt/bitnami/apps/wordpress/htdocs/wp-config.php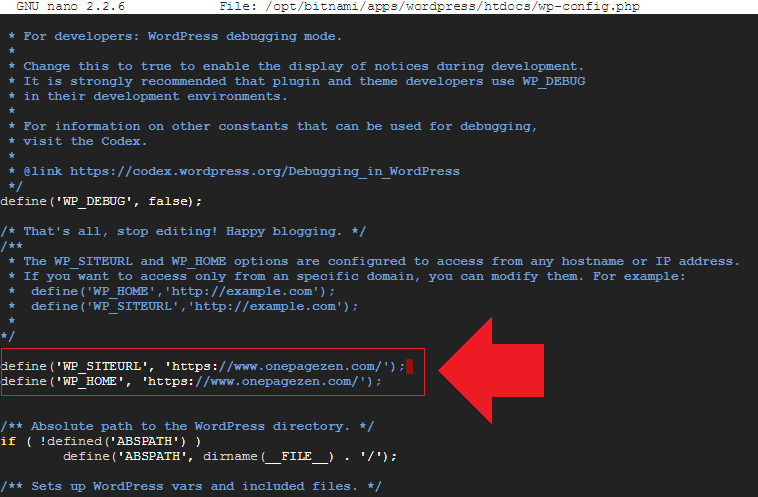
  REPLACE THIS:


  define('WP_SITEURL', 'http://' . $_SERVER['HTTP_HOST'] . '/');

  define('WP_HOME', 'http://' . $_SERVER['HTTP_HOST'] . '/');


  WITH THIS:


  define('WP_HOME','http://example.com');

  define('WP_SITEURL','http://example.com');
Remember to replace example.com with either the www. or non-www. version of your domain name – whichever your prefer. For example:
  define('WP_SITEURL', 'http://www.yourdomain.com/');

  define('WP_HOME', 'http://www.yourdomain.com/');
If you’ve already configured SSL for your domain, you should substitute the http:// in the code above for https:// instead. For example:
  define('WP_SITEURL', 'https://www.yourdomain.com/');

  define('WP_HOME', 'https://www.yourdomain.com/');
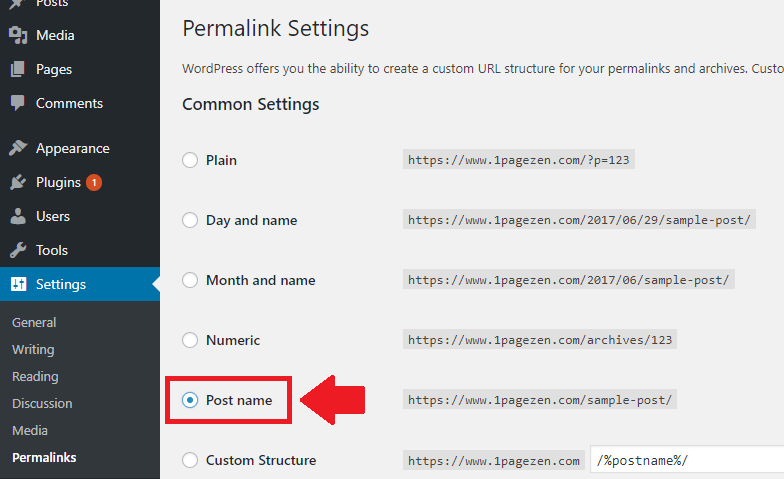
Next, make sure to verify your website’s permalink structure. This setting often gets corrupted after changing your domain name settings. You can access your permalink settings by going to Settings > Permalinks.
2. WordPress Click-to-deploy instructions
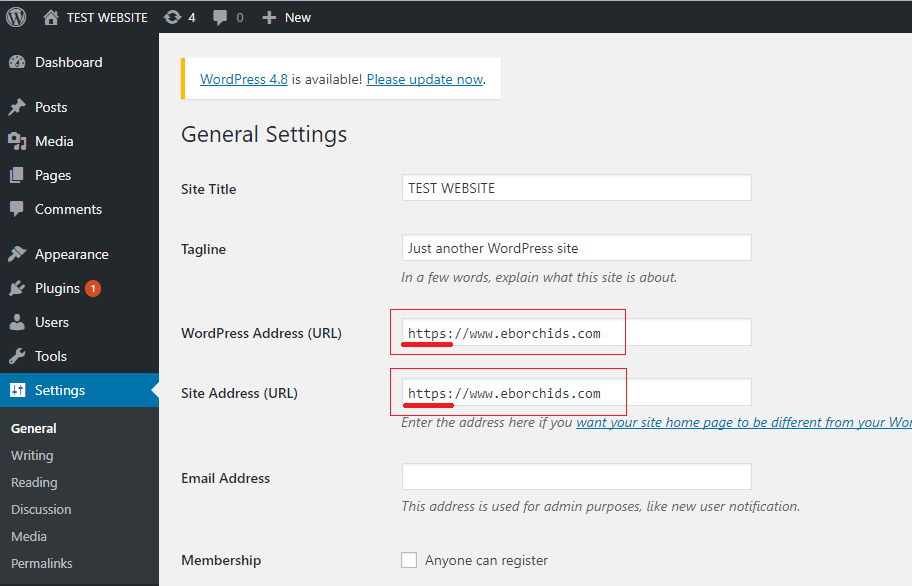
If you’re using the Click-to-Deploy version of WordPress on Google Cloud, you can configure your domain settings directly through your WordPress Dashboard, by going to Settings > General.
In the URL fields, make sure to enter the preferred URL for your website. This can be either www.yourdomain.com or yourdomain.com. The important thing is to choose a preferred version and stick to it.
Also, if you’ve already configured SSL for your website, make sure the domain name you enter is preceeded by https:// instead of http://.
Next, make sure to verify your website’s permalink structure. This setting often get corrupted after changing your domain name settings. You can access your permalink settings by going to Settings > Permalinks.
That’s it!
Now that you’ve configured your WordPress domain name on Google Cloud, the next step is to configure an SSL certificate for your website (Bitnami or Click-to-deploy).
If you’ve already configured SSL for your website, then you can take advantage of Cloudflare’s free CDN by following this tutorial here.
If you have any questions or comments, please post them below!
Thanks,
![]()
Up Next…
Valentine Nnanyere says
Thank you very much. I must admit that this page has been more useful from the onset of my journey with Google Cloud Hosting. Now I have successfully hosted by the site. But I encountered a lot of challenges with the SSL Certificate and later decided to make use of Cloudflare. Please, I want to know if that is a good option for a career blog.
Much Regards,
Nnanyere
Leron Amin says
Thanks for the feedback Valentine – I’m glad to hear the tutorial was helpful to you.
Rahul says
Hi, i am really stuck here my site is looking normal but there is a exact copy of my site with my ip address like;
mysite.com/sample-post and the ip addres version is 35.54.577.215/sample-post
and this ip addres site is showing as backlink to my site.
when i am making the changes here in Google cloud SSH and following your command it is not showing me like you have got here.
it is showing
The base configuration for WordPress
*
* The wp-config.php creation script uses this file during the
* installation. You don’t have to use the web site, you can
* copy this file to “wp-config.php” and fill in the values.
*
* This file contains the following configurations:
*
* * MySQL settings
* * Secret keys
* * Database table prefix
* * ABSPATH
*
* @link https://wordpress.org/support/article/editing-wp-config-php/
*
* @package WordPress
*/
// ** MySQL settings – You can get this info from your web host ** //
/** The name of the database for WordPress */
define( ‘DB_NAME’, ‘bitnami_wordpress’ );
/** MySQL database username */
define( ‘DB_USER’, ‘bn_something’ );
/** MySQL database password */
define( ‘DB_PASSWORD’, ‘32114’ );
/** MySQL hostname */
define( ‘DB_HOST’, ‘localhost:3606’ );
/** Database Charset to use in creating database tables. */
define( ‘DB_CHARSET’, ‘utt8’ );
/** The Database Collate type. Don’t change this if in doubt. */
define( ‘DB_COLLATE’, ” );
/**#@+
* Authentication Unique Keys and Salts.
please help !
Leron Amin says
Hi Rahul,
Your site will always be accessible via it’s external IP address – this is expected behavior.
It’s not a bug and isn’t necessarily an issue. If it bothers you, you can configure a redirect in your Apache configuration to forward traffic from the IP to your domain name. If you want to configure the redirect, you’d follow the instructions in the first answers in this thread.
Also, make sure you’ve configured your site’s URL’s in your wp-config.php file, as this generally handles the redirect.
Let me know if you have other questions,
Joe
Frans says
I followed everything for the Bitnami version but after I edited the HOMEurl and SITEurl in the nano editor, I lost access to the admin page.
It says like this:
Ooops! That page can’t be found.
We are sorry, we seem to have lost this page, but we do not want to lose you.
Please I need help.
Leron Amin says
Hi Frans,
Did you restart your server after editing the wp-config.php file? This is necessary for the changes to take effect.
Talk to you soon,
Joe
Kelly Quintero says
Hi, im running click to deploy, all was running till i change de url on my wordpress backend. Now, i can see de front-end with the url, but i can´t acces to the backend no with the static ip or the url http://www.mysite.com/wp-admin I missed something? Thanks a lot. This is the second i use your tutorial and the first run awesome.
Leron Amin says
Hi Kelly,
Do you mean you changed from an old domain name to a new one? Or did you assign a domain name to your WordPress instance for the first time?
If it’s the former (changing from one domain name to another), then that’s likely what caused the issue – as there are additional steps involved.
Talk to you soon,
Joe
Uthandaraman R says
Hi,
After update Google Cloud Bitnami wordpress SSL certifcate.
my wordpress general settings url not changed. It was http.
so ssl partially updated, It works with out ssl.
I update in Google cloud VM SSH with nano editor I change only http to https.
Now my site works only https. their is no err in page update.
Leron Amin says
Glad to hear you were able to get it working Uthandarmaman@
Manish Tiwari says
Hi,
i had registered our webite to Everdata Technonologies and i have hosted our website on GoDaddy VPS server , and now i have move our website from GoDaddy to Google Cloud and i have change the name server in our Domain Registered Company and i have done all the changes on Cloud DNS , and currently i am try to open WP_Admin from Google Cloud and its redirect to GoDaddy and bith WP-Admin i am not able to access please help me how to resolve the issue on urjent basiss becouse our website is down right now.
Leron Amin says
Hi Manish,
It’s a DNS cache issue. You’ll typically have to wait up to a couple of days for the DNS changes to take effect.
Please check out this thread for additional information.
Let me now if you have questions,
Joe
Debabrata Mondal says
How to change WordPress Administration Email Address?
Leron Amin says
Hi Debabrata,
To change your email, open your WordPress admin dashboard and navigate to Settings > General.
If you’re hosting on Google Cloud (which I’m assuming you are), then you’ll have to configure SMTP in order for WordPress to be able to send emails from your VM instance.
Let me know if you have questions,
Joe
Alette says
Hello. I followed your steps for the Bitnami portion and everything seemed to work fine. However, when I click on the “Log into the admin panel” button on the Google Cloud Platform Bitnami WordPress page to log into my website, I get an error. How do I change the site address and admin URL here so that it shows my domain name and not my IP address? Thank you in advance.
Leron Amin says
Hi Alette,
Did you change your WordPress URL’s in your wp-config.php file?
You need to change this setting in order for your website to use your domain name.
Let me know if you have questions,
Joe
Suhel Shikalgar says
can’t access my wordpress after changing ip address to domain :
I have changed my url on both the place (1] myphpadmin: wp-option/site url & home url; 2] edited wp-config.php using sftp )
still it is showing error
please help
Leron Amin says
Hi Suhel,
You should only change the URL’s in your wp-config.php file – updating these values in phpmyadmin has the potential to cause errors.
What is the error that you’re seeing?
Talk to you soon,
Joe
Jay says
Thanks for your complete step tutorial for WordPress by Bitnami.,
after install WordPress the
Administration Email Address is as : user@example.com
with following message
“This address is used for admin purposes. If you change this we will send you an email at your new address to confirm it. The new address will not become active until confirmed.”
after change my mail address its still pending
There is a pending change of the admin email to MY-MAIL-ID@gmail.com.
how can i fix it.
Leron Amin says
Hi Jay,
You will need to configure SMTP in order for WordPress so send the confirmation email. Follow this guide.
Let me know if you have questions,
Joe
Jay says
Thanks.,
I already configured the SMTP with my Google creditial. The emails are going well with my Gmail id as a sender.
But in ‘general settings’ of WordPress shows the default email (user@example.com) because of that, my theme template fetches the default admin address and put it in the bottom of all sending mails with “For contact: user@example.com” as a credit line.
That’s my problem.
Leron Amin says
You should be able to simply change the email, and then once you’ve confirmed the new email address, the setting will change.
Daniel says
Hi Leron,
I Started a new project and purchased a G Suite account, so wanted to explore further the Google options so began to learn about GCP, virtual machine, stacks, and all savvy terminology
I am used to managed wordpress. Nevertheless, wordpress click-to-deploy is absolutely different. Setting up my site found some issues and needed to add lines of code to wp-config.php file, but where is it? even though where is the root folder?
I really need some help. It’s been like 4 times of making mistakes that forced me to start again and again.
Leron Amin says
Hi Daniel,
If you’re new to GCP, it can take a lot of trial and error – but stay strong!
The webroot is at /var/www/html and the wp-config.php file will be in your wp-content directory, which is also located in the webroot.
Hope this helps provide some guidance, and please reach out if you have further questions!
Joe
Ernest Akpos says
Hello Leron
After setting up my website on GPC i decided to stop the instance to conserve my google credit until i was ready to send traffic to the website. When i was ready i went to the website instance and started it. it is over 72hours after i started the instance but the website is still not loading. What should i do? Thanks
Leron Amin says
Hi Ernest,
Did you reserve a static IP address for your instance? If not, is possible that the IP changed and your domain name is no longer mapping to the correct IP.
If it turns out that’s not the issue, then I’d recommend running the appropriate command to make sure your server is running:
For click to deploy:
For Bitnami:
Let me know if you have questions,
Joe
Tak says
Thank a lot for your tutorial on setting up a domain on Google Cloud.
Leron Amin says
No problem Tak – glad to hear it was helpful!
Mohit says
Hii, this is Mohit
I want to install multisite in my already working single site Bitnami WordPress. will you please help me out or give me the link of the tutorial.
Leron Amin says
Hi Mohit,
I wouldn’t recommend installing Multisite alongside another WordPress installation on the same VM – it would be a complex configuration to setup compared with deploying Multisite on a new VM, then migrating the standalone WordPress website to the new Multisite installation. For Bitnami’s Multisite documentation, checkout out this resource here.
Let me know if you have any questions,
Joe
JANAGAMA SAI THARUN says
The following errors were reported by the server:
Domain: http://www.twingdel.tk
Type: connection
Detail: dns :: DNS problem: SERVFAIL looking up A for
http://www.twingdel.tk
To fix these errors, please make sure that your domain name was
entered correctly and the DNS A/AAAA record(s) for that domain
contain(s) the right IP address. Additionally, please check that
your computer has a publicly routable IP address and that no
firewalls are preventing the server from communicating with the
client. If you’re using the webroot plugin, you should also verify
that you are serving files from the webroot path you provided.
help me with this error
Leron Amin says
Hi Janagama,
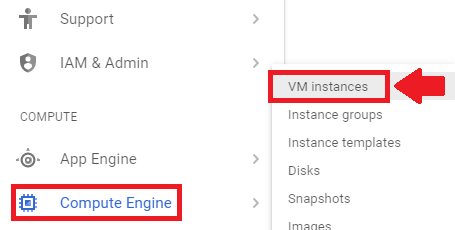
Make sure you’re allowing traffic on port 80 and 443 for your VM instance. You can configure these settings by navigating to the Compute Engine dashboard, then clicking on the instance which you want to edit. Once you’ve selected the instance, a dashboard will appear with all of the instance details – including two boxes with the options to allow traffic on port 80 and 443.
If that’s not the issue, review your DNS settings to ensure that your A record is configured with the IP address that’s attached to your instance – this is more likely to be the problem.
Let me know if you have questions,
Joe
rishabh shukla says
hi sir
i have installed wordpress by bitnami and completed aal these steps . i have configured SSL in my site( bazaarvia.com) is secure but still our site in http on wp admin section.please guide me
Leron Amin says
Hi Rishabh,
It sounds like it could be an insecure content error.
If you open Chome devtools and inspect the page, are you seeing any errors in the console? If so, what are they?
Talk to you soon,
Joe
Mirela says
Hi,
I followed your instructions and all worked perfectly: creating google cloud project, deploying wordpress (I did multisite), exporting and importing wordpress, ssl setup, DNS pointing…
When I thought all is done I noticed only homepage worked (in the backend all looked goodas well). Other pages and posts were all missing https://mywebsite.com and showing only /post-or-page instead https://mywebsite.com//post-or-page. URLs were correct but pointing to /post-or-page and therefore showing errors.
I was desperate so I changed all DNS back to old server and now google cloud IP points to my URL but it’s not hosted on google cloud. Could you please please help? How do I set and work with working version of my website on google cloud while my real website stays as it is on old servers?
Leron Amin says
Hi Mirela,
What was the error that was showing when you tried to access your posts/pages?
Talk to you soon,
Joe
Hersinya says
Hello there,
This is what i come across after i write down the codes;
sudo -i
nano /opt/bitnami/apps/wordpress/htdocs/wp-config.php
I don’t know what to do… Help me please… here it is;
<?php
/**
* The base configuration for WordPress
*
* The wp-config.php creation script uses this file during the
* installation. You don't have to use the web site, you can
* copy this file to "wp-config.php" and fill in the values.
*
* This file contains the following configurations:
*
* * MySQL settings
* * Secret keys
* * Database table prefix
* * ABSPATH
*
* @link https://codex.wordpress.org/Editing_wp-config.php
*
* @package WordPress
*/
// ** MySQL settings – You can get this info from your web host ** //
/** The name of the database for WordPress */
define('DB_NAME', 'bitnami_wordpress');
/** MySQL database username */
define('DB_USER', 'bn_wordpress');
/** MySQL database password */
define('DB_PASSWORD', 'xxx2222222');
/** MySQL hostname */
define('DB_HOST', 'localhost:3306');
/** Database Charset to use in creating database tables. */
define('DB_CHARSET', 'utf8');
[ Cancelled ]
^G Get Help ^O Write Out ^W Where Is ^K Cut Text ^J Justify ^C Cur Pos ^Y Prev Page
^X Exit ^R Read File ^\ Replace ^U Uncut Text ^T To Spell ^_ Go To Line ^V Next Page
Leron Amin says
Hi Hersinya,
Use the down arrow key to navigate further down the file, until you reach the section that you want to edit.
To save changes to the file after editing, press CTRL + X, then Y, then ENTER.
Let me know if you have questions,
Joe
Gabe says
Hi Leron,
Thank you for this insightful blog, it is hard to find acurate information since GCP is a rising platform.
I ´m having the same problen than Joe, but I have futther details, I istalled a WP- Multisite instance .(wordpress-multisite-1-vm)
I am pretty sure this is why at the 5th point of the tutorial we are getting stucked.
This is a vew of the code on Google Photo
https://photos.app.goo.gl/S7YM24yZkFA1E2MM6
Do you have info or a tutorial for this last step for WP Multisites ?
Thank you Leron
Gabe
Leron Amin says
Hi Gabe,
I see the contents of your wp-config.php in the photo – but what exactly is the issue you’re experiencing?
Let me know and I will see how I can help!
Joe
Gabe says
Thank you, Joe,
I was experienced the same issue than than Hersinya, in this post . Actually the only line via SSH to change when installing Wp MULTISITE is ( ‘DOMAIN_CURRENT_SITE’, ‘yoursite.com’ );
Adding your own domain, however there’s another directory to modify when your are working in multisite instance.
I did it, my WP multisite is working ok.
Than you for your promt response.
Keep this amazing and cutting edge work ! Thank you
Leron Amin says
Awesome job Gabe – I’m glad to hear you were able to get Multisite working!
Thanks for sharing your feedback, and please reach out in the future if you have any other questions.
Talk to you soon,
Joe
Amandip Singh says
hi, im not able to change website and site address in general settings of wordpress.. it is showing the ip address non changeable..
Leron Amin says
Hi Amandip,
In the WordPress Bitnami stack, the ability to change the IP address from the WordPress settings page is disabled.
You will have to SSH into your instance and change the setting manually in the wp-config.php file. Check out step 7 of this Bitnami SSL tutorial for step-by-step instructions on how to do this.
Let me know if you have questions,
Joe
Ankit Bishnoi says
Hi Joe,
I follow your steps and it seems that everything is fine but I visit my site it shows that “This site can’t be reached” and I am getting this error from last more than 24 Hours.
Even though I follow your steps.
Please help me.
Thank you
Ahmad Essayyed says
Hi,
I followed your instructions, but maybe I missed to add the ‘s’ in ‘https’. Now I don’t have access to dashboard to correct that error.
What to do?
Leron Amin says
Which version of WordPress on Google Cloud are you using – Bitnami or Click-to-deploy?
Joan Osler-lane says
Click to deploy
Leron Amin says
The instructions below are for manually changing your WordPress URLs if you can’t access the website from the front-end. The instructions below apply to the Click-to-deploy version of WordPress on Google Cloud.
First, open your theme’s functions.php file for editing by running the command below – remembering to replace ‘twentysixteen’ with the name of your active WordPress theme:
After the file is open, add the following two lines of code to the top of the file, immediately after the opening php tag:
After that, save the file by pressing CTRL + X, then Y, then enter.
Next, restart your Apache server by running the following command:
You can learn more about the process of changing WordPress site URLs from the WordPress Codex.
Jeremy says
I am trying to do this on click to deploy as I think something went wrong with my URLs and I cannot access the WP Admin dashboard to change them, but when I enter command above, it says it is not an available directory.
I am on click to deploy wordpress, and I just don’t know the command lines in SSH to get to the wp-config.php file which is where I think it is I need to be changing the wp URLs.
Leron Amin says
Hi Jeremy,
If you’re using Click-to-deploy, run the following command to open your wp-config.php file for editing:
Good luck and let me know if you have questions,
Joe
Jo Osler-lane says
Hi Leron
I’m still really stuck on redirecting a g suite domain name to Google Cloud Platform and could really do with some help. I have used your tutorials and do find them very easy to understand. I think I have a technical problem but cannot seem to get any help from GCP support. I unlocked the domain in go daddy (g suite’s proxy domain provider) also I have tried to ‘Transfer domain away from G Suite’.even this does not appear to have worked. Is there anything I can do or you can suggest that might help me in this???
yours desperately
Jo Osler-Lane
mahesh says
HI can someone help me.
i don’t see this on ssh.cloud.google
define(‘WP_SITEURL’, ‘http://’ . $_SERVER[‘HTTP_HOST’] . ‘/’);
define(‘WP_HOME’, ‘http://’ . $_SERVER[‘HTTP_HOST’] . ‘/’);
Leron Amin says
Hi Mahesh,
That setting is located in your wp-config.php file. If those lines of code aren’t already present in the file (they aren’t included in the WordPress Click-to-deploy configuration), you can add them manually.
Let me know if you have any questions,
Joe
HUMBERTO UREÑA ALFARO says
SALUDOS ESTIMADO LERON
REALMENTE SUS TUTORIALES SON DE ENORME AYUDA.
GRACIAS POR LA PERMANENTE ACTUALIZACIÓN DE LOS MISMOS.
Leron Amin says
Gracias por sus comentarios Humberto! 🙂
HUMBERTO UREÑA ALFARO says
Gracias a usted Leron por su magnífico sitio de soporte.
Tengo una consulta.
Como puedo integrar una instancia de Cloud SQL en Google Cloud Platform para recoger los datos generados por mi formulario de contacto de mi sitio web generado con WordPress y Elementor?
Saludos y agradezco cualquier guía que puedas brindarme.
Leron Amin says
Hola Humberto,
El método más sencillo y seguro es conectarse a la instancia de MySQL usando la IP privado de la instancia. Aquí hay instrucciones sobre cómo configurar una instancia de Cloud SQL con una instancia de ‘Compute Engine’.
Saludos, Joe
HUMBERTO UREÑA ALFARO says
SALUDOS ESTIMADO JOE
PERFECTO, HE TOMADO NOTA DE TU RECOMENDACIÓN.
COMO SIEMPRE MUY CLARAS Y PRECISAS TUS OBSERVACIONES.
MUCHAS GRACIAS.
Ruhrpott Marketing says
Very helpful tutorial ! I was able to fix all in short time. Thank you
Linshuang says
Hi, very good instruction. But after I change the context in SSH, I don’t know how to save and exit SSH. Thanks for your time.
Best Regards,
Linshuang
Leron Amin says
Hi Linshuang,
To save and exit files: first enter CTRL + X, then CTRL + Y, then press the ‘return (enter)’ key.
Let me know if you have any questions,
Joe
Linshuang says
Thank you so much for your patience and reply.
Regards,
Linshuang
Asif Hussain says
I have Install Bitnami WordPress Multisite on Google Cloud and also Free SSL with auto renewal. Now I am trying to wordpress dashboard but failed. I have also configure my domain to google cloud. My IP is not redirecting to domain I also facing SSL issue. Even I am confuse how can i configure my site url in wp configuration file. According to your tutorial there was single wordpress guideline. Can You find something for me.
manjunadha reddy says
my IP address https://35.226.60.51 is not redirecting to the domain. I have seen checked your address it is redirecting to your domain address. I am not getting where I did a mistake. my domain https://www.bookofer.com/
Leron Amin says
Hi Manjunadha,
You will need to wait some time for the DNS to propagate, this can take a few day or more.
Anyways, don’t spend too much time worrying about it, as people aren’t trying to access your domain via it’s public IP. Just make sure you register your primary domains with Google webmasters.
Hope this helps,
Joe
David Proeber says
I’m having a difficult time changing the permalink structure on my website. When setting up the site originally, I chose the default structure that adds “index.php” behind the domain, and prior to each page. When trying to change this in WordPress to a domain.com/post-name (eliminating the index.php), I am left with each page turning into a 404 error.
I’ve tried updating this on the google cloud side through SSL, but am having issues locating the exact spot to update the permalink structure.
I am using the Click-to-deploy version of WordPresson google cloud. My website is aridoutdoors.com. Have more experience using an htaccess structure so this has been a learning curve.
Thanks!
Leron Amin says
Hi David,
Update the permalink structure under Settings > Permalinks.
You should be able to change the setting to Post name, save the page, and it should work. You may have to do this twice – sometimes it doesn’t work the first time.
Hope this helps and let me know if you have any questions,
Joe
Mitesh says
I am also having the same issue. I am using the Cick-to-Deploy Version.
Following your advice, I tried the following but it is not working.
>>>Update the permalink structure under Settings > Permalinks.
>>>Changed the setting to Post name and saved the page. Did it twice – it did not work. Did it thrice, still did not work.
Kindly help!
Leron Amin says
Hi Mitesh,
Please outline which tutorials you followed before arriving at this one.
Are you using Bitnami or Click-to-deploy?
Talk to you soon,
Joe
Mitesh says
Hi Joe,
I am using Click-to-deploy.
I followed these two tutorial:
How to Install WordPress on Google Cloud for Beginners?
How to Reserve a Static IP Address on Google Cloud?
Thanks,
Mitesh
Leron Amin says
Hi Mitesh,
Try installing mod_rewrite by running the following command:
Then try changing your permalink structure again after restarting Apache.
Let me know if this fixes it,
Joe
Mitesh says
I tried your suggestion. It said “Module rewrite already enabled”. I anyways restarted Apache and tried changing the permalink structure. But no luck, the issue still persists.
Dotun says
Hello Thanks for a great tutorial. However, I’m having an issue. I have two server instances. One has moodle installed and the other one has WordPress installed on it. Both instances uses the LAMP stack. I have a domain and a subdomain.
if i map the moodle instance to the domain, and the WordPress instance to the subdomain, everything works fine. If i do it the other way round, the subdomain keeps redirecting back to the main domain. Can you help with any pointers as to what the issue might be?
Aniket Jatav says
Hello !
These tutorials are of a great help. I have setup one of my website using these. So for my another project, I configured and transferred domain to my wordpress site (bitnami version) URL: https://www.fandomrealm.com . But now after forwarding the website doesn’t loads giving out errors like DNS server could not be found or the site can’t. I’m on a very stable internet connection. Any chances of a possible solution or tip ? Anything would work.
Thanks a lot for putting out these tutorials !
Leron Amin says
Hey Aniket,
It looks like you were able to the get the issue resolved!
What turned out to be the issue?
Talk to you soon,
Joe
Ante says
Hi Joe,
Do you have any idea why my extension .de website instead .com won’t work?
I replaced everytime the .com with .de …
Btw consider setting up a forum on this website 😀
Thanks,
Ante
Ante says
Sorry I found the problem!
Leron Amin says
Great – glad you were able to get the problem resolved! 🙂
Gee says
Hi Leron,
awesome resource you have created here. My domain is pointing correctly to the wordpress site and the next step is to update the wp-config.php file with the domain address. Even though I followed your instructions to a tee but it seems I have a problem when I try to update the wp-config.php file. When I replace
define(‘WP_SITEURL’, ‘http://www.yourdomain.com/’);
define(‘WP_HOME’, ‘http://www.yourdomain.com/’);
with my domain, nothing shows up in the browser, just white screen. I double and triple checked the syntax and all is good but still white screen. I revert back to the original settings and the site is ok. Any idea what I’m doing wrong? Something else I need to look into?
thanks
Leron Amin says
Hi Gee,
Check your error logs by running the following command:
Does anything from the error logs standout?
What happens when you try to restart Apache? Any error messages?
Talk to you soon,
Joe
Pradip says
Hi Leron,
I have one question:
Is the static IP address will forward to a domain name or visible if browse through IP address?
for example:
when I am browsing using domain name (www.example.com) everything ok but when using the IP address(35.xxx.xxx.xx) it didn’t forward to the domain name?
Is it ok?
Leron Amin says
Hi Pradip,
If your configuration is setup according to the tutorial, then your IP address should automatically resolve to your domain name. However, it’s not also not that big of a deal, as the only person who will be accessing your website from it’s IP address is you.
Also, make sure that you changed your WordPress site URLs in your Settings > General page.
Hope this helps and let me know if you have any questions,
Joe
Ryan says
Hey Joe,
I ran the Bitnami instance ad followed the tutorial to point the wpconfig.php file to my new subdomain:
shop.hexpose.com
But it’s taking me to my error page that I have set up in my bucket for that when I click on the “go to wp-admin panel” in my wordpress instance.
Any advice on why this might be?
Thanks for a great set of tutorials, they have really helped me quite a bit.
Leron Amin says
Hi Ryan,
What is the error page and what does it say?
Also, what is the bucket for? Are you using it with a CDN?
Also are you running your sub domain on WP Multisite or as a separate VM?
Talk to you soon,
Joe
kevin says
I changed my config file to use my website instead of the IP but some of my pages are still redirecting to the IP. How long does it take for the changes to take effect? http://35.192.169.168/product-category/wallets/
Leron Amin says
Hi Kevin,
The changes shouldn’t take more than 5 minutes to take effect. Try viewing the website through a free proxy to ensure that your browser isn’t serving a cached version of the page. If the proxy is still loading the IP, then there may be an issue with your DNS configuration.
Let me know if you have any questions,
Joe
H says
I am having the same problem. Some of the pages are showing IP. It has been awhile and I am using Cloudflare. Any help? Its the click to deploy version of wordpress
Leron Amin says
Hey H,
I would check that you have your WordPress URLs set to your domain name under Settings > General.
You shouldn’t have to make any changes to any of your conf files, but if it’s still not working, follow the steps from the first answer in this link. However, instead of using an htaccess file, add the rewrite to your wordpress.conf file located at /etc/apache2/sites-available/wordpress.conf.
You could also just go ahead and complete the SSL tutorial for Click-to-Deploy, as an HTTPS redirect is configured in step 7 of that tutorial.
Hope this information helps and let me know if you have any questions,
Joe
H says
I appreciate your help, I got into another problem. I am not able to receive emails from my WordPress site. I had transferred my site from another host, to here on G cloud. I used WP-Mail plugin to send emails, and I have been using the SMTP from Mailgun. I have been using the email credentials, from the old host. They seem to do the same, able to send but not receive.
In my WordPress, I see that the default email address is admin@ipoftheserver.com
https://prnt.sc/k8q4yd
I tried adding it as ‘Incoming server’ in my email client, but I don’t know where I can find its login credentials. Kindly help me
Leron Amin says
Hi H,
To send/receive emails from your WordPress website on Google Cloud, use the WP Mail SMTP plugin, and configure it according to the instructions here.
You don’t need to use a 3rd party service such as Mailgun – just create a Gmail account to handle all of the mail for your website, or use an existing one.
Hope this helps. If you have any additional questions related to email configuration, please ask them on this tutorial page, or on the Facebook support page.
Hope this information is helpful!
Joe
Pralay Bhaduri says
hello joe
This is Pralay, I follow each steps carefully (wordpress bitnami) but after this steps (“Domain Name Configuration for WordPress on Google Cloud”) and specially when I go to verify website’s permalink structure
then my IP adress change to my domain name (theoikonomia.com) but page not opened after long buffering and then it shows.
” This site can’t be reached
http://www.theoikonomia.com took too long to respond.
Try:
Checking the connection
Checking the proxy and the firewall
ERR_CONNECTION_TIMED_OUT”
I will thank full to you If you guide me to solve this problem .
Leron Amin says
Hi Pralay,
The website appears to be working fine. It was probably just a DNS error that resolved itself over time.
Let me know if you have any questions,
Joe
Rafal says
How do you save the edited wp-config.php file in the nano editor?
Thanks
Leron Amin says
Hi Rafal,
First, press CTRL + X
Then, the nano editor will ask if you want to save. Press Y then press ENTER again.
Let me know if you have any other questions,
Joe
Rafal says
Thanks
rahul says
what to do after
define(‘WP_SITEURL’, ‘https://www.yourdomain.com/’);
define(‘WP_HOME’, ‘https://www.yourdomain.com/’);
and saving it by ctrl +x and yes
Leron Amin says
Hi Rahul,
That’s it – just remember to replace ‘yourdomain’ with your actual domain name.
Hope this helps and let me know if you have any questions,
Joe
will bode says
I got to the save section after control x and y and was unsure what format to save it as DOS MAC Append Prepend, Backup File, To files… I tried to files and it reverted when I came back.
Mark J says
Hi Leron,
Thanks for taking the time to give tutorials. I went wrong somewhere and want to see if you can help. I’m using Click to Deploy version. I followed a video and changed to static yesterday and can’t get my website back.
My domain is pointed at the old ip address how do I point it to the new ip address without losing all the things I’ve already done to the site?
I can’t access wordpress settings to change now bc it’s pointed to old GCP ip address. I was trying to mask ip address when you go to URL, but messed it up. Thank you very much.
Best,
Mark
Mark J says
Hi Leron,
Sorry to bother you again, but any suggestions?
Thanks,
Mark
Leron Amin says
Hi Mark,
First of all, the IP address/networking is completely separate from your website’s data.
Losing access to your website via it’s external IP address will not affect the data/contents of the website itself, as all of your website information is stored on your virtual machine’s disk – so don’t worry.
To troubleshoot, the first thing to do is to verify that the IP address attached to your VM instance matches the IP address in your Cloud DNS “A Record”.
Does it match? If not, change the A Record IP address to the IP address of your website’s VM. Wait a few minutes, then try viewing your website through a proxy such as hide.me to avoid being served a cached version of your website. Did this fix the problem?
Talk to you soon,
Joe
Mark J says
Hi Joe,
I changed the A record address to the IP address of website’s VM but didn’t work. I was trying to hide the original IP from showing up, but changed the IP address through GCP completely. I’m using click to deploy and on my deployment it still shows the old up address.
The video I used was to reserve static IP address, so changed IP on VM once created. Now I can’t figure out how to change/redirect domain to new IP address. I use google domain so pretty straight forward as far as changing settings. For me I can’t figure out how to change IP address in WordPress site not being able to access it. Thanks for your help.
Message I get when I try to go to URL. Safari can’t open the page at…because the server where the page is located isn responding.
Leron Amin says
Hi Mark,
If you’re unable to change your WordPress URL’s via the dashboard, open your wp-config.php file (sudo nano /var/www/html/wp-config.php) and add the following lines immediately after the opening php tag:
Remember to replace example with your own domain name.
If this method doesn't work, you should try the next solution as documented in the WordPress Codex here.
Let me know if you have any questions.
Thanks,
Joe
Leron Amin says
Also, copy and paste the
lines of code directly from the WordPress Codex – not from my comment (formatting issues).
Ernest Akpos says
Hello Leron Amin, Thanks for your tutorial. I set up a website with bitnami on GPC the first time using your tutorial. I wanted to set up a second website again following the same procedure, but when i got to the point to reserve a static IP address i got an error that Quota static address limit exceeded. That i would have to pay. Is there a way around this? as there is no bitnami multi site tutorial on your site right now. I need help as i want to set up 5 wordpress site on the free 1 year i have
Leron Amin says
Hi Ernest,
IPV4 addresses are in short supply, and so Google limits the number that it allows it’s “free trial” customers to use. To get around this, you have to set up billing for your account.
If you don’t want to set up billing, then assign the static IP address to whichever website is most important to you or your business.
For vm instances that don’t have a static IP assigned to them, make sure to limit starting/stopping them, as they will be assigned a new IP addresses each time you restart them.
Let me know if you have any questions,
Joe
Ernest Akpos says
Thank you for your reply. That has been resolved. Now the issue i have is after insert
define(‘WP_SITEURL’, ‘http://www.yourdomain.com/’);
define(‘WP_HOME’, ‘http://www.yourdomain.com/’);
How do i save changes so that it takes effect? What is the command? i noticed that when i go to check it has gone back to the default without my domain name
Leron Amin says
Hi Ernest,
The command to save changes is CTRL + X, then Y, to save.
After that you will have to restart Apache for the changes to take effect.
Hope this helps,
Joe
Syed Ahmed says
Hello Joe,
I have tried the above steps but in wp-config.php file I’m getting not getting
define(‘WP_SITEURL’, ‘http://www.yourdomain.com/’);
define(‘WP_HOME’, ‘http://www.yourdomain.com/’);
instead define(‘Domain_Current_site’, ‘IP Address.xip.io’);
Please let me know if I need to modify this the above command or add Siturl and Home. And after adding how do I save the changes (New to SSH :)). Thanks!!
Leron Amin says
Hi Syed,
So in your wp-config.php file you don’t see the two lines of code:
define(‘WP_SITEURL’, ‘http://www.yourdomain.com/’);
define(‘WP_HOME’, ‘http://www.yourdomain.com/’);
Is that correct? By default they should be included in your wp-config.php file.
Talk to you soon,
Joe
Syed Ahmed says
Yes Joe. I cannot see those lines in my wp-config.php. I tried to rename define(‘Domain_Current_site’, ‘IP Address.xip.io’); but not sure how to save the changes. I even tried to edit this file by using FileZilla, but it fails all the time. I am able to download and view many of the files using FileZilla, but wp-config.php file does not open or get downloaded. Please help
Leron Amin says
Hi Syed,
That is a problem – those 2 lines of code are required to change your domain name.
Can you please confirm that you aren’t using WordPress Multisite instead of just WordPress, because the instructions for changing the domain name in this tutorial do not apply to WordPress Multisite.
Talk to you soon,
Joe
Sandra says
Hi Joe, Do you possibly have a tutorial on how do link e.g. domain bought on google domains to multisite wordpress (by bitani) on Google Cloud Platform?
Leron Amin says
Hi Sandra,
I don’t have a tutorial for that at the moment – but will look into publishing something on that subject in the future.
Talk to you soon,
Joe
Aryan Singh says
How Can I create a subdomain using cloud DNS? Can you please guide me through. I want to use the subdomain for split domain routing
Leron Amin says
Hi Aryan,
I will be doing a tutorial soon about configuring multiple sites on single virtual machines using Multisite – including how to configure subdomains.
Stay tuned for that tutorial! 🙂
Joe
Aryan Singh says
I was expecting if you could do that more soon
Aryan Singh says
Please just guide me through bcz I wanna create a subdomain just for split domain routing to have a special mailing path for each form of main. I don’t wanna host WordPress or anything. And my website is going to get live soon within a week
Leron Amin says
Hi Aryan,
I will only be doing the tutorial for WordPress multisite.
If you’re just trying to set up a subdomain you can just add a CNAME to your cloud DNS, and then create a new virtual host in your .conf file that maps your subdomain to it’s root directory.
Check out step 4 of this tutorial which shows you how to do just that.
Let me know if you have any questions,
Joe
Leron Amin says
Hi Chiranjit,
Yes – I will make a video tutorial on this!
Thanks for commenting 🙂
Best regards,
Joe
Ernest says
RewriteEngine On
RewriteCond %{HTTP_HOST} ^99\.12\.39\.535$
RewriteRule ^(.*)$ http://www.yourdomain.com/$1 [L,R=301]
For bitanami wordpress, Should i replace the Ip 99.12.39.535 with my external ip and http://www.yourdomain.com with my site url?
Leron Amin says
Yes Ernest – that is correct!
Dev says
Hey! I’m using bitnami multisite install. How do update URLs for multisite?
Leron Amin says
Hey Dev,
I don’t have much experience with multisite, so unfortunately I don’t know the answer.
Did you figure out the solution? Would you mind sharing it? 🙂
Best regards,
Joe
Mohamed Hak says
Hi Joe,
I am really getting frustrated at this point.
after doing the other tutorial ssl certificate, everything was fine and my site is up and running.
after i did reserve the static IP and followed this part and the site url is not working at all.
can you help? please
Leron Amin says
Mohamed,
You need to check your DNS records to verify that the IP address in the A record for your domain matches the IP address for your instance.
From Google Cloud Platform dashboard, go to cloud DNS. Check your IP address of your A record. Go to your VM instance page, look at the IP address of the VM instance that is running your WordPress website. Do they match? If not, you need to go back to External IP addresses and assign the IP address to your instance.
Mohamed Hak says
Hello Joe,
Thank you for your answer.
I just checked and they are Identical, but the domain still not working
Mohamed Hak says
WORKED WORKED WORKED
Thank you so much
so I asked you yesterday should I skip this post if I already did the ssl certificate.
Leron Amin says
Hi Mohamed,
Your domain is working – your certificates aren’t.
Make sure they are entered properly in your bitnami.conf file, as shown in step 6 of the Bitnami SSL tutorial.
Talk to you soon,
Joe
Mohamed Hak says
I just checked and everything is identical to the tutorial, and I didn’t miss the part to change the eborchids.com to my domain.
I don’t know what happened
Leron Amin says
Hi Mohamed,
You will have to re-trace your steps and take a look at the certificate files, and make sure they match the domains you are securing, and go back and look for any syntax errors in the configuration files that are used in the tutorial. What happens when you restart Apache by running: sudo /opt/bitnami/ctlscript.sh restart apache
Do you get any errors, issues?
Mohamed Hak says
I went back form step one all the way down, and everything is right.
I also restarted apache and gave me syntax ok .
Mohamed Hak says
Hi Joe,
I am getting a really weird behavior, The site sometimes opens sometimes not, It is like rolling the dice. for example, right now it’s working on chrome but not in safari.
I had to go through the steps again one by one.
the one thing really confusing me is the part “Disable Direct Access via IP address”
RewriteEngine On
RewriteCond %{HTTP_HOST} ^92\.18\.29\.239$
RewriteRule ^(.*)$ http://www.yourdomain.com/$1 [L,R=301]
and on the ssl page I have to configure it llike that
RewriteEngine On
RewriteCond %{HTTPS} !=on
RewriteRule ^/(.*) https://%{SERVER_NAME}/$1 [R,L]
Which one should I do?
Sorry for keep hammering you with questions, I am really embarrassed of you.
Leron Amin says
Hi Mohamed,
Do the second one – on the SSL page. Disabling direct access via IP is optional, and I think it is disabled automatically after changing your WordPress URLs (I’m not positive, though).
Does this answer your questions?
Talk to you soon,
Joe
Mohamed Hak says
should I change anything on the third line
RewriteEngine On
RewriteCond %{HTTPS} !=on
RewriteRule ^/(.*) https://%{SERVER_NAME}/$1 [R,L]
so instead of SERVER_NAME , I type my domain name like that
RewriteEngine On
RewriteCond %{HTTPS} !=on
RewriteRule ^/(.*) https://%{www.mydomain .com}/$1 [R,L]
Leron Amin says
Hi Mohamed,
Don’t put your domain name in the place of SERVER_NAME – just leave the command exactly as it is.
Mohamed Hak says
Thank you Joe
I really appreciate your help
Leron Amin says
My pleasure Mohamed,
I know how frustrating it can be to troubleshoot errors on GCP!
Best regards,
Joe
Mohamed Hak says
Hi Joe ,
I followed the instruction in this post, Bitnami version and also the part related to (https ) ssl certificate.
but the website doesn’t open anymore, and the browser saying this site can’t be reached.
am I missing something?
Leron Amin says
Hi Mohamed,
Did you restart Apache after making the changes? If so, did you get an error message?
Talk to you soon,
Joe
Mohamed Hak says
I just want to let you know what I wnt through so far maybe you figure out the problem.
1- I followed the video setup & install WordPress bitnami (video)
2- ssl certificate setup WordPress bitnami (video)
3- I had a question about WordPress address(URL) is grayed out and its HTTP not https, and you directed me to this article.
but there is a note in the beginning of this article about ssl
4- I followed the instruction here all the way to the end.
Do you think the problem lies here the order I did the configuration
should I have skipped this part about reserve static IP
Sorry for the dumb questions, I am not really sure about what I am doing.
deepak says
How you created your table contents in your legal page ?
I want to do that in my website …
Leron Amin says
Hi Deepak,
This is done using page anchors.
In the table of contents, you would put:
<a href="https://onepagezen.com/legal/#termsofservice">Terms of Service</a>Place the following code wherever you want this to link to in the page:
<a name="termsofservice"></a>Best regards,
Joe
jose sanchez says
can you help me systemctl status apache2.service error**
Leron Amin says
Hi Jose,
Can you give me more details about the error please?
Which tutorial caused the error?
Thanks,
Joe
jose sanchez says
y para la version click to deploy cual es el comando en vez de este
udo /opt/bitnami/ctlscript.sh restart apache
Leron Amin says
sudo service apache2 restart
jose sanchez says
error ***
root@wpsdunamis-vm:~# /etc/apache2/sites-available/wordpress.conf
-bash: /etc/apache2/sites-available/wordpress.conf: Permission denied
Leron Amin says
Run the following command:
gcloud auth login
Muhammad Fikri says
Hello Joe,
when i run the code /etc/apache2/sites-available/wordpress.conf and there is a notification after i run the code : -bash: /etc/apache2/sites-available/wordpress.conf: Permission denied
Leron Amin says
Hi Muhammad,
Run the following command to authenticate your username:
gcloud auth login
This should fix the problem.
Thanks,
Joe
Mike says
Great tutorials! I’m trying google cloud for the first time and these tutorials have saved me a lot of time. Thank you for putting these together!
There are a few things I would add to this tutorial on step 2:
On the part about the using SSH terminal to open your bitnami.conf file, your copy-able text doesn’t include “nano”. No big deal, but it could save someone some time.
Also, I tried to run “sudo a2enmod rewrite” , but I got the following “sudo: a2enmod: command not found”. It seemed to work without that though. I think bitnami may have made some changes to the stack configuration. I’m not super code savvy… so I don’t know.
Lastly, many people may not realize that they need to change their address to a static ip address. I read about this elsewhere… but it’s probably worth including a paragraph about where and how to configure that.
Thanks again for the great tutorials!
Leron Amin says
Hi Mike,
Thanks for taking the time to post this insightful comment. It’s difficult to make the tutorials without a couple of errors the first time around, so I am very thankful to users like you who take the time to go over the tutorials and notify me about any errors you might find. So thank you!
I have fixed both of the errors that you referred to in your comment. Also, I will post a section related to configuring a static IP for VM instances. This is a good thought because many users experience problems down the road after restarting their instances that stem from not having reserved a static IP for their instance.
Thanks again for posting this, and please let me know if you find errors in any of the other tutorials!
Best regards,
Joe
Leron Amin says
Did this tutorial work for you?
Leave your questions and comments below!
Thanks,
Joe