In this tutorial you will learn how to quickly setup FileZilla to remotely manage your files for websites running on Google Cloud Platform. This is quick-start tutorial is designed for websites running on Google Cloud’s compute engine.
Setting up FileZilla FTP is a quick and easy way to remotely manage your website’s files.
To get started, follow along with the video above. If you get stuck, check below to see the steps listed individually with images.
Before starting this tutorial, you should have already created a Google Cloud Platform account and launched a website on the Google Cloud Platform Compute Engine.
There are 7 steps in this tutorial:
1. Download PuTTY and FileZilla

The first step in this tutorial is to download PuTTY and FileZilla.
Putty is an SSH client and key generator. You will use this application to generate a private/public key pair and establish a secure connection between your Google Cloud Platform instance and FileZilla.
FileZilla is the FTP Client that we will use to securely manage our Google Cloud website’s files straight from our desktop.
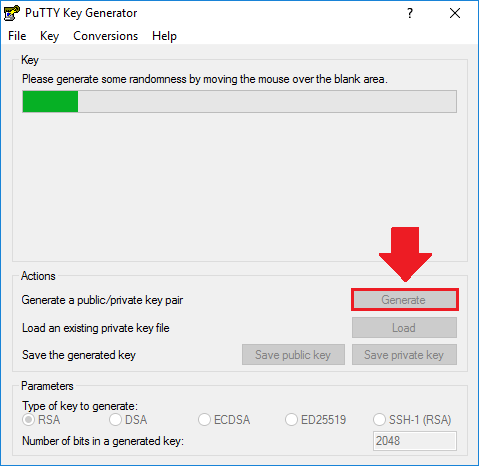
2. Generate SSH Keys
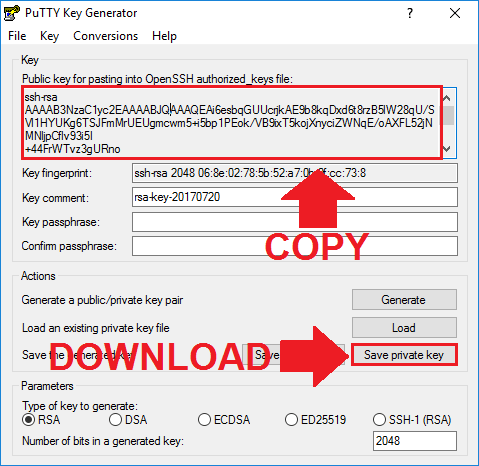
3. Copy and save the keys
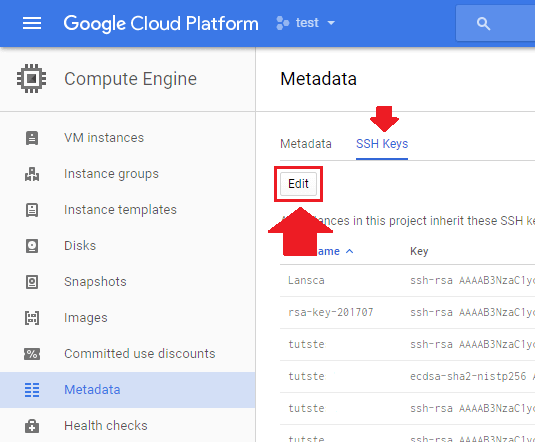
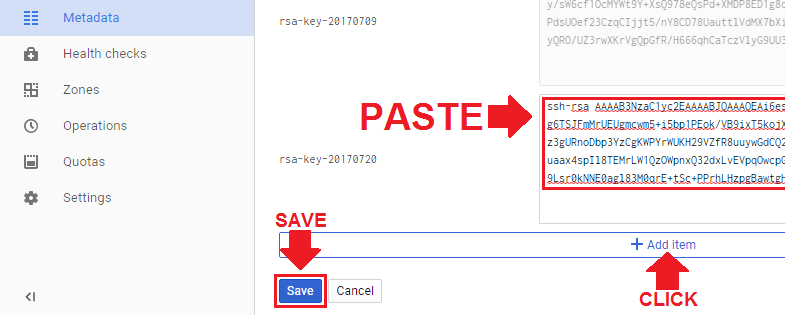
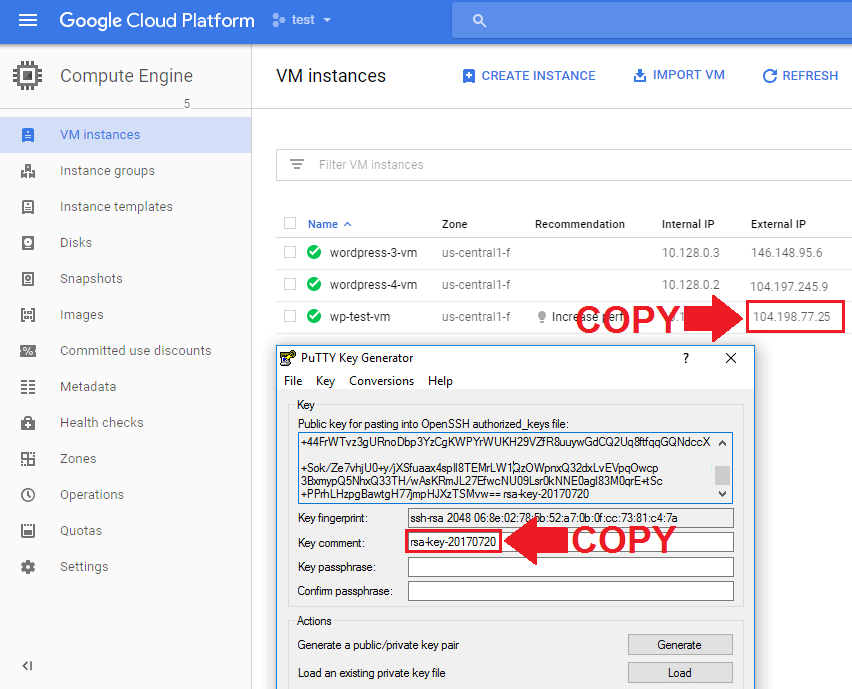
4. Paste Public Key in Google Cloud
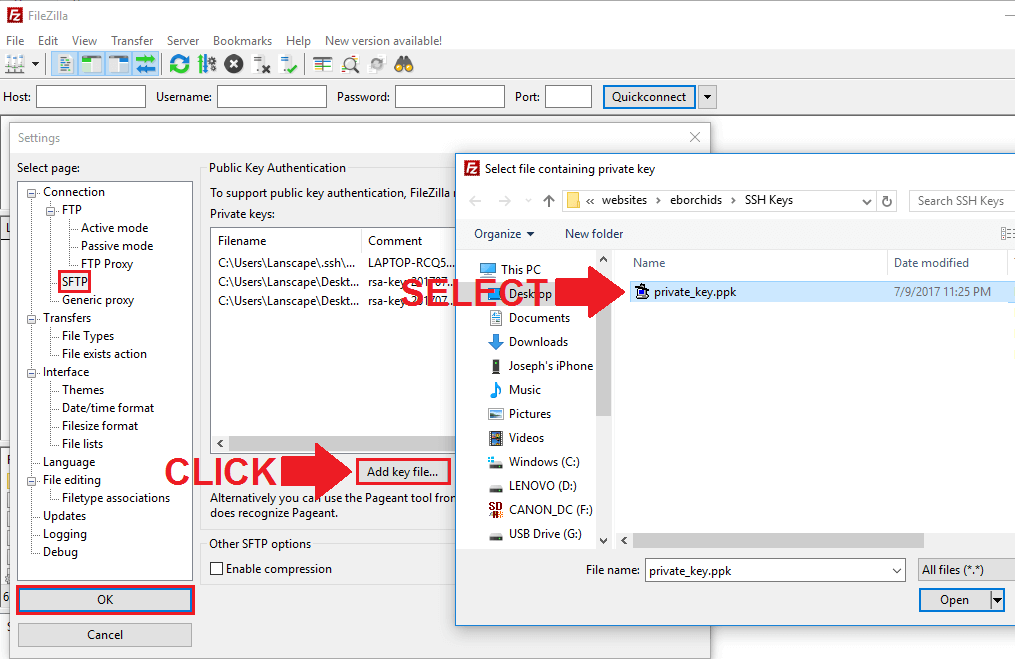
5. Upload Private Key in FileZilla
6. Establish Connection to Google Cloud
In order to establish a connection between Google Cloud and Filezilla, you will need both the IP Address to your instance, and the username for your SSH Key.
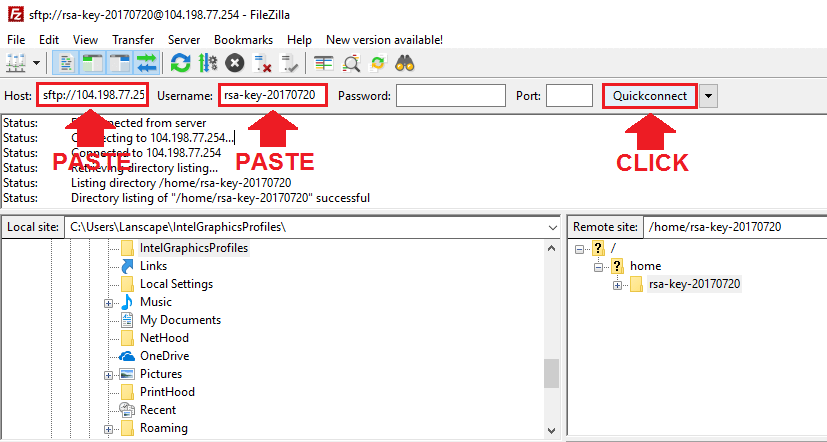
Lastly, click the Quickconnect button.
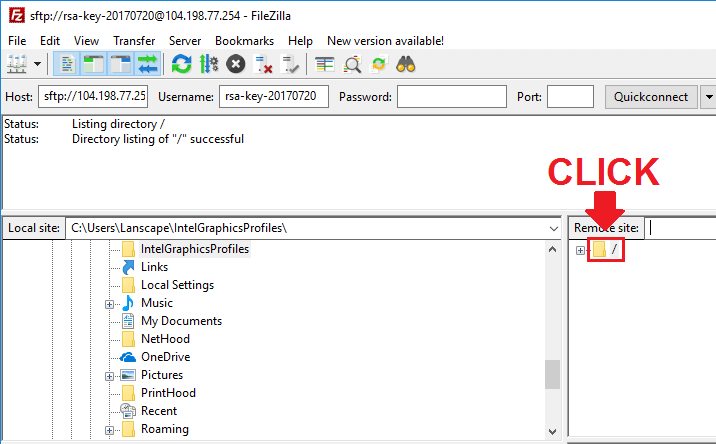
7. Navigate to your root directory
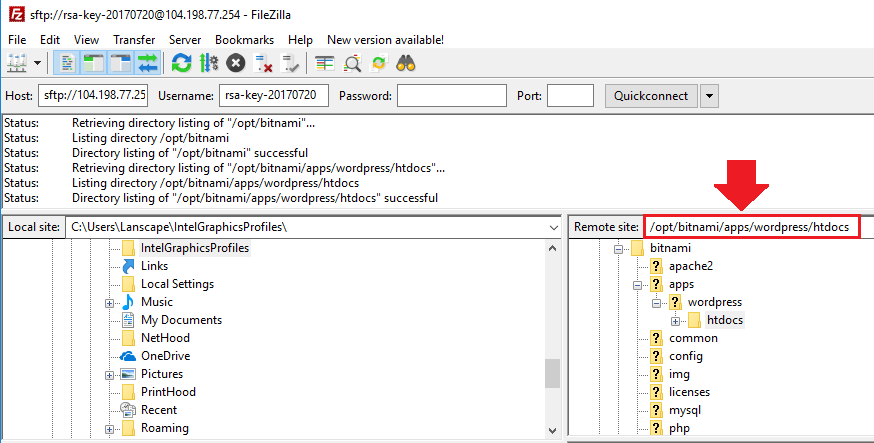
If you’re running the Bitnami version of WordPress on Google Cloud, your root directory is located at:
/opt/bitnami/apps/wordpress/htdocsIf you’re running the Click-to-Deploy version of WordPress on Google Cloud, your root directory is located at:
/var/www/htmlThat’s it!
If you run into permission errors, click here to fix the problem.
If you are looking to configure your SSH Keys using the Cloud SDK gcloud command-line-interface, you can check out that tutorial here.
Please leave any questions and comments below!
Up Next…
Byron Rodrigues says
After 3 or 4 sites, this was the only one that worked … Thank you very much.
Leron Amin says
Glad to hear it worked Byron! Thank you for the feedback!
Tim says
thank you! so much easier to understand than Google’s instructions which I spent about an hour trying to follow. this short video got me it working in about 10 minutes!
Leron Amin says
Thanks for the feedback Tim! I’m glad to hear you were able to get it working!
charles haime says
thanks! worked great!
Ray says
Help? I got to the end but I don’t have a Bitnami installation of WP. In my root directory all I see is a bunch of hidden files: .vminfo, .profile, .mysql_history, .bashrc, .bash_logout, .bash_history; and hidden folders: .ssh, .config, .cache. I’m in the /home/username directory. In the /home directory there’s also a /ubuntu directory. I can’t figure out where my wordpress installation is located. I’ve looked in every folder beneath. I know it’s there somewhere because I can see the site on my browser and I can enter the wp-admin dashboard.
Since this is a test for me, I don’t have a static IP address.
Leron Amin says
Hi Ray,
First, SSH into your instance on Google Cloud (Compute Engine > VM Instances > SSH). Next, enter the following command to navigate to your root directory:
This will take you to your root directory, and from here you will need to use basic linux commands to navigate your file tree and get an understanding of where your application’s files reside relative to the root directory.
Hope this helps and let me know if you have questions,
Joe
Jiqa says
Great Help me a lot . i was stuck . like newbie
Kelly says
Thanks for a great tutorial, after completing it I noticed that in my next SSH session my CNTRL key no longer works. Does this have something to do with Putty? Is this tutorial undoable?
Leron Amin says
Hi Kelly,
Different terminal emulators allow for different keyboard shortcuts.
For instance, some terminals will allow users to paste with CTRL + V, and with others it requires CTRL + SHIFT + V.
Do a web search for what you’re trying to accomplish, for instance: “how to paste text in putty”
Let me know if you have questions,
Joe
Ashutosh K Singh says
I would like a question about transferring my website from shared hosting to Google cloud hosting .
My website is heavy around 2 GB data and I have already tried to transfer website through “All in one WP Migration tool” also increase the size of transfer limit bit it didn’t increased.
I want to upload my website through “SFTP” and how can i do .
kindly guide me.
Regards
Leron Amin says
Hi Ashutosh,
I would recommend exporting and uploading your media separately. Or even better, I’d recommend offloading all media from your WordPress instance and serving it from Cloud Storage instead. There’s a plugin called WP-Stateless which handles this process.
Let me know if you have other questions,
Joe
shahbaaz says
Hi, I am a small website owner. I follow your blog for like a year now, and It’s fantastic! Your Tutorials have always helped me a ton and saved me a lot of time.
I have a question. Can anyone access my google cloud VM using FileZilla if they have the key end of the public key(key comment) and the VM instance IP?
I recently tried this with FileZilla. I deleted all keys from the FileZilla settings>SFTP, Cleared all private data from the edits tab, typed my VM IP address with sftp:// , entered the last part of the public key (key comment) and I was connected with my VM.
That scared me a lot. Am I doing something wrong? Or does FileZilla keep all the connection details? How can I make sure that no one else can access my VM with FileZilla? It would be great you can answer my question.
Thank you So Much in advance.
Leron Amin says
Hi Shabaaz,
It’s great to hear from you.
Somehow the keys are being cached – so they’re persisting even though you deleted them. Not sure why or how, but it’s nothing to worry about.
Let me know if you have any other questions,
Joe
Nikhil Gala says
Wow!
Exactly what I wanted to do.
Well written. Helpful. Thanks!
Leron Amin says
Thanks for the feedback Nikhil!
Harunup says
I paid for some body to host my site of which he did but I find it difficult to log in using FTP with the logins he gave? Saying wrong password. Any help?
Leron Amin says
Hi Harunup,
In this tutorial, I showed how to set up SFTP – which requires a public/private key pair to ensure your connection is encrypted.
I wouldn’t recommend using FTP; instead, try using the ‘upload file’ feature which is built into the Google Cloud SSH terminal.
Let me know if you have questions,
Joe
Shahbaaz says
Hi joe.
Your website has helped me to grow a lot. I am currently running a website on google cloud platform bitnami version.
I recently imported some posts from a old blogger website I used to run. The blog didn’t have a domain and was using .blogspot domain.
However, after that I am unable to install any plug-in. Everytime I try to install a plug in it shows
“unable to create directory. Is the parent directory writable?”
Thus I am unable to redirect any traffic. Can you please help me? I tried to
chmod -R 777 /path/dir but it didn’t work.
Please suggest me something. Thank you in advance.
Leron Amin says
Hi Shahbaaz,
Thanks for the feedback – I’m glad to hear you’ve benefited from the tutorials.
Changing the permissions level of the parent directory should fix the problem. What exactly was the command that you executed (path/dir)?
Talk to you soon,
Joe
Shahbaaz says
Hi. Thanks for your response. The issue is fixed. Thanks to you.
Thiwa says
Thanks and this is a very quick guide how to connect FileZila for GCP.
Leron Amin says
I’m glad the guide was helpful to you!
Jity says
Which caching plugins are best for bitnami gcp because w3 total cache is not working properly
Leron Amin says
Hi Jity,
Bitnami has documentation here which outlines how to optimize your Bitnami WordPress website’s performance, including the recommended caching plugins to use.
Hope this helps and let me know if you have questions,
Joe
mark .j says
I am trying to upload new modified .htaccess file through FileZilla but every time I face Permission Denied problem. It lists (/var/www/html/.htaccess: open for write: permission denied). Can you tell me what could be the Issue?
Thanks!
Leron Amin says
Hi Mark,
You will have to change the permissions or ownership of /var/www/html in order to upload to it.
I go over the process for changing permission in this tutorial.
Hope this helps, and please reach out if you have any questions!
Joe
CL says
Hi Joe,
I was able to connect FileZilla previously, using clear cut methods that u’ve shared in the article. However, recently when i needed to access FTP again, the same method did not work.
I must point out that from our site we have moved from hosting at Google Cloud to Google Cloud SQL, which could be one of the reasons contributing to the current problem?
Anyways, this message showed up “FTP Host Key Mismatch” and then there is this warning about potential security breach, and at the bottom there is this “Trust the new key and carry on connecting” and underneath that I’ve selected the checkbox for “Update cached key for this host”.
Saw some comments at the forum “Those host key changes do not have to be security breaches, so don’t panic.The most probable explanation is that the Host keys for the sites have been updated by the site hoster (possibly because they expired*). You need to ask them if they did that change. If yes, just let FileZilla update the Host key when you get the warning. It won’t then bother you again until the next change.” which was why i ticked the checkbox and now i’m seeing the below:
Error: Connection timed out after 20 seconds of inactivity
Error: Could not connect to server
Status: Waiting to retry…
Status: Connecting to 35.187.254.58…
Response: fzSftp started, protocol_version=8
Command: keyfile “C:\Users\CL\Desktop\Puttykey\Puttykey.ppk”
Command: keyfile “C:\Users\CL\Desktop\Puttykey\PrivateKey180815.ppk”
Command: keyfile “C:\Users\CL\Desktop\Puttykey\PrivateKey190912.ppk”
Command: open “rsa-key-20190912@35.187.254.58” 22
Error: Connection timed out after 20 seconds of inactivity
Error: Could not connect to server
I’ve tried deleting the newly created ssh key from Google Cloud metadata page, redo the whole thing, yet still receiving the same message.
Once again could you kindly shed some light on what went wrong and how to fix them? Thanks a lot!
Leron Amin says
Hi CL,
I hope you’re well!
If you go through the tutorial again (and generate a new SSH key) you’ll need to make sure you’re updating the public key that you posted into your VM instance’s settings page. Also – what are you using for the username when you try to connect? Try connecting without a username and let me know what happens.
Talk to you soon,
Joe
CL says
Hello Joe,
Been busy with other stuff and just got time to look into this matter again. I’ve tried deleting the previous private puttykeys and also public SSH keys saved at Google Cloud metadata, and restarted the process all over again.
i’ve tried using clp as the username instead of default rsa-key-xxx name, but clicking on Quickconnect led to this
Status: Retrieving directory listing…
Status: Listing directory /home/clp
Status: Directory listing of “/home/clp” successful
it seems to be connected to the wrong directory?
i’ve tried connecting without any username, and the following appeared
Status: Waiting to retry…
Status: Connecting to (my external ip)…
Response: fzSftp started, protocol_version=8
Command: keyfile “C:\Users\CL\Desktop\Puttykey\PuttyKey 191009.ppk”
Command: keyfile “C:\Users\CL\Desktop\Puttykey\clp.ppk”
Command: open “anonymous@(my external ip)” 22
Error: Disconnected: No supported authentication methods available (server sent: publickey)
Error: Could not connect to server
I could not understand what went wrong, as previously it used to work with ease, could you please shed some light onto my problem?
Thank you so much!
p.s. just noticed that when i clicked on the SSH at Google Cloud compute engine, the black screen that appeared showed Ubuntu, which i dont recall seeing so previously. If there has been such changed which is probably made by our developers, could that be the major reason causing such issue on my side? Thanks again!
Leron Amin says
Hi CL,
You had it right the first time!
After you’ve connected to FileZilla using the first method that you mentioned (the one that worked), then look over at the right half of the FileZilla file explorer dashboard and click the top-most folder icon (you’ll see a folder icon with a question mark on it, and there will be a / to the right of it). Clicking this icon will bring you to your webroot, and from there you’ll see all of your website/application files and folders.
Let me know if you have any other questions and I will be happy to help!
Talk to you soon,
Joe
Babak says
thanks so much
i access to plugin section very easy!
directory is
/opt/bitnami/wordpress/wp-content/plugins
Shubham Goel says
I did the same but getting error from filezilla.
fzSftp started, protocol_version=8
Command: keyfile “C:\Users\admin1\Desktop\rsa-key-20190801”
Command: open “rsa-key-20190801@35.232.168.43” 22
Error: Disconnected: No supported authentication methods available (server sent: publickey)
Error: Could not connect to server
Please help me in this.
Thank’s
Shubham Goel
Leron Amin says
Hi Shubaham,
This is a relatively common error, but there can be one or many causes. I’d recommend looking into this resource.
If that doesn’t help, try doing an internet search for “Disconnected: No supported authentication methods available (server sent: publickey)”
Let me know if you have any questions,
Joe
Madfedy says
I paid for some body to host my site of which he did but I find it difficult to log in using FTP with the logins he gave? Saying wrong password. Any help?
Leron Amin says
Hi Madfedy,
You may have to contact whoever is hosting the site to make sure your FTP credentials were configured properly.
Let me know if you have questions,
Joe
anand says
I am moving out of Google cloud. How do I download (export) my sql db? I followed your instructions when installing wordpress on Google Cloud.
Leron Amin says
Hi Anand,
You can use the general instructions in this Bitnami tutorial to learn how to export your MySQL DB.
Let me know if you have questions,
Joe
Ernest Akpos says
Hello Leron
Please is it possible to connect to GPC wordpress instance by entering username and password in filezilla instead of using Private key ? I asked someone for help and he wants username and password to connect to my instance on filezilla and not private key. Thank you very much
Leron Amin says
Hi Ernest,
This setting is disabled by default because it is insecure. However, check out this thread for a workaround (use the solution from answer 2).
Hope this helps!
Joe
Ernest Akpos says
Thank you Leron. But i am stuck here
C) Edit /etc/ssh/sshd_config setting
For a valid user to login with no key
PasswordAuthentication yes
Also want root to login also with no key
PermitRootLogin yes
How do i edit /etc/ssh/sshd_config. Please give me the step by step command to enter to finish this step.Thanks
Leron Amin says
Hi Ernest,
Run the following command to edit your sshd_config file:
Once inside of the file, edit the settings as described in the link I sent you.
Do the same thing for the sudoers file:
Once inside of the file, edit the settings accordingly.
Do note that connecting via FTP with only a username and password is not recommended for security reasons.
Hope this helps,
Joe
Hitesh L. says
Thank you for helping me Leron Amin,
I’m bit stuck, I have run this command (sudo nano /etc/ssh/sshd_config) and edited (PasswordAuthentication yes & PermitRootLogin yes)
I didn’t know what to edit with the command (sudo nano /etc/sudoers) so I skipped it.
Now I’m getting some sort of error when I connect to my server with Filezilla( I require the hostname, username & password right? port to be left empty?)
Kindly assist me at the earliest.
Maksim says
Joe!
Thanks for the articles about WordPress in the GCP.
I think you saved me a few days of work .
RESPECT!!! 😀
Leron Amin says
Thanks for the feedback Maksim!
I am glad to hear that the tutorials have been helpful to you! 🙂
Regards,
Joe
Alizah says
Hello. My posts are getting 404 error (The requested URL /hello-world/ was not found on this server). The posts are visible only on Plain permalink option. In the rest of the option, it’s giving 404 not found error. It’s a new website.
ben test says
I also have this problem. Were you able to fix it?
Leron Amin says
Hi Ben,
I’m assuming you’re using WordPress Click-to-deploy? If so, I posted the solution to this problem in a comment which you can view here.
Let me know if you have questions,
Joe
Roger B says
Thank you mucho for this tutorial; it saved me a little bit of time since Google doesn’t have anything on SFTP that i could find.
Leron Amin says
Thanks for the feedback Roger – I’m glad to hear the tutorial helped you! 🙂
C.L. says
Hi Joe,
Wasn’t able to reply to the previous thread, but once again, you’re the man! Stumbled upon another problem which required me to edit file via Filezilla, and your last comment was really helpful.
Thanks a lot!
Leron Amin says
Glad to hear it! – Thanks for the feedback C.L.
CL says
Hi Joe,
Thanks again for your clear and easy to understand tutorials. I’ve followed exactly the steps showed in the video and managed to access my root directory.
However, when I tried to delete a Plugin due to as the installation was previously interrupted, permission was denied. Here are some of the lines appeared in Filezilla
Status: Deleting 2 files from “/opt/bitnami/wordpress/wp-content/plugins/wp-smushit”
Command: rm “/opt/bitnami/wordpress/wp-content/plugins/wp-smushit/readme.txt”
Error: rm /opt/bitnami/wordpress/wp-content/plugins/wp-smushit/readme.txt: permission denied
Command: rm “/opt/bitnami/wordpress/wp-content/plugins/wp-smushit/uninstall.php”
Error: rm /opt/bitnami/wordpress/wp-content/plugins/wp-smushit/uninstall.php: permission denied
Wonder if there’s any workaround that I can do?
Thanks in advance!
C.L.
Leron Amin says
Hey C.L.,
Thanks for reaching out, and I’m glad you’ve enjoyed the tutorials.
The error you presented appears to be a simple permissions error. I go over how to fix permission errors in the following tutorial.
Take a look at the tutorial and feel free to reach out if you have any questions,
Joe
C.L. says
Hi Joe,
I’ve actually looked into that tutorial of yours moments after posting the previous comment. I guess i’ve successfully changed the permission from initial 775 to 777.
clpoh@wordpress-1-vm-asia:~$ stat -c “%a %n” /opt/bitnami/wordpress/wp-content/plugins
777 /opt/bitnami/wordpress/wp-content/plugins
but when i tried to delete the plugin file, same permission denied message appeared. I’ve then tried changing the file attributes by right clicking the plugin folder > File permission > and changed the default Numeric value of 775, to 777, but to no avail too.
Command: chmod 777 “wp-smushit”
Error: set attrs for /opt/bitnami/wordpress/wp-content/plugins/wp-smushit: permission denied
Your help is very much appreciated!
Leron Amin says
Hi C.L.,
The command to change the permissions would be:
The command to delete the plugin would be:
As a precaution, I would recommend first navigating into the plugin directory, then deleting the plugin from there:
Make sure that you’re creating regular backups of your website before adding/deleting files.
Let me know if you have any questions,
Joe
C.L. says
Hi Joe,
I’ve tried changing the permission by connecting to SSH at Google Cloud Console, but still got the same lines as what showed up when I tried doing the same thing via FileZilla
clpoh@wordpress-1-vm-asia:~$ chmod -R 777 /opt/bitnami/wordpress/wp-content/plugins/wp-smushit
chmod: changing permissions of ‘/opt/bitnami/wordpress/wp-content/plugins/wp-smushit’: Operation not permitted
chmod: changing permissions of ‘/opt/bitnami/wordpress/wp-content/plugins/wp-smushit/uninstall.php’: Operation not permitted
chmod: changing permissions of ‘/opt/bitnami/wordpress/wp-content/plugins/wp-smushit/_src’: Operation not permitted
chmod: changing permissions of ‘/opt/bitnami/wordpress/wp-content/plugins/wp-smushit/_src/scss’: Operation not permitted
I tried ” sudo rm -rf /opt/bitnami/wordpress/wp-content/plugins/wp-smushit ” but nothing showed up.
But when I tried to look up the plugin file again via FileZilla, I can no longer find the file, so tried installing the plugin again and IT WORKED!!
Thanks again so very much, Joe! Although still unable to change the file permission to 777, but in the meantime my problem is solved. So gonna subscribe to your page and channels.
Leron Amin says
Hi C.L.,
You have to include “sudo” in front of chmod command:
I corrected this mistake in my previous comment.
Hope this helps,
Joe
Kaibron says
Hello, could you tell me how to get his wordpress dashboard back? Because I installed extra security before accessing my dashboard. This consists of, in addition to the usual username and password, to answer a question that only the administrator knows. And it turns out that for two days, the famous question no longer appears on the login page. I find myself with the access denied because I do not answer the question. Question that I would like to answer but that is unfortunately invisible…
I would also like to mention that I am on GCP.
Thanks in advance for your support
Leron Amin says
Hi Kaibron,
You will have to SSH into your website and delete that plugin.
To increase your project’s security, I would recommend using strong passwords and taking regular backups of the VM that houses your WordPress website. Additionally, add 2-factor authorization to the Google Cloud account. This way, even if your website gets hacked, you’ll be able to quickly restore it from one of the backups which are housed in your Google account.
I hope you find this information helpful, and let me know if you have any questions.
Joe
Kaibron says
Exactly Leron,
I wanted to know if you had not made a tutorial about it. I mean by that, got into SSH, found the plugin and deleted it.
Leron Amin says
Hi Kaibron,
I did not make a tutorial on how to accomplish this, but you can check out this tutorial for examples of common Linux commands and their use.
For your situation specifically, the easiest thing to do is simply to SSH into your VM instance, and run the following rm -rf command to delete the plugin. Remember to replace absolute/path/to/plugin with the absolute path to your plugin.
Remember to be very careful when using the
rm -rfcommand, because it will forcefully remove files/directories.If you want to take a more cautious approach, you could SSH into your VM instance and then run the following command to change the permission level of the plugin to 777 (read, write, execute):
Then connect to FileZilla, locate the plugin folder, then delete it.
The only issue with the second method is that it adds an extra step, however, it is what I would recommend if you don’t feel fully comfortable using the
rm -rfcommand in the SSH terminal.I hope this information helps and let me know if you have any questions,
Joe
Anton Lim says
Hi,
If I want to just give access to specific folder for specific user, how i can manage it?
thank you for your tutorial 🙂
Best Regards,
Anton
Leron Amin says
Hello Anton,
Check out this thread for some methods on how to restrict/grant access to folders for specific users.
Let me know if you have questions,
Joe
Anton Lim says
Hello Joe,
I have done like the step above, but my filezilla got connection timeout.
My condition is like this:
My server is windows instance windows server 2008 in google cloud.
I have installed filezilla and putty key gen in my client pc that want to connect to server.
I have put ssh key in metadata in google cloud console
this is the response from my filezilla
Response: fzSftp started, protocol_version=8
Command: keyfile “D:\Documents\Projects Start Document\Server\1\putty-private-key.ppk”
Command: open “rsa-key-20180630@*5.1*7.15*.*0*” 22
Error: Connection timed out after 20 seconds of inactivity
Michael Backus says
I am having the same issue. Did you every figure out how to resolve this problem?
armando says
same issue
Tech Dog says
Hi
Thanks for help. I am following the same method but getting the error “Disconnected: No supported authentication methods available (server sent: publickey)”. Any idea why?
Regards
TD
Leron Amin says
Hi Tech Dog,
The first things I would check are:
If you’ve accomplished all of these things and you’re still having issues, please feel free to reach out and I will see how I can help.
Thanks,
Joe
ChrisandTre says
I’m having the same issue, did Tech Dog ever come up with a solution?
I get the same error when trying to connect through PuTTY (Putty’s says Disconnected: No supported authentication methods available (server sent: publickey)
1. I believe it’s the same name… tried many variations of the name as well… Is it the same name that is listed in the private key?
2. sftp:// yes.
3. Private key uploaded yes.
Thanks!
Mary says
Just wanted to say Thanks for the help. I have been watching your videos since yesterday trying to move all my wordpress sites from GoDaddy. You have helped way more than google has. Now I have to go check secure connection. Ughhh
Thanks a bunch
Mary
Leron Amin says
Thanks for the feedback Mary – I’m glad to hear the tutorials have helped you! 🙂
Taylor says
Once again, this worked like a charm. I really have to hand it to ya – I’m totally new to Google Cloud and your tutorials are making this a breeze.
Leron Amin says
Thanks for the feedback Taylor – I’m glad you found the tutorial helpful! 🙂
Ethan says
Hey Leron,
Wonderful tutorials! Simple and easy to follow.
Question:
1. I sftp on filezilla and noticed that wp-content and plugin directories were missing. Also, the all the permission were bitnami:bitnami and not-bitnami:daemon.
2. Does this mean my site was hacked? Can’t find any of my wordpress stuff.
Thanks,
Ethan
Leron Amin says
Hi Ethan,
Thanks for the feedback!
And no – you weren’t hacked.
In FileZilla, after connecting to your VM, enter the the following in the Remote Site field (the text input field above where the remote folder/directories are listed)
/apps/wordpress/htdocsThis will show the directory contents of your WordPress installation, which is where your wp-content directory is located.
Please let me know if you have any questions,
Joe
Ay says
Hello Joe
are there any way to connect ftp on amazon cloud
Leron Amin says
Hi Ay,
The instructions are nearly the same as in this tutorial, except with FTP you’re configuring the graphical user interface.
That being said, check out this thread for step by step instructions for FTP on AWS.
Feel free to reach out to me if you have any questions,
Joe
Claire says
Hi Joe,
I have a question. I set up Filezilla on my Mac, and unfortunately, my computer broke (and is completely dead)… so now I have a new mac. Is it ok to just download the Filezilla again and follow your tutorial? Does it matter that I already set it up on my old computer and essentially lost it?
Thanks,
Claire
Leron Amin says
Hey Claire,
There shouldn’t be any issues – you can start from scratch and re-install Filezilla.
Let me know if you have any questions or run into any issues,
Joe
Ay says
Hello
I have a new issue I have installed a wp-rocket plugin to cache my site but give this errors in google speed test
Leverage browser caching
Setting an expiry date or a maximum age in the HTTP headers for static resources instructs the browser to load previously downloaded resources from local disk rather than over the network.
my htaccess file have the codes for a cache but not work properly
plz can you check this page
https://docs.wp-rocket.me/article/80-browser-caching
they tell that may Apache expires module ( mod_expires) is turned off
how can I test for that and how can I turned it on I have installed WordPress bitnami version
also is the htaccess file cause this problem it have 644 permisson
Leron Amin says
Hi Ay,
Here is a basic guide you can use regarding configuring expires headers, including how to activate the mod_expires module.
Also check out this guide about optimizing a Bitnami WordPress install.
Hope this helps,
Joe
Ay says
Thanks alot my friend really i tried many tutorials but all not working
i think that your site have the same problem
https://developers.google.com/speed/pagespeed/insights/?url=https%3A%2F%2Fonepagezen.com
plz try to solve this problem and record all setting
i have 3 day try to solve the problem but failed you have good experience so you will find the right solution rather than me
Great thanks to my friend Leron
Leron Amin says
Hi Ay,
The issues that you see listed in Google Pagespeed insights are suggestions on how to improve your website’s load time – they’re not indicative of a problem with your website. To check for indexing problems, make sure to set up your website with Google Webmasters.
With setting up expires headers, it’s important to know the expiration to set for each element. For instance, elements on your page that remain constant such as your website’s logo, sidebar items, etc. should have a different expiration that items that change more frequently.
Anyways, follow the guide I sent you about configuring expires headers, and check out this resource to make sure mod_pagespeed is enabled on your Bitnami install. These will both help to reduce your page-load time.
Hope this helps,
Joe
burhanuddin says
Hi sir,
i have hosted woocommerce website on google cloud. when i am installing plugin on my wordpress website its asking for ftp credential for installing plugin. i have input external ip and ssh username but its asking host name. please suggest what should i do.
Leron Amin says
Hi Burhanuddin,
The host name is your external IP address, preceded by sftp://
For instance, your host name would be sftp://134.110.63.223 if your external IP address is 134.110.63.223.
You username is either bitnami or whatever you configured it to be (In step 3 of the tutorial, you set your username by entering it in the Key comment field).
Let me know if you have any questions,
Joe
burhanuddin says
yes, i have enter sftp://134.110.63.223 in host name and rsa-key in username and password left empty but its still saying FTP hostname is required. please brief me how to install plugin from wp-admin.
where can i send you the screenshot of this issue?
Leron Amin says
Hi Burhanuddin,
I have not had any experience with any plugins that require you to provide them with FTP information, so for that reason, I don’t have a solution for you.
What I would do is try to contact the plugin developer and see if they can help. Based on what you’ve described, The rsa “key comment” would go in the username field, and you would use port 22.
I hope this information helps!
Joe
burhanuddin says
Hi sir,
Below message is showing on WordPress dashboard. i have run 777 permission command in SSH. how do i fix it.
“File Permission Issues
We were unable to modify required files. Please ensure that /opt/bitnami/wordpress/wp-content/uploads/ has the proper read-write permissions, or modify your wp-config.php file to contain your FTP login credentials as outlined her..”
Leron Amin says
Hi Burhanuddin,
What plugin are you trying to configure?
Did you try to change the permission level of your /opt/bitnami/wordpress/wp-content/uploads/ directory?
Talk to you soon,
Joe
Leron Amin says
Also, you can send me a message through Facebook messenger on the One Page Zen FaceBook page and I will take a look at it if you’d like.
Talk to you soon,
Joe
tiger nak says
Thanks for the great tutorial.
I also got permission denied problem while tried to open home directory.
Is there any way to got a root permission using filezilla?
Leron Amin says
Hi Tiger,
Thanks for posting a comment!
Unfortunately, I am not aware of a way to get root permissions through FileZilla. You will likely have to change the permissions of the file/directory that you want to edit through the SSH terminal prior to editing the file via SFTP, as shown in this tutorial.
Let me know if you have any other questions. 🙂
Joe
Bimbimz says
Hello bro.
If i running google compute engine without cms,
where my root directory is located ?
Thx
Leron Amin says
Hi Bimbimz,
If you’re not using a CMS, you can upload files directly to your server’s ‘root’ without specifying a file path if you’re already a root user. (sudo -i)
Let me know if this answers your question.
Talk to you soon,
Joe
Bimbimz says
yes thanks for the answer it is very helpful,
Note
if there is spare time please create tutorial about:
* running bootstrap 3.x in google cloud.
* hide / change phpmyadmin page url in wordpress
Thx
Leron Amin says
Hi Bimbimz,
Those sound like good ideas for tutorials.
I will look into them. Thanks for the suggestions! 😀
Joe
Leron Amin says
Hi Bimbiz,
If you’re not using a CMS, you can upload files directly to your server’s ‘root’ without specifying a file path if you’re already a root user. (sudo -i)
Let me know if this answers your question.
Talk to you soon,
Joe
Shyam Chathuranga says
Hey mate,
You just saved me a lot of research time. You were ranking on the first page just when I searched without knowing how to access the files of a site hosted on Google Cloud and your article solved both problems I faced instantly. (File permission 2nd problem)
Instructions are very clear. BTW, I think I love your tutorials and going to subscribe through this comment. Keep up the great work.
Thank you,
Shyam Chathuranga
Genesis Developer
Leron Amin says
Hey Shyam,
I am glad to hear that the tutorial was helpful to you!
Thanks for taking the time to post a comment and share your experience! 😀
Best regards,
Joe
Chris says
Hi Joe, I’m working through most of your tutorials. When creating the SSL certificates, this recommendation is given, “Your account credentials have been saved in your Certbot configuration directory at /etc/letsencrypt. You should make a secure backup of this folder now. This configuration directory will also contain certificates and private keys obtained by Certbot so making regular backups of this folder is ideal.”
When I try to download a copy this folder using Filezilla, I get
“Error: Directory /etc/letsencrypt/accounts: permission denied
Error: Failed to retrieve directory listing”.
I assume that’s because there’s security on the folder. Can you tell me how to handle that?
Thanks for all your work!
Chris
Leron Amin says
Hey Chris,
You don’t need to make regular backups of your SSL certificates simply because they are free and you can issue new ones at any time.
I would, however, recommend that you take snapshots of your virtual machine at regular intervals (maybe 2x/month, depending on how often you update your site) in order to ensure that your data (including your SSL certs) can be safely recovered in case it breaks and can’t be easily restored.
If you still want to make a backup of your SSL certificate files, what you would need to do is follow this tutorial.
At step 4, the command you would execute is:
sudo chmod -R 777 /etc/letsencrypt/
Remember to revert the files back to their default permission level (the reason for step 3).
After making these changes, you should be able to download the entire letsencrypt directory and it’s contents.
Good luck and let me know if you have questions, 🙂
Joe
Mike says
Beautiful post. Nicely explained. And it works. Thanks.
Leron Amin says
Hey Mike – thanks for commenting!
I am glad you found the tutorial helpful!
Best regards,
Joe
Rob McDonald says
Hey wanted to comment here to get some help in connecting to my files using Cyberduck. I use a MacBook Pro, and I have to admit up front, that I am not that great with the command line, but I can get through it if I know the right commands to use.
Having said that, I am having issues SFTP to my files using cyberduck. It doesn’t like the keys, or the format of the keys I am using , and it keeps asking for a passphrase, which I did not add when I created the keys. I don’t have the same problem when I create an image through the bitnami launchpad, as it generates the keys, both in .ppk and .pem and I just download the .pem file and I connect fine. However, I don’t really want to use the bitnami launchpad install as it has its limitations that I won’t go into here.
Do you know of any tutorials for us that are using a mac trying to connect to our files with Cyberduck.
Hope you have a great week!
–Rob
Do you know of any tutorials out there using cyberduck with a mac
Leron Amin says
Hey Rob,
Unfortunately I don’t have a solution to your problem.
I know Deepak proposed a solution in one of the comments before you, but if I remember correctly that pertained to the Bitnami configuration.
Please let me know if you find the solution, as several other people have asked this same question!
Best regards,
Joe
Rob McDonald says
Hey Joe,
I have not really found a solution yet either, but I find a work-around.
I used the .pem key that was generated by the site I created with the bitnami launch pad and added it to the site that was generated by the google launchpad. I added this key to the VM instance under the custom metadata with the value of sshKeys.
Once I did this I was able to use this key to login with Cyberduck. I don’t know if this will work on every vm instance that I add, but maybe I can used this single key on multiple sites until I can figure out another way.
-Rob
John says
Can you make a tutorial for cyberduck
Leron Amin says
Hi John,
Will do – and thanks for the tutorial suggestion!
Best regards,
Joe
deepak sharma says
for cyberduck use the same .ppk key as the ssh private key and you can use use the above tutorial for cyberduck , file zilla and cyberduck bith can use .ppk , where as in cyberduck you can also use .pem file . so follow the tutorial and open cyberduck in servername fill the external ip, select port 22 for ssh, fill username form the putty gen key comment , and use the saved putty gen private ket i.e .ppk file as ssh private key in cyberduck and as far as i know you can connect. i have used .ppk key many times in cyberduck
check this out https://community.bitnami.com/t/how-can-i-get-a-pem-file-for-cyberduck-using-bitnami-wordpress-on-google-cloud-console-not-on-bitnami-site/50571/2
Rob McDonald says
Deepak,
Have you been able to get this to work with Cyberduck? The reason I am asking is that I have tried this method and it doesn’t work for me. It clearly states in the bitnami documentation that Cyberduck need the key in .pem format. So I think that is my problem. My Cyberduck will not take the .ppk key.
I was able to used the .pem key that was generated by the site I added with the bitnami cloud launcher and use it on the site I created with the google cloud launcher. The bitnami launcher creates both types during the install, which you can download to your pc, but the google cloud launcher only creates the ppk, which does not give you the option to download.
Not sure why bitnami does this and not google, but at least I was able to use that key to cyberduck to my vm instance.
–Rob
deepak sharma says
Yes it was working fine, but i can’t talk about the current requirements as i am not able to connect to my instance since few days due to some different serious bad configuration .
But earlier it was working for me https://trac.cyberduck.io/wiki/help/en/howto/sftp#PuTTYKeyFormatInteroperability this link also says a bit about it. I am not using mac so i can’t comment with confidence. But in short as per my understanding both .ppk & .pem file should work for cyberduck as per their documentation. And you are right it is not easy to create a .pem file using google cloud platform and that was the reason i asked this question in the bitnami forum https://community.bitnami.com/t/how-can-i-get-a-pem-file-for-cyberduck-using-bitnami-wordpress-on-google-cloud-console-not-on-bitnami-site/50571/2 . thanks
Ralco says
Hey there Leron,
I am trying to upload new modified .htaccess file through FileZilla but every time I face Permission Denied problem. It lists (/var/www/html/.htaccess: open for write: permission denied). Can you tell me what could be the Issue?
Thanks!
Your Blog is Amazing 🙂
Leron Amin says
Hi Ralco,
Thanks for commenting!
You are going to need to connect to your instance with SSH from your VM instance page.
From there, enter the command sudo chmod -R 777 {DIR}
For example, if you wanted to change the permissions for the /opt directory and all of it’s children, you would enter chmod -R 777 /opt
This fix is not a best practice if you have multiple users with access to your Cloud Project files, as it grants full Read/Write/Execute permissions to all users.
Let me know if you have other questions!
Thanks,
Joe
Benjamin Waller says
Hello Joe,
This looks good but unfortunately I am on a Mac so I can’t use PuTTy to generate SSH keys. Though doing a quick search online, I think I can use the in-built Terminal app and using command line. I found a video tutorial here https://www.youtube.com/watch?v=W0f2zfhH9HU
which does the same sort of thing you did but without the graphical interface. I will have to look more into it.
Thanks again Joe.
Best regards,
Ben
Leron Amin says
Hey Benjamin,
I checked out the video that you linked to and it looks relatively easy to configure on Mac. The reason I used PuTTY is because I know many users prefer to avoid the command-line-interface whenever possible (which isn’t very often when working on GCP). Looks like you could just do the same steps from the PuTTY tutorial except you’d have to open up and copy the contents of the public key file. Let me know if you figure it out and what the process was like!
Talk to you soon,
Joe
Mohamed Hak says
Hello Benjamin,
I am working on mac too, Can you tell me please how did you get the username for filezilla because Joe got it from Putty under Key comment.
I followed the video you shared and it is not clear.
thank you
Benjamin says
Hello Mohamed,
Look at this tutorial from Joe. All the steps are the same except that you stay in the Terminal to create the ssh key and then open the public key using ‘vi’ command.
https://onepagezen.com/manage-wordpress-files-on-google-cloud-platform/
It was fairly straight forward. Hope that helps.
Cheers,
Ben
Leron Amin says
Did this tutorial work for you?
Please leave your questions and comments below!
Thanks,
Joe