Interested in hosting WordPress on AWS?
In this tutorial you will learn how to install WordPress on Amazon’s AWS Cloud Platform using the Bitnami version of WordPress on AWS.
Hosting WordPress on Amazon’s massive cloud network allows you to take your WordPress website to the next level.
Although hosting WordPress on AWS offers amazing performance, it can be challenging. If you’re a new to the development world, you may be interested in managed shared hosting or managed cloud hosting.
To get started, create a free AWS account and follow along with the video above. If you get stuck, check below to see the steps listed individually with their commands.
There are 8 steps in this tutorial:
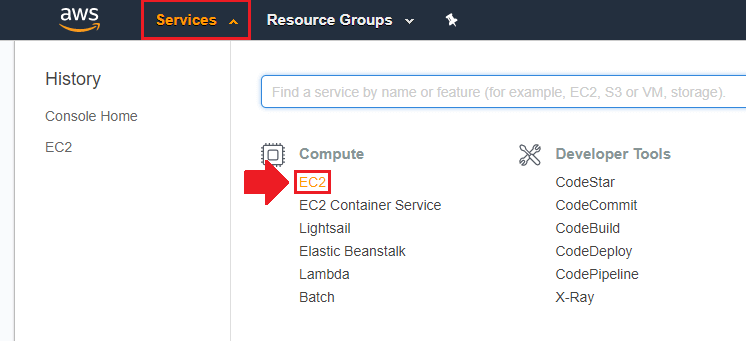
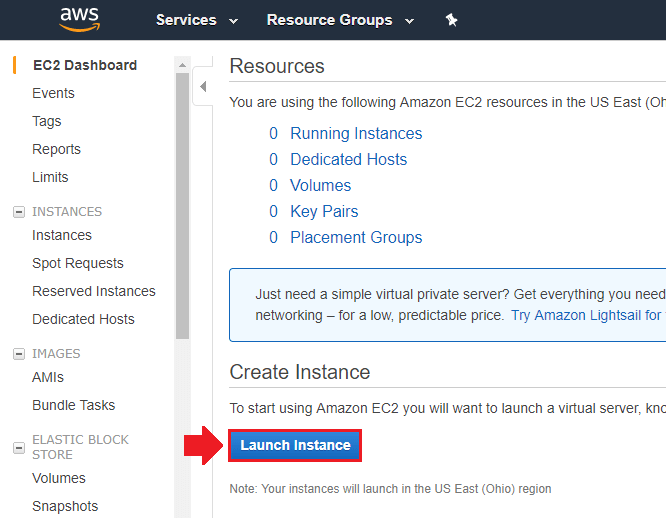
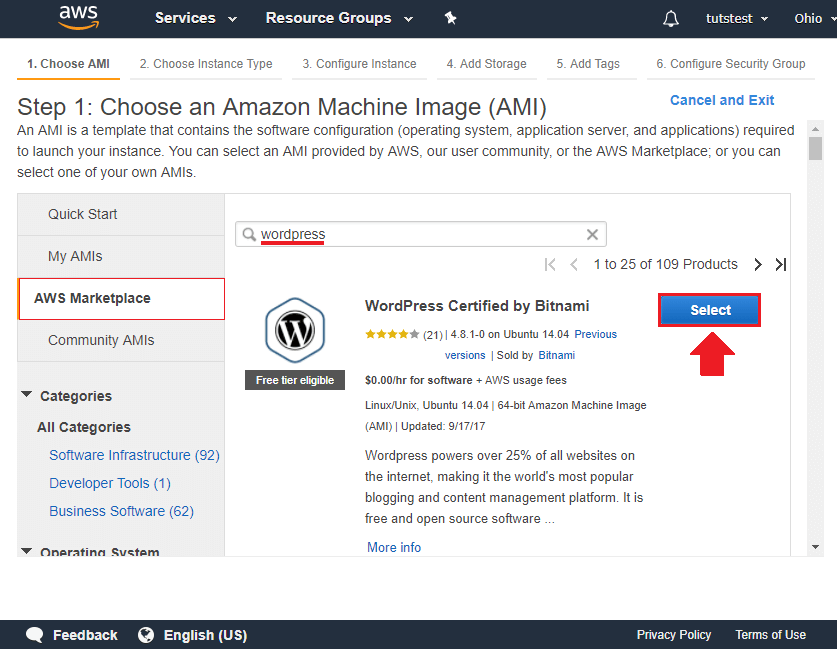
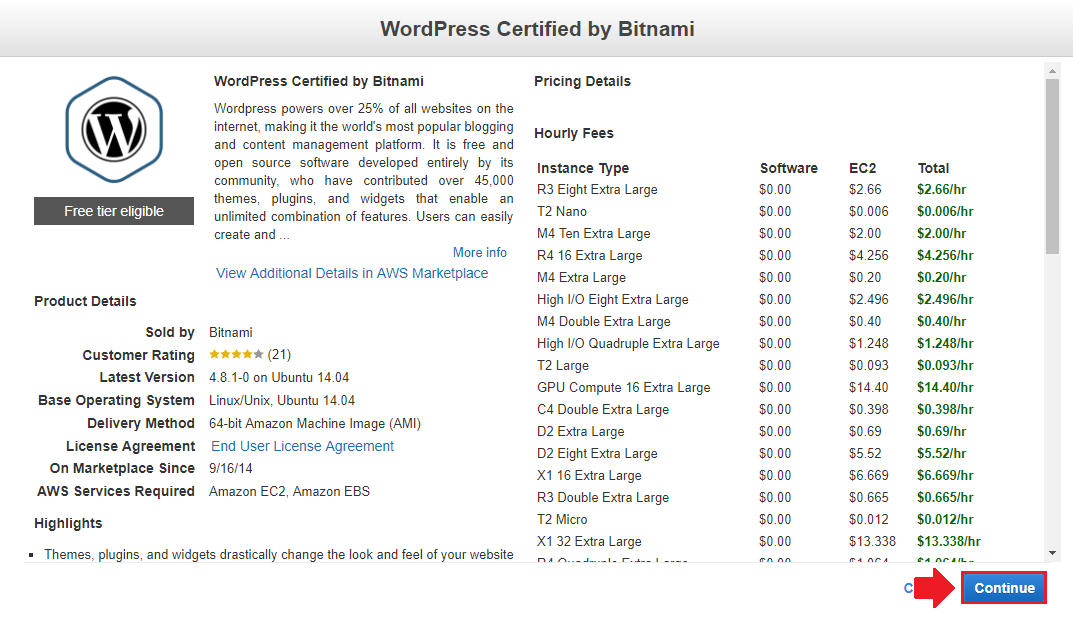
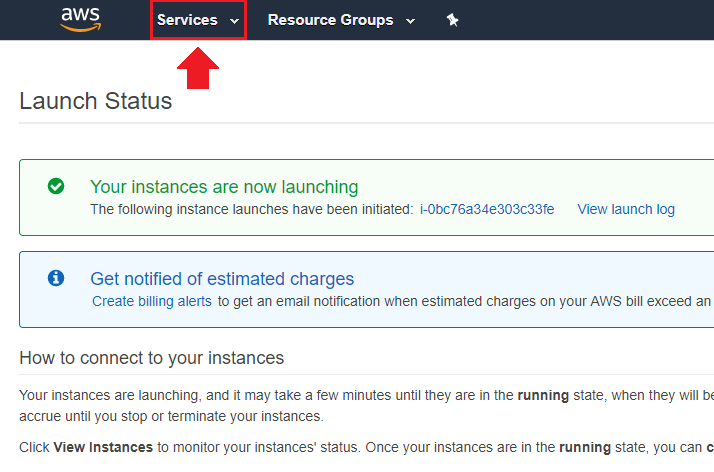
1. Launch a WordPress Instance
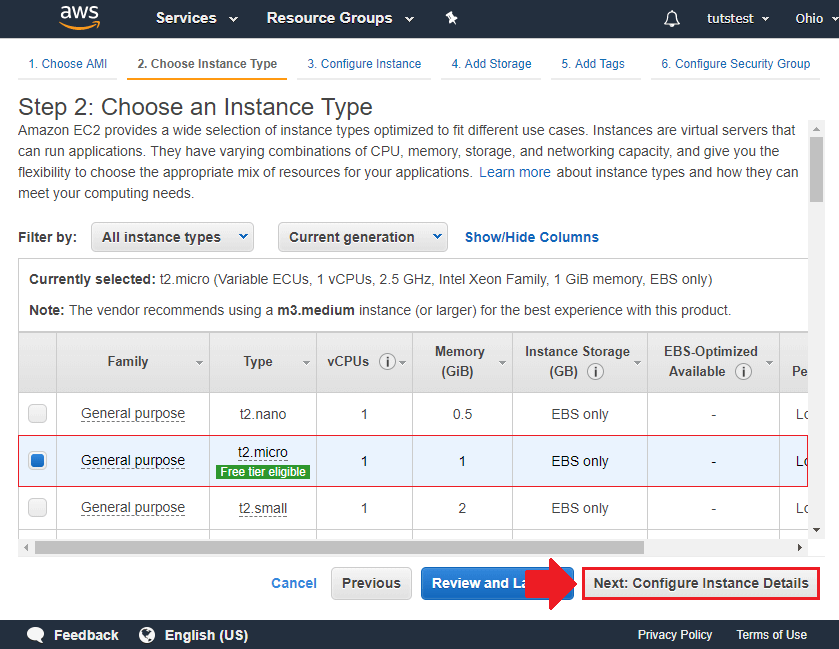
2. Choose Instance Type
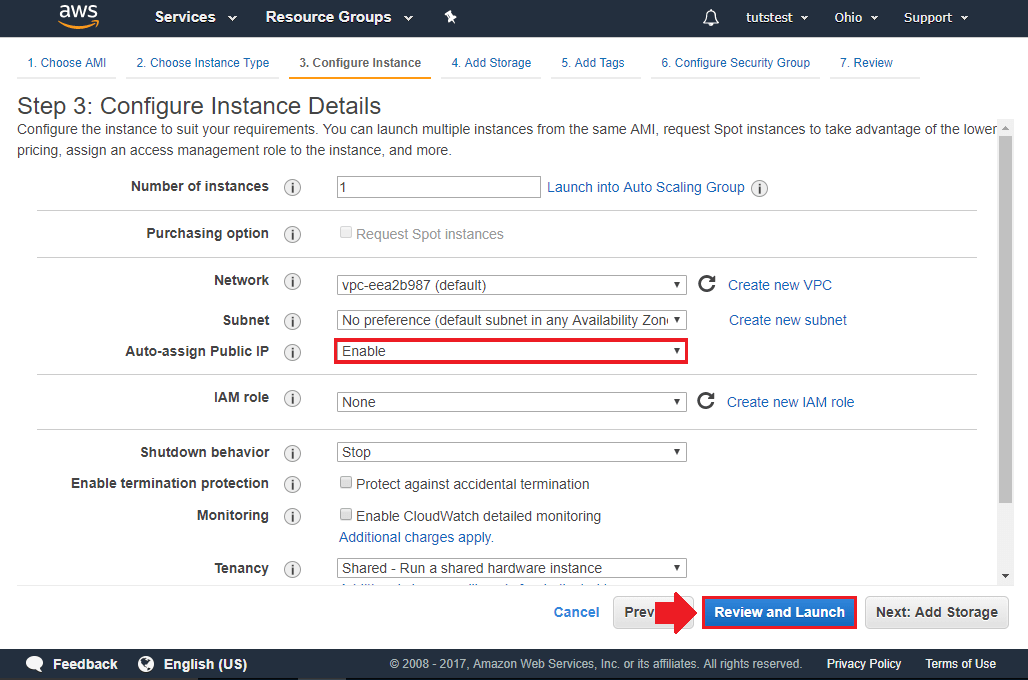
3. Configure Instance Details
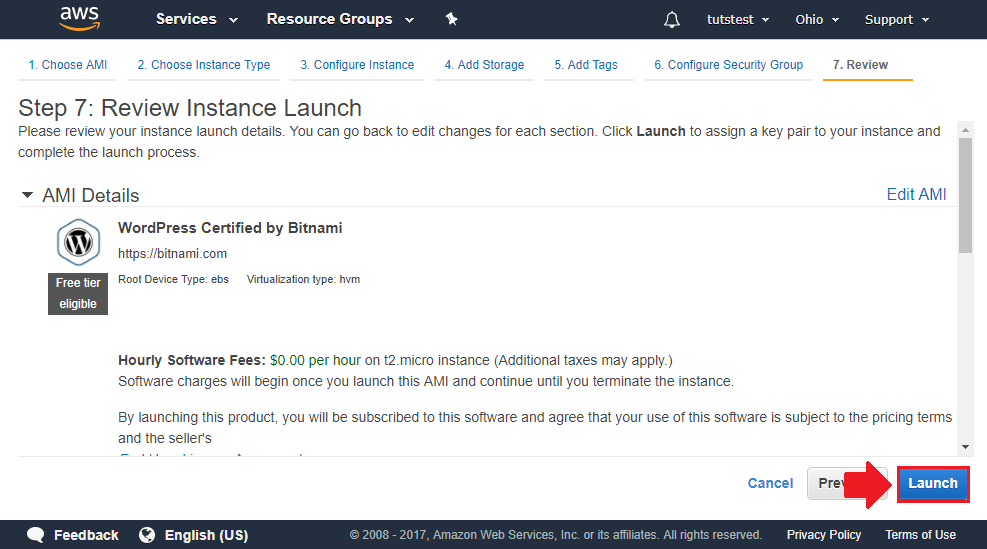
4. Review Instance Details
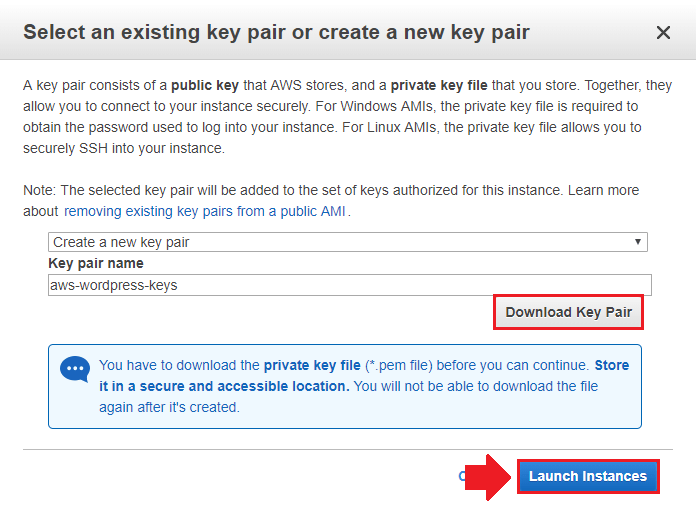
5. Generate SSH Key
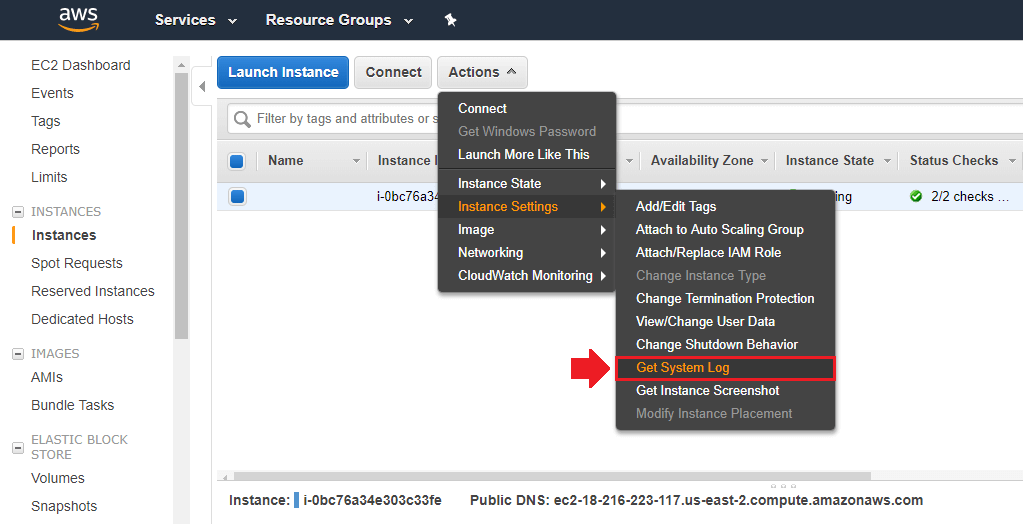
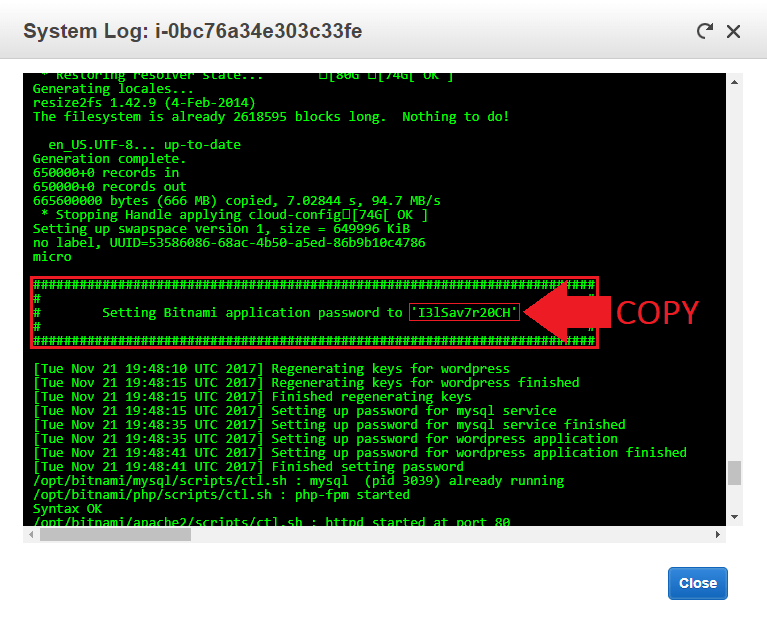
6. Obtain WordPress Credentials
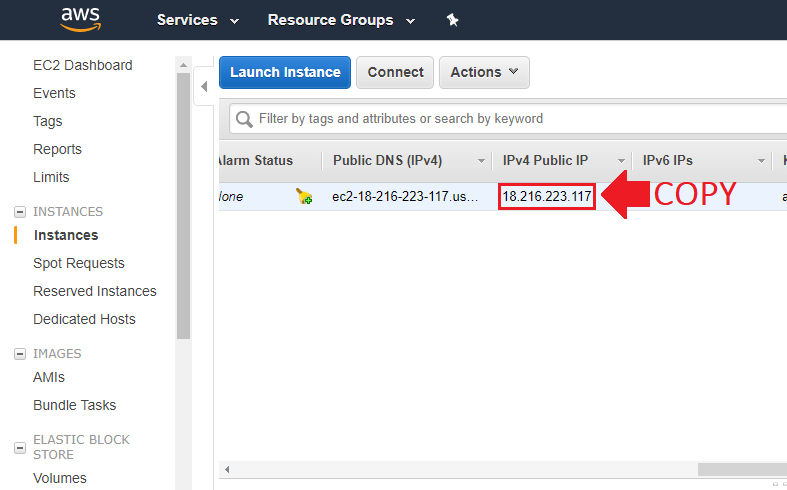
7. Copy External IP Address
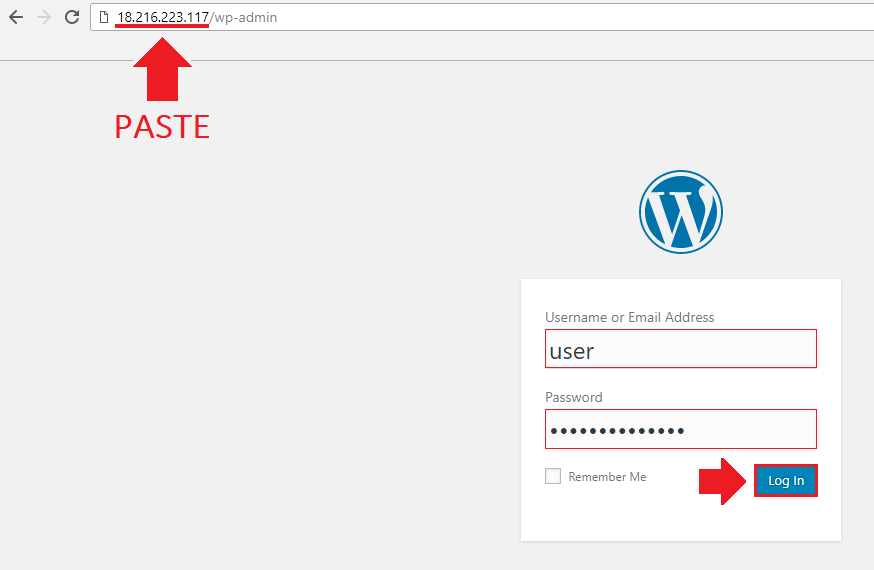
8. Login to WordPress
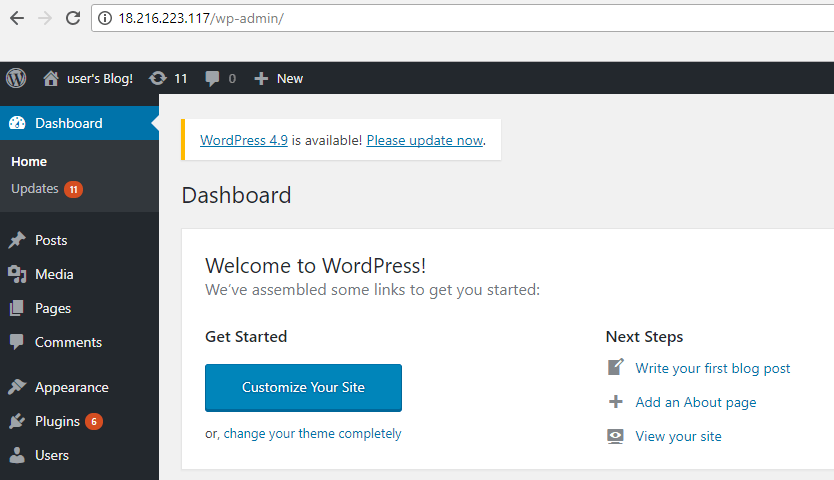
That’s it!
You’ve successfully launched a WordPress application in a virtual machine instance on AWS!
Now that your WordPress application is successfully configured, you can look into more advanced functionality such as setting up a domain name and SSL encryption.
If you have any questions or comments about this tutorial, please be sure to post them below!
Thanks,
![]()
Up Next…
David Smithey says
I have followed the directions on your page and watched the video; however, in my system log there is no box with the application password. I downloaded the log file and searched it for “password” and it does not exist. In fact my log file does not have the box with the application password that your screen shot shows. Has this changed since you wrote your instructions and made this video? Thanks. David
Xuefeng says
Hi Sir,
Thank you so much for your tutorial. I am just getting started with WordPress and AWS. If I want to migrate the website and change its domain name, is it this the right steps: 1) install WordPress in new AWS account; 2) use plugins to migrate old website into new WordPress website; 3) change new website domain name; 4) maybe redirect the old website domain name to the new one in case old users do not know about this transfer.
Please help me with this, thank you so much!
Xuefeng
Leron Amin says
Hi Xuefang,
You would first want to launch a bare-bones WordPress website on AWS and configure the domain name and SSL on this new deployment.
Once that’s done, you will want to use the All-in-One WP Migration plugin to export your existing site, making sure to use the Find and Replace feature to replace your old domain name with your new one. Once that’s done, generate the export and import it into your running bare-bones WordPress website on AWS.
Hope this helps and let me know if you have questions,
Joe
shank says
Hey zen, All aws tutorials are complete..But please make a tutorial on “How to install SSL certificate” on amazon EC2
Leron Amin says
Hi Shank,
I am currently working on it.
Thanks for the great suggestion,
Joe
shank says
Yeah thanks dear..waiting for your tutorials
Danish Haidri says
Great tutorial, i have launched the instance but when i go to ‘instance settings’ > ‘get system log’, it is a blank screen with black background? How do I get the password to log into WP-Admin?
Leron Amin says
Hi Daniel,
I’m not sure why the credentials aren’t showing up in the log. I would give it a few minutes then check back.
Talk to you soon,
Joe
Bibhash Roy says
Hi,
I have the following questions
[1] Your youtube video showed the usage of the free tier Amazon Linux free tier instance. I believe this is good for demo. But what instance should I pick for a live production wordpress site? And how do I decide on scaling in future in terms of instance? I am ready to pay for the right AMI.
[2] Is it better to install bitnami wordpress module on top of lamp stack instead of bitnami wordpress if in future, I need to host multiple wordpress sites on the same instance?
Leron Amin says
Hi Bibhash,
Great questions!
[1] The free tier instance is just their smallest available machine. It’s a good option for most small-medium size WordPress websites. Unless you know your machine requirements beforehand, I’d recommend starting small and monitoring resource usage to determine if migrating to a bigger machine is necessary.
[2] If you intend to run multiple WordPress websites on the same instance, I would recommend starting with a more powerful machine. If you’re going to stick with a Bitnami solution, you won’t find as much benefit to installing Bitnami outside of the one-click solution. If you’re looking to scale, I’d instead recommend a generic WordPress Multisite installation on top of LAMP stack.
Let me know if you have any questions,
Joe
Ansar Ulhaq says
Hi
I had EC2 instance running and website hosted. Now my EC2 instance and route53 hosted zone have disappeared but the website is still live. Can you please tell me what is the reason for that and how can I recover my EC2 instance and hosted zone, please?
Leron Amin says
Hi Ansar,
Make sure that you’re viewing resources in the region in which your project was created. For instance, if the instance and hosted zone were created in us-east-1 but your’re viewing resources in ap-south-1, that would explain why those resources aren’t appearing.
Let me know if you have questions,
Joe
Lunarshade says
After WordPress installation I want to change WordPress Address (URL) from http to https how can I do that and also email address is not changing. Is their any way to configure WordPress file then pls explain. My website is lunarshade.com I am using cloudflare free SSL certificate.
Leron Amin says
Hi Lunarshade,
Check out the instructions in this tutorial to learn about changing your WordPress URL from http to https.
Let me know if you have any questions,
Joe
Aashish Sharma says
i am facing 2 issues.
1) How to change WordPress Admin email(user@example.com) to my email
2) accessing DB using phpmyadmin
Leron Amin says
Hi Aashish,
1) You will have to change your admin email from the WordPress admin dashboard under Settings > General.
2) You can only access phpMyAdmin via SSH tunnel. See the instructions from the documentation here, and the SSH tunnel tutorial that I created here.
Let me know if you have any questions,
Joe
Kalyan says
Does this wordpress incur any charges or is it completely free?. Because I see in one screen there are too many pricing listed.
Leron Amin says
Hey Kalyan,
No – it is not completely free.
The free micro instance is only free for one year. Also, there are several miscellaneous usage charges that aren’t covered under the free tier (DNS, Bandwidth, etc.).
Hope this answers your question,
Joe
patrick perez says
You are the man! this was a very clear tutorial which saved me hours of work. Literally got it up and running in less than 10 minutes. Thanks!
Leron Amin says
Thanks – I’m glad you found the tutorial helpful!
Billy says
Yes sir it Worked like a charm ..THANK YOU!!!!! I want to build a website for towing and Roadside assistance.. Do you have any instructions from just part on that may help me like with the right pictures and SEO and all that good stuff?? Thank you again..
Leron Amin says
Hi Billy – I’m glad it helped.
If you’re getting just started with WordPress, the #1 thing I would recommend is that you install Yoast plugin to guide your website’s SEO.
Let me know if you have any questions,
Joe
Kris says
Hello and thanks for this tutorial!
My question is what would be the benefits of running a wordpress site on AWS? Would it provide faster page load? More secure? How does the cost of running a 1,000 visitor a month site compare to just regular hosting?
thanks for your time and help!
Leron Amin says
Hi Kris,
You will generally get better performance from running your website on a cloud platform, dollar-per-dollar, than you would from using a shared hosting provider.
That being said, the cost of running a 1,000 visitor/month site would proabably be about the same – 2-3 dollars or so – just like what you would pay with a shared hosting provider. For a 1,000 visitor/month site, you won’t see a great deal of added value from migrating to the cloud.
The main benefit of cloud is it provides virtually unlimited functionality for your site. So if you were anticipating your site growing and adding lots of new features/integrations, then using a cloud platform would be much more cost effective than using a shared hosting provider in the long run.
Hrishi Dere says
Hello Sir,
As per your suggestion I am currently using Amazon Web Service to host my website. I have install WordPress with Lets Encrypt SSL properly with your article. Thank You for writing such helpful article.
But I have a minor issue. Currently in my WordPress general settings my email address is user@example.com. I want to change it with my G mail address. When i overwrite my email address it said There is a pending change of the admin email to myaddress@gmail.com but I dont receive any mail to confirm. Is there any way to change it. Thanking You
Regards
Hrishi Dere.
Hrishi Dere says
Hello Sir
I need your help in a matter with AWS. I follow your guide for learning cloud system. First I create a successful google cloud for my website but then due to some technical issue I move to AWS. Now the problem is AWS is charging me for using their Route 53 and I were not aware of this. I register my website with Google Domains. So is it possible to use Google DNS for AWS instance with the same configuration I have set for my website now.
I have contacted AWS twice about this and they said they will remove the Route 53 if I do not want to get charged but they also said that this will bring my website down and I dont want this.
Please help me as I am very new to cloud management and help me survive my website.
Thanking You
Regards
Leron Amin says
Hi Hrishi,
Neither Cloud DNS nor Route 53 are free services. The charge for using Route 53 is quite small; it starts at 50 cents per hosted zone, and 40 cents for the first 1,000,000 queries. So the cost of using Route 53 with most WordPress websites would be between 50-90 cents per month.
Google’s Cloud DNS service follows a similar pricing model, and you can expect to pay a comparable amount whether you use Route 53 (roughly 50 cents per month) or Cloud DNS (roughly 25 cents per month).
I hope this answers your question! 🙂
Talk to you soon,
Joe
Leron Amin says
Did this tutorial work for you?
Please share your questions and comments below!