Did you know that you can quickly configure your Let’s Encrypt certificates to automatically renew themselves by executing a simple letsencrypt auto-renew script?
Configuring auto-renew for you Let’s Encrypt SSL certificates means your website will always have a valid SSL certificate.
In this beginner tutorial you will learn how to configure your Let’s Encrypt SSL certificates to automatically renew themselves prior to their expiration date.
Before getting started with this tutorial, you should have already configured Let’s Encrypt SSL certificates for an Apache server on Google Cloud compute engine.
If you haven’t yet configured your SSL for your website, here is the tutorial for the Click-to-deploy (standard Apache) and Bitnami (custom Apache) server configurations.
There are 6 steps in this tutorial:
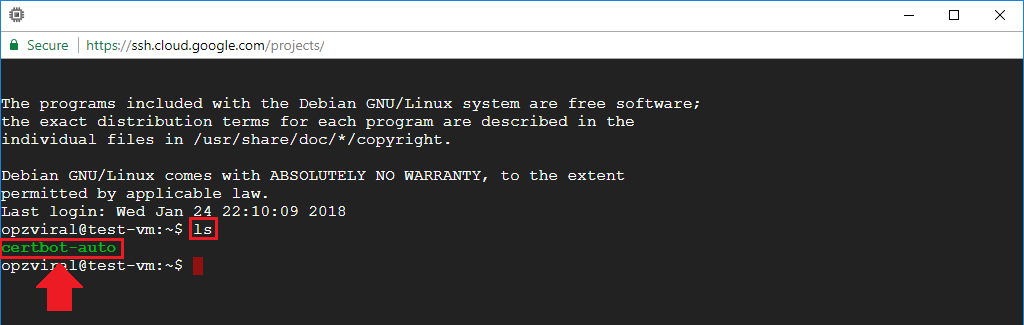
1. Locate Certbot-Auto Package
For those of you who configured SSL using the Click-to-deploy and Bitnami SSL tutorials, your certbot-auto package was downloaded to your home directory. You can view the the package by simply executing the ls command.
For those of you who downloaded the certbot-auto package to a different directory, it is important to find it. If you cannot find the certbot-auto package, you can re-download the package by executing the following command:
wget https://dl.eff.org/certbot-auto && chmod a+x certbot-auto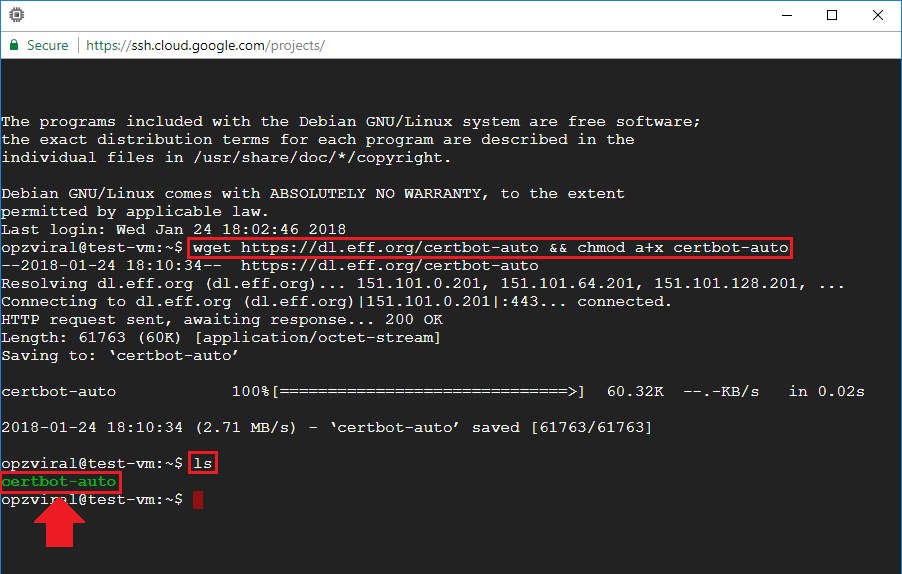
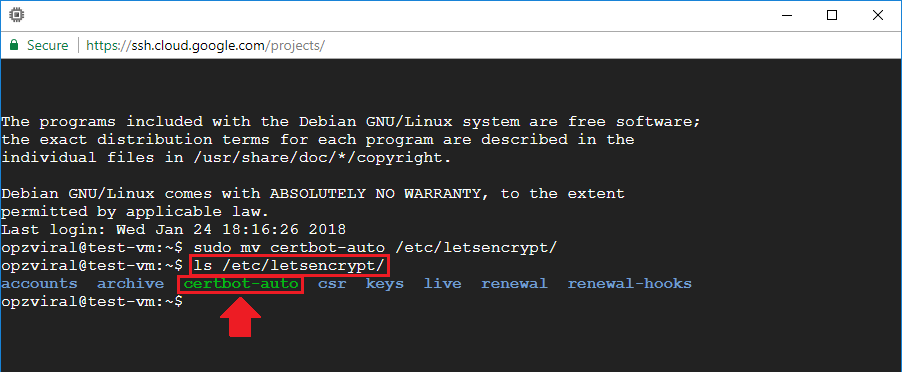
2. Move Certbot-Auto Package
After you’ve established the location of your Cerbot-Auto package, the next step is to move the certbot-auto package into the /etc/letsencrypt/ directory.
So, for users who followed either of the above mentioned Click-to-deploy or Bitnami tutorials, your command would be:
sudo mv certbot-auto /etc/letsencrypt/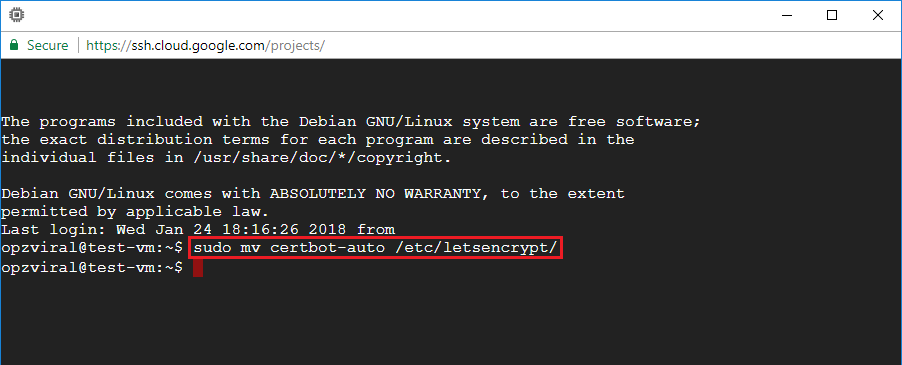
3. Edit Crontab File
Now that you’ve moved your certbot-Auto package to the /etc/letsencrypt/ directory, the next step is to open your crontab file.
To open your crontab file, execute the following command:
sudo crontab -e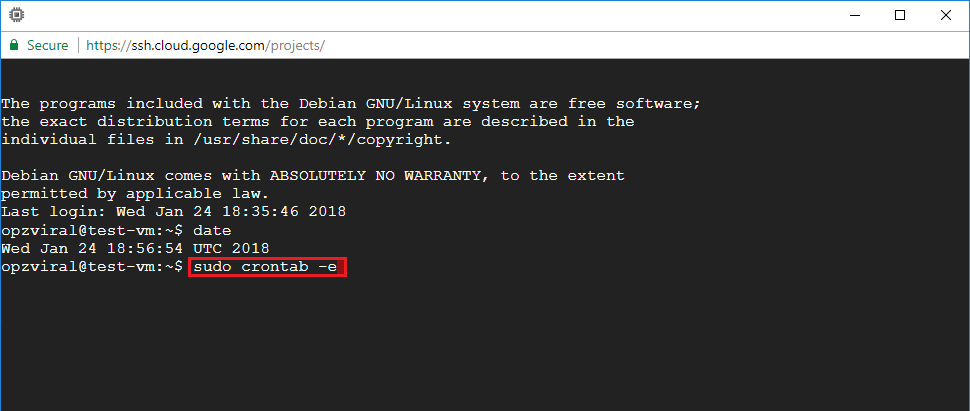
4. Configure Auto-Renew Script
Now that you’ve opened your crontab file, the next step is to add a script at the bottom of the crontab file which will execute once per week and will automatically renew the SSL certificates if they are about to expire.
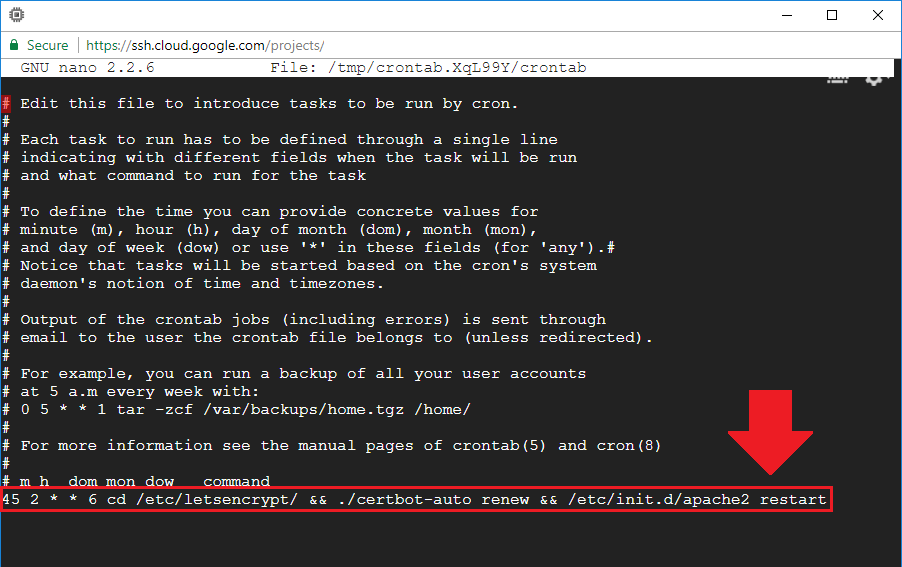
For Click-to-deploy or standard Apache users, add the following script:
45 2 * * 6 cd /etc/letsencrypt/ && ./certbot-auto renew && /etc/init.d/apache2 restartFor Bitnami users, add the following script:
45 2 * * 6 cd /etc/letsencrypt/ && ./certbot-auto renew && /opt/bitnami/ctlscript.sh restart5. Basic Auto-Renew Testing
To test your auto-renew script for errors, you can quickly perform a 'dry run' - a process in which the auto-renew script will be executed without actually renewing the certificates. To perform a 'dry run', execute the following two commands:
For Click-to-deploy or standard Apache users:
sudo -i
  cd /etc/letsencrypt/ && ./certbot-auto renew --dry-run && /etc/init.d/apache2 restart
For Bitnami users:
sudo -i
  cd /etc/letsencrypt/ && ./certbot-auto renew --dry-run && /opt/bitnami/ctlscript.sh restart
Congratulations! You've successfully configured your Let's Encrypt SSL certificates to automatically renew prior to expiration.
If you would like to test-run the renewal process, continue to the next step (optional). Because the script will renew the certificates one month prior to expiration, you can use a SSL Checker to verify whether the certificates have renewed successfully.
6. Advanced Auto-Renew Testing
In this advanced testing section of the tutorial you will learn how to use the --force-renew command to simulate certificate renewal in a live environment.
To get started, check the current date and time stamp on your server. To do this, execute the date command.
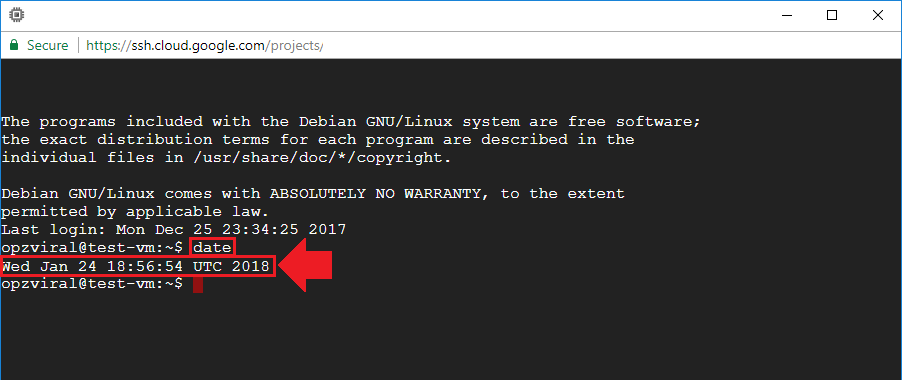
Take note of the date and time - either paste it into Notepad or write it down on a piece of paper. Based on the example above, I would write down 18:56:54
6.1 Check current expiry date
Now that you've logged your system's current date and time, the next step is to check when your certificate is currently set to expire. To do that, execute the following commmand:
openssl x509 -noout -dates -in /etc/letsencrypt/live/example.com/cert.pemNote: Make sure to replace example.com with your own domain name.
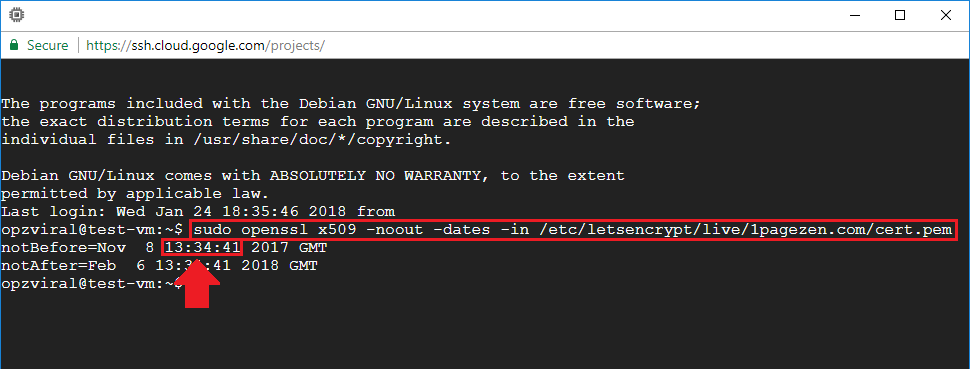
Take note of the date and time when the certificate was issued - either paste it into notepad or write it down on a piece of paper.
Based on the example above, I would write down 13:34:41
6.2 Force Crontab script
Execute the command sudo crontab -e to re-open your crontab file.
In this example my virtual machine's date and time stamp showed 18:56:54. So, I would want the auto-renew script to execute a few minutes ahead of 18:56:54 at 18:59:00.
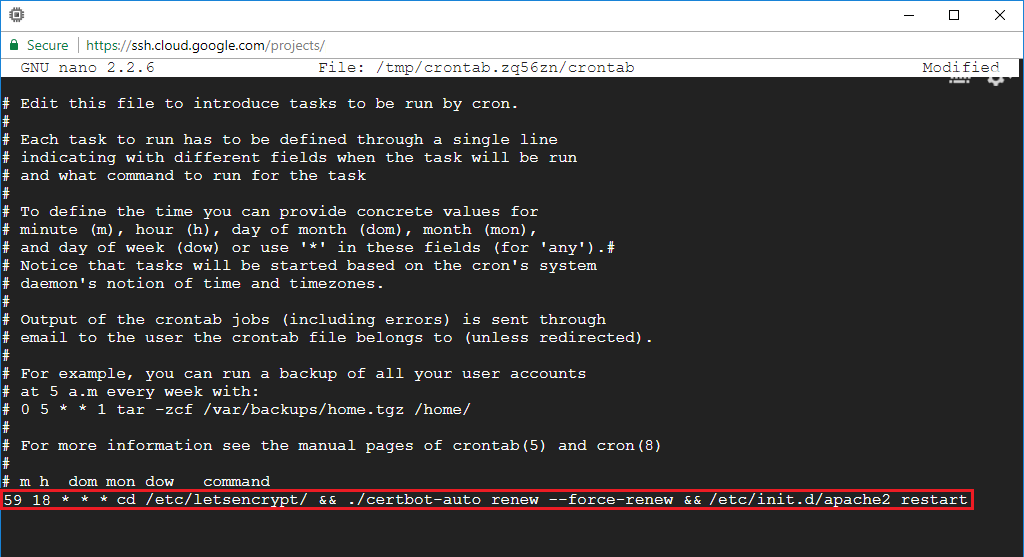
For Click-to-deploy or standard Apache users:
59 18 * * * cd /etc/letsencrypt/ && ./certbot-auto renew --force-renew && /etc/init.d/apache2 restartFor Bitnami users:
59 18 * * * cd /etc/letsencrypt/ && ./certbot-auto renew --force-renew && /opt/bitnami/ctlscript.sh restartAfter the time at the front of the script has passed (18:59 in this example), check your system log to verify that the script has executed successfully.
To check your system log, navigate to your log directory by executing cd /var/log/.
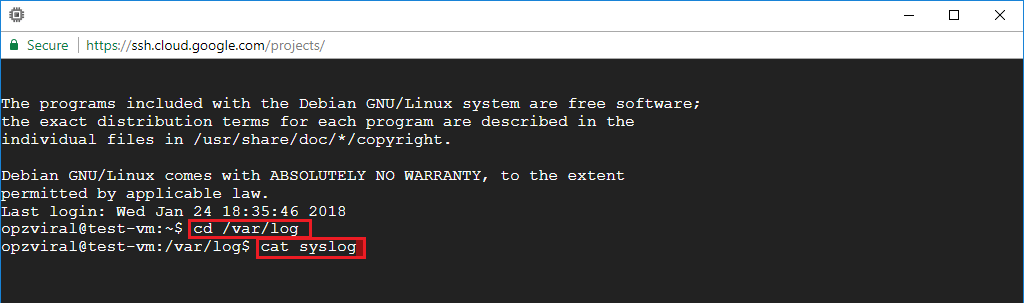
Next, print your system log to your screen by executing the command cat syslog.

6.3 Check if renewal was successful
To check if renewal was successful, navigate back to your home directory by executing cd, then execute the following command, making sure to replace example.com with your own domain name.
openssl x509 -noout -dates -in /etc/letsencrypt/live/example.com/cert.pem
It is also a good idea to double-check with an online SSL certificate checker to make sure your renewed certificates are being recognized.
6.4 Revert crontab script to default
Now that testing is complete, remember to change your crontab script back to the default from step 4 of this tutorial!
That's it!
Now that you've configured auto-renewal for your Let's Encrypt SSL certificates, you will never need to worry about renewing them again!
If you have any questions or comments about this tutorial, please post them below.
Thanks,
![]()
Up Next...
Steve says
Hi Joe,
I follow your instruction to setup the auto-renew of SSL (Bitnami) for my new website. But it seems that the Let’s Encrypt Authority X3 does not support it anymore.
I found that after I set up the SSL certificate for my new website. The SSL is supported by R3, not Let’s Encrypt Authority X3
So I cannot download and install the Cerbot-auto to setup auto-renew for my SSL. I worry that after three months, my website will be unable to connect because the SSL will be expired soon.
Is there any way I can setup the autorenewal for WordPress Bitnami stack (Google cloud) with the R3 certificate?
Looking forward to your reply soon.
Best Regards
Steve
Leron Amin says
Hi Steve,
I hope you’ve been well!
I don’t anticipate there being any issues with your certificates, but it’s worth testing. To test, connect to your VM isntance then execute either of the following two commands, depending on which version of certbot you’re using:
If the –dry-run command fails, then you should go ahead an re-install a newer version of certbot, then re-issue the certificates. First you’ll need to verify your instance’s operating system by executing lsb_release -a, then generate the correct certbot installation instructions from the certbot instructions website based on the operating system.
Hope this helps!
Joe
majda says
cd /etc/letsencrypt/ && ./certbot-auto renew –dry-run && /etc/init.d/apache2 restart
Skipping bootstrap because certbot-auto is deprecated on this system.
Your system is not supported by certbot-auto anymore.
Certbot cannot be installed.
Please visit https://certbot.eff.org/ to check for other alternatives.
Please tell me what this means?
Leron Amin says
Hi Majda,
According to this article, certbot-auto is now deprecated.
I’d recommend returning to the certbot instructions page, and selecting the correct installation instructions based on your operating system.
Let me know if you have other questions,
Joe
adi says
Hi Joe! Im trying to use these commands for OpenLightSpeed wordpress on GCP but its not working. what to do
Leron Amin says
Hi Adi,
These instructions are for Apache server, and therefor won’t work for OpenLiteSpeed web server.
If you’re using the 1-Click OpenLiteSpeed WordPress solution from the Google Cloud Marketplace, then you will be immediately prompted to configure SSL when you SSH into your instance for the first time. You can learn more about this functionality from the ‘Quick Start’ guide available here.
Let me know if you have other questions,
Joe
Steve says
Hi Joe,
This is Steve from http://www.hienthaoshop.com again. I already finished setting up the auto-renewal for my SSL certificate. However, After I cannot move the Certbot auto to Letsencrypt folder. I must excuse the command: ./certbot-auto certonly –webroot -w /opt/bitnami/apps/wordpress/htdocs/ -d 1pagezen.com -d http://www.1pagezen.com to generate the new certificate . And finnaly, I can move it to the folder of Letsendcrypt: sudo mv certbot-auto /etc/letsencrypt/
Thank you for your time. Your tutorior is very helpful. We really appreciate your help.
Best Regards
Steve
http://www.hienthaoshop.com
Leron Amin says
Hey Steve,
It’s great to hear from you!
I’m glad to hear you were able to get it working.
Please reach out if you have other questions,
Joe
Rutsam says
Hi Joe,
It looks like those steps aren’t working if you have not yet updated the Cert Tool (Bitnami), I followed this instructions and docs: https://docs.bitnami.com/aws/how-to/generate-install-lets-encrypt-ssl/
Command: sudo /opt/bitnami/bncert-tool
It looks like it updated and renewed successfully afterwards, let’s see what it says in after 89 days. Checked SSL checker and it works with HTTPS.
I find the new tool from bncert straightforward!
Good luck,
Rustam
Leron Amin says
Awesome – thanks for sharing this tip Rutsam!
Rene says
Thank you v.much for this tutorial. Usual question my SSL expired today but it did not seem to renew even after I set up the the command below.
45 2 * * 6 cd /etc/letsencrypt/ && ./certbot-auto renew && /opt/bitnami/ctlscript.sh restart
I then thought well then maybe I have a Apache system! Although the begining it does say “welcome to Bitnami WordPress”. I then looked for the certbot cert after trying the dry run instructions given above and it then said could not find the folder. I checked and it def. sits in the /etc/letsencrypt folder as certbot-auto.
What happens if you cert expires, it worked really well 3 months prior as I followed your above instructions but somehow did not auto renew. Do I have to start all over again setting a free certificate?
Hope this makes sense. I did check the ssl checker and it expired today.
Thanks again
Leron Amin says
Hi Rene,
The tutorial has recently been updated to consolidate all of the domain and SSL steps into a single tutorial.
Check it out here.
Let me know if you have any questions!
Joe
TravelBrust says
That’s wonderfull. I am using digitalOcean free SSL and after 3 months i have to renew this… do you have any video tutorial on this? Also in any next article can you guide me about how to upgrade PHP version in “Litespeed WordPress” DigitalOcean. Thank you
Leron Amin says
Hi Remmel,
Did you run the command with ‘sudo’ in front?
Talk to you soon,
Joe
Remmel Kemp says
I followed your instructions verbatim.
I am good at following instructions and your page is so well written, makes it easy.
Remmel Kemp says
Hello,
I am runnning in to one problem. When I use command
sudo mv certbot-auto /etc/letsencrypt/,
it says
mv: cannot move ‘certbot-auto’ to ‘/etc/letsencrypt/’: Not a directory
How to create the directory ?
Leron Amin says
Hi Remmel,
Run the following command to both create the letsencrypt directory then move certbot-auto into the newly created directory:
Hope this helps, and let me know if you have questions!
Joe
Sam says
Hello, thanks for your help.
I did
sudo ./certbot-auto renew
and got such output:
./certbot-auto has insecure permissions!
To learn how to fix them, visit https://community.letsencrypt.org/t/certbot-auto-deployment-best-practices/91979/
Saving debug log to /var/log/letsencrypt/letsencrypt.log
– – – – – – – – – – – – – – – – – – – – – – – – – – – – – – – – – – – – – – – –
No renewals were attempted.
– – – – – – – – – – – – – – – – – – – – – – – – – – – – – – – – – – – – – – – –
What’s wrong?..
Leron Amin says
Hi Sam,
Based on the instructions provided in the ‘best-practices’ link in the error message, you should change the permissions of your certbot-auto script:
Let me know if you have questions,
Joe
VK says
Joe, thanks for your videos. My SSL certificate added earlier through your Bitnami video is expiring tomorrow. So I was watching this video to auto-renew SSL’s. Now in the Step 1 of locating ‘certbot auto’ I get the response as ‘apps certbot-auto htdocs stack’. Then, when I try to move it using Step 2, it says cannot move as ‘/etc/letsencrypt/’ is not a directory. Am stuck here. Can you please help?
Leron Amin says
Hi VK,
Which Bitnami SSL tutorial did you use when you set up your certificates?
Let me know, and I will walk you through the instructions!
Talk to you soon,
Joe
Aashik Shetty says
I am having the following error on doing a dry-run…please help….
Saving debug log to /var/log/letsencrypt/letsencrypt.log
– – – – – – – – – – – – – – – – – – – – – – – – – – – – – – – – – – – –
– – – –
Processing /etc/letsencrypt/renewal/umdhealthcare.com.conf
– – – – – – – – – – – – – – – – – – – – – – – – – – – – – – – – – – – –
– – – –
Cert not due for renewal, but simulating renewal for dry run
Could not choose appropriate plugin: The manual plugin is not working; t
here may be problems with your existing configuration.
The error was: PluginError(‘An authentication script must be provided wi
th –manual-auth-hook when using the manual plugin non-interactively.’,)
Attempting to renew cert (umdhealthcare.com) from /etc/letsencrypt/renew
al/umdhealthcare.com.conf produced an unexpected error: The manual plugi
n is not working; there may be problems with your existing configuration
.
The error was: PluginError(‘An authentication script must be provided wi
th –manual-auth-hook when using the manual plugin non-interactively.’,)
. Skipping.
All renewal attempts failed. The following certs could not be renewed:
/etc/letsencrypt/live/umdhealthcare.com/fullchain.pem (failure)
– – – – – – – – – – – – – – – – – – – – – – – – – – – – – – – – – – – –
– – – –
** DRY RUN: simulating ‘certbot renew’ close to cert expiry
** (The test certificates below have not been saved.)
All renewal attempts failed. The following certs could not be renewed:
/etc/letsencrypt/live/umdhealthcare.com/fullchain.pem (failure)
** DRY RUN: simulating ‘certbot renew’ close to cert expiry
** (The test certificates above have not been saved.)
– – – – – – – – – – – – – – – – – – – – – – – – – – – – – – – – – – – –
– – – –
1 renew failure(s), 0 parse failure(s)
root@ip-172-26-7-148:/etc/letsencrypt# cd /etc/letsencrypt/ && ./certbot
-auto renew –dry-run && /opt/bitnami/ctlscript.sh restart
Leron Amin says
Hi Aashik,
Check out this LetsEncrypt thread for information on how to fix the error.
Let me know if you have additional questions,
Joe
Ben says
Hello Joe!
Thanks for this great tutorial. It was very helpful.
Please at STEP 4, which combination of keys do i use to save after inserting the command?
ctrl+X
or
ctrl+O
or
ctrl+Y
I can i get your direct email or phone number so we can work closely.
Many thanks to you.
Leron Amin says
Hi Ben,
The key combination to save the file is CTRL + X, then CTRL + Y, then Enter.
Let me know if you have any other questions,
Joe
Ben says
Many thanks Joe.
Leron Amin says
Happy to help Ben!
Dave says
Hi,
I’ve used this tuturial a few times without any issues, but on my latest site I’m getting this at the top of the dry run:
./certbot-auto has insecure permissions!
Looking at the certbot docs, it suggests that certbot-auto should be installed in a different directory and only run/installed by root:
https://community.letsencrypt.org/t/certbot-auto-deployment-best-practices/91979/2
Did I do something wrong in the original LE SSL installation maybe that’s on this site? Here’s the log (domain has been renamed to domain.com):
2020-04-14 14:29:29,338:DEBUG:certbot._internal.main:certbot version: 1.3.02020-04-14 14:29:29,339:DEBUG:certbot._internal.main:Arguments: [‘–dry-run’]2020-04-14 14:29:29,339:DEBUG:certbot._internal.main:Discovered plugins: PluginsRegistry(PluginEntryPoint#apache,PluginEntryPoint#$2020-04-14 14:29:29,351:DEBUG:certbot._internal.log:Root logging level set at 202020-04-14 14:29:29,352:INFO:certbot._internal.log:Saving debug log to /var/log/letsencrypt/letsencrypt.log2020-04-14 14:29:29,385:DEBUG:certbot._internal.plugins.selection:Requested authenticator <certbot._internal.cli.cli_utils._Defaul$2020-04-14 14:29:29,385:DEBUG:certbot._internal.cli:Var dry_run=True (set by user).2020-04-14 14:29:29,385:DEBUG:certbot._internal.cli:Var server=set(['staging', 'dry_run']) (set by user).2020-04-14 14:29:29,385:DEBUG:certbot._internal.cli:Var dry_run=True (set by user).2020-04-14 14:29:29,385:DEBUG:certbot._internal.cli:Var server=set(['staging', 'dry_run']) (set by user).2020-04-14 14:29:29,385:DEBUG:certbot._internal.cli:Var account=set(['server']) (set by user).2020-04-14 14:29:29,414:DEBUG:urllib3.connectionpool:Starting new HTTP connection (1): ocsp.int-x3.letsencrypt.org:802020-04-14 14:29:29,541:DEBUG:urllib3.connectionpool:http://ocsp.int-x3.letsencrypt.org:80 "POST / HTTP/1.1" 200 5272020-04-14 14:29:29,542:DEBUG:certbot.ocsp:OCSP response for certificate /etc/letsencrypt/archive/domain.com/cert1.pem is sign$2020-04-14 14:29:29,545:DEBUG:certbot.ocsp:OCSP certificate status for /etc/letsencrypt/archive/domain.com/cert1.pem is: OCSPC$2020-04-14 14:29:29,548:INFO:certbot._internal.renewal:Cert not due for renewal, but simulating renewal for dry run2020-04-14 14:29:29,548:DEBUG:certbot._internal.plugins.selection:Requested authenticator webroot and installer None2020-04-14 14:29:29,552:DEBUG:certbot._internal.plugins.selection:Single candidate plugin: * webrootDescription: Place files in webroot directoryInterfaces: IAuthenticator, IPluginEntry point: webroot = certbot._internal.plugins.webroot:AuthenticatorInitialized: Prep: True2020-04-14 14:29:29,553:DEBUG:certbot._internal.plugins.selection:Selected authenticator <certbot._internal.plugins.webroot.Authen$2020-04-14 14:29:29,553:INFO:certbot._internal.plugins.selection:Plugins selected: Authenticator webroot, Installer None2020-04-14 14:29:29,555:DEBUG:certbot._internal.main:Picked account: <Account(RegistrationResource(body=Registration(status=None, $2020-04-14 14:29:29,556:DEBUG:acme.client:Sending GET request to https://acme-staging-v02.api.letsencrypt.org/directory.2020-04-14 14:29:29,557:DEBUG:urllib3.connectionpool:Starting new HTTPS connection (1): acme-staging-v02.api.letsencrypt.org:4432020-04-14 14:29:30,184:DEBUG:urllib3.connectionpool:https://acme-staging-v02.api.letsencrypt.org:443 "GET /directory HTTP/1.1" 20$2020-04-14 14:29:30,184:DEBUG:acme.client:Received response:HTTP 200Server: nginxDate: Tue, 14 Apr 2020 14:29:30 GMTContent-Type: application/jsonContent-Length: 724Connection: keep-aliveCache-Control: public, max-age=0, no-cacheX-Frame-Options: DENYStrict-Transport-Security: max-age=604800
I'm on AWS Lightsail not Google Cloud but otherwise I used the Google Cloud guide.
Thanks in advance!
Leron Amin says
Hi Dave,
Did you create the crontab file as root?
Also, are you using a recent version of certbot?
These are the two issues I would look into first.
Let me know if you have questions,
Joe
Dave says
Thanks for the reply. It’s a brand new AWS Lightsail server so certbot was downloaded fresh.
I followed this tutorial: https://onepagezen.com/free-ssl-certificate-wordpress-google-cloud-bitnami/
Which directs to this one to set up the auto-renew.
Is there something I can do to check what you suggest?
Thanks
Leron Amin says
Hi Dave,
Try changing the permission level of the script. It looks like newer the script requires a certain permission level to execute.
Follow these instructions that I just recommended to Sam, and let me know how it goes!
Talk to you soon,
Joe
Rene says
Joe I followed these instructions to with same issue-
vm: /etc/letsencrpt$ sudo chmod 0755 /path/to/certbot-auto
It says no such file or directory. etc/letsencrypt is were my certbot-auto is filed.
Thanks
Leron Amin says
Hi Rene,
Since you’re executing the command from within the letsencrypt directory, the command you just be:
Let me know if you have questions,
Joe
Hung Luong says
Hi Joe,
Thanks for this tutorial! After setting up the SSL on my wordpress site for Bitnami, I got he “i” icon on the browser bar instead of the “Lock” for Secured icon.
I checked SSL checker, everything seem to work, but just not fully secured. Any suggestion?
Best regards,
Hung
Leron Amin says
Hi Hung,
That sounds to me like a mixed-content error – meaning that your website is displaying both HTTP and HTTPS content.
To fix the error, check out step 1 of this tutorial.
Let me know if you have questions,
Joe
Abhilash says
Hello,
My ssl got expired – I followed your video “Setup Free SSL for WordPress on Google Cloud (Bitnami) (Latest)” to set it up initially. So now i was trying out “How to Setup Auto-Renew for Let’s Encrypt SSL Certificates (Apache)” video and getting an error for this step – “sudo mv certbot-auto /etc/letsencrypt/” . It shows as no such directory or file. Please suggest a fix for this. Thank you.
Leron Amin says
Hi Abhilash,
Did you confirm whether or not the letsencrypt directory actually exists?
If not, you can create it by running the following command:
Let me know if you have any questions,
Joe
Ruwan Fernando says
Hi Dear,
My letsencrypt SSL is already expired when I notice that.
Then I followed these instruction to fix that, but still it’s not woring.
Can you please help me.
Leron Amin says
Hi Ruwan,
Which steps have you take so far, and what errors are you seeing in the console?
Talk to you soon,
Joe
Rakeah Mali says
is it possible to set automatic copy the cirtificate to another folder as it auto-renewel? Actaully I have setup auto-renew using it’s command instead on cron. The auto-renew is working but one of the internal service also use that certificate. So I need a way to copy when the certificate auto-renew
Leron Amin says
Hi Rakeah,
I’d recommend simply referencing the file path to the certificates from the internal service. Is this a possibility?
Talk to you soon,
Joe
Rakeah Mali says
Hi Joe,
Actually the ‘internal service’ is not on the same server, I will need to copy the ssl to another server using scp command.
Yoshi says
Hello Joe,
Thank you very much for Wonderful tutorial!
I would like to ask you just one question as I have not found related question.
I received email notification from “Let’s Encrypt” about expiration of SSL(30 days prior notice) .
So, I followed your tutorial and thankfully succeeded to auto-renew setup at Apache of Google Could Platform.
Today(Aug.15), I received the Expiration notification again from “Let’s Encrypt” (10 days prior notice) .
Dose this mean, I have to do something at “Let’s Encrypt” in order to keep SSL?
Or they just send this email notification to all, although Apache Auto-renew is completed?
Thank you very much
Yoshi from Tokyo
Leron Amin says
Hi Yoshi,
Thanks for your feedback – I’m glad you found the tutorial helpful!
Try testing your domain in this SSL Checker and see what displays as the expiration date (‘Valid from’ and ‘Valid until’ fields).
Hope this helps and let me know if you have questions,
Joe
Yoshi says
Hi Joe,
Thank you very much for kindly explain!!
I checked SSL checker you introduced me and read that
Valid until “Sat, 20 Jun 2020”
So I guess it seems okay according to this.
But my confusion here is “Issuer”, which is “CloudFlare Inc”.(as I use Cloudflare for my website)
And Validity “Sat, 20 Jun 2020” in my case is by “CloudFlare Inc”. (Not by “Let’s Encrypt”)
(And Actually, before SSL Auto-Renew set up of “Let’s Encrypt”, I saw this “Sat, 20 Jun 2020” at google developer tools.)
Do you know how do these “Let’s Encrypt” and “CloudFlare Inc” relate to SSL ?
Thank you very much for your time!
Yoshi
Leron Amin says
Hi Yoshi,
That’s the expiration for the Cloudflare certificate. If you’re using the Full (Strict) SSL setting, then there will be a certificate for the connection between your server and Cloudflare (the Let’s Encrypt certificate), and a certificate for the connection between Cloudflare and the client (the Cloudflare certificate).
You can switch to Cloudflare’s flexible SSL setting if you’re worried about your certificate expiring. Click here to learn about the different SSL settings available on Cloudflare. Click here to learn how to check the expiration dates specifically for your Let’s Encrypt certificates.
Let me know if you have questions,
Joe
amin says
how can me delete all this script and try and try again
lou says
Hi,
very useful tutorial. Only one question: why do we need to move the certbot? I forgot to move and run the commands with the certbot stil in my home/user folder and it didn’t throw any error. So I wonder why is it necessary to move inside etc/letsenctypt folder?
Leron Amin says
Hi Lou,
You could keep certbot in your home directory. The reason it’s moved in the tutorial is to ensure a well-organized file/directory structure.
If you do decide to leave certbot in your home directory, you will have to omit the cd /etc/letsencrypt/ portion of the auto-renew script. For example, the script that you would add to your cronjob for Click-to-deploy would be:
For Bitnami, it would be:
Let me know if you have any other questions,
Joe
lou says
Perferctly clear. Thank you very much
Hadia says
Hi
I followed your tutorial but i am getting an issue the auto renewel is not successful.After step 5 i get this error;
WARNING: The following packages cannot be authenticated!
libssl1.1 openssl libssl-dev
E: There were unauthenticated packages and -y was used without –allow-unauthenticated
Please help me asap.
Leron Amin says
Hi Hadia – which command command caused the error?
Mait says
Hi and thanks for the great tutorial!
One thing that don´t understand and confuses me.
Tried yesterday and everything worked like a charm until first section of 6.3
The command: openssl x509 -noout -dates -in /etc/letsencrypt/live/domain.com/cert.pem
gives output:
notBefore=May 9 09:48:27 2019 GMT
notAfter=Aug 7 09:48:27 2019 GMT
But here it goes tricky. There you are referring to:
“It is also a good idea to double-check with an online SSL certificate checker to make sure your renewed certificates are being recognized”
well from SSL certificate checker I get the following output:
valid from February 22, 2019 to May 23, 2019 (The certificate will expire in 12 days.)
what am I missing here?
Section 6 says:
In this advanced testing section of the tutorial you will learn how to use the –force-renew command to simulate certificate renewal in a live environment.
Question is -> should the simulation of cert renewal process produce a valid output (+ 3 months) from SSL certificate checker or not? At the moment it does not although from command line is seems to be working…
thanks!
Mait
Leron Amin says
Hi Mait,
Use the –force-renew flag to attempt to renew the certificates regardless of whether or not they’re due for renewal. Use the –dry-run flag to simulate the renewal process, as it will not actually renew the certificates.
Hope this provides clarification, and let me know if you have questions,
Joe
Rahul Sengupta says
Hi Leron,
Firstly, really wanted to thank you for the hard work of breaking down the steps for us.
Really helpful.
However when I followed your instructions I did run into an error and would love your help.
Attempting to renew cert (rahul-marketing.me) from /etc/letsencrypt/renewal/rahul-marketing.me.conf produced an unexpected error: Missing command line flag or confi
g entry for this setting:
Input the webroot for rahul-marketing.me:. Skipping.
All renewal attempts failed. The following certs could not be renewed:
/etc/letsencrypt/live/rahul-marketing.me/fullchain.pem (failure)
Would you know why this is happening. If you do could suggest how I can fix this.
Ps. This is what happened when I tried doing a dry run step.
Leron Amin says
Hi Rahul – what was the certificate renewal command that you executed?
TheRealShady says
Thank you this was very helpful, in particular the bitnami section
Leron Amin says
Glad to hear it – thanks for the feedback!
Lav says
bhelloriya_lav@wordpress-1-vm:~$ ls
apps htdocs stack
bhelloriya_lav@wordpress-1-vm:~$ ls /etc/letsencrypt
accounts archive certbot-auto csr keys live renewal renewal-hooks
bhelloriya_lav@wordpress-1-vm:~$ sudo -i
root@wordpress-1-vm:~# cd /etc/letsencrypt/ && ./certbot-auto renew –dry-run && /opt/bitnami/ctlscript.sh restart
Saving debug log to /var/log/letsencrypt/letsencrypt.log
– – – – – – – – – – – – – – – – – – – – – – – – – – – – – – – – – – – – – – – –
Processing /etc/letsencrypt/renewal/domain.com.conf
– – – – – – – – – – – – – – – – – – – – – – – – – – – – – – – – – – – – – – – –
Cert not due for renewal, but simulating renewal for dry run
Plugins selected: Authenticator webroot, Installer None
Renewing an existing certificate
Performing the following challenges:
http-01 challenge for http://www.domain.com
http-01 challenge for domain.com
Cleaning up challenges
Attempting to renew cert (domain.com) from /etc/letsencrypt/renewal/domain.com.conf produced an unexpected error: Missing command line flag or config entry for this setting:
Input the webroot for http://www.domain.com:. Skipping.
All renewal attempts failed. The following certs could not be renewed:
/etc/letsencrypt/live/domain.com/fullchain.pem (failure)
– – – – – – – – – – – – – – – – – – – – – – – – – – – – – – – – – – – – – – – –
** DRY RUN: simulating ‘certbot renew’ close to cert expiry
** (The test certificates below have not been saved.)
All renewal attempts failed. The following certs could not be renewed:
/etc/letsencrypt/live/domain.com/fullchain.pem (failure)
** DRY RUN: simulating ‘certbot renew’ close to cert expiry
** (The test certificates above have not been saved.)
– – – – – – – – – – – – – – – – – – – – – – – – – – – – – – – – – – – – – – – –
1 renew failure(s), 0 parse failure(s)
root@wordpress-1-vm:/etc/letsencrypt#
I have followed your each step successfully but auto renew and dry run of ssl is not going through. Directory of certbot is same as you showed us in your video but dry run and auto renew in not working.
changed my domain name for privacy.
Please help!
Thanks!
Leron Amin says
Hi Lav,
Open a new terminal window.
cd into your letsencrypt directory by running the following command:
Execute the renew script:
If these steps don’t work, please provide the output.
Talk to you soon,
Joe
Lav says
The output was:
bhelloriya_lav@wordpress-1-vm:~$ cd /etc/letsencrypt/
bhelloriya_lav@wordpress-1-vm:/etc/letsencrypt$ sudo ./certbot-auto renew
Saving debug log to /var/log/letsencrypt/letsencrypt.log
– – – – – – – – – – – – – – – – – – – – – – – – – – – – – – – – – – – – – – – –
Processing /etc/letsencrypt/renewal/domain.com.conf
– – – – – – – – – – – – – – – – – – – – – – – – – – – – – – – – – – – – – – – –
Cert not yet due for renewal
– – – – – – – – – – – – – – – – – – – – – – – – – – – – – – – – – – – – – – – –
The following certs are not due for renewal yet:
/etc/letsencrypt/live/domain.com/fullchain.pem expires on 2019-06-21 (skipped)
No renewals were attempted.
– – – – – – – – – – – – – – – – – – – – – – – – – – – – – – – – – – – – – – – –
Now how do I setup auto renew?
Please help!
Thanks!
Leron Amin says
Hi Lav,
Do a Google search for more information regarding the error, “… produced an unexpected error: Missing command line flag or config entry for this setting:
Input the webroot”.
Here’s a resource I found from Let’s Encrypt which documents the same error.
Let me know if you have questions,
Joe
Isaac Itopa Suberu says
Hi,
I installed SSL certificate sometimes ago after following your tutorial. Few days ago, I discovered that my SSL certificate has expired. I came back to this tutorial again on how to auto renew SSL certificate, I ran “Is” command, but I received this: -bash: Is: command not found
Please, how can I go about it? Mine is Bitnami
Hope to hear from you as soon as possible
Leron Amin says
Hi Isaac,
The command is “ls” with the first letter being a lower-case L, not a lowercase I.
After doing this, just execute the ./certbot-auto renew command from your letsencrypt directory.
Let me know if you have questions,
Joe
Hyma says
Hi ,
I m trying the steps given in this page…But When I ran my cron job its returning below errors……
Kindly help us….
Traceback (most recent call last):
File “/opt/eff.org/certbot/venv/local/lib/python2.7/site-packages/certbot/renewal.py”, line 430, in handle_renewal_request
main.renew_cert(lineage_config, plugins, renewal_candidate)
File “/opt/eff.org/certbot/venv/local/lib/python2.7/site-packages/certbot/main.py”, line 1166, in renew_cert
le_client = _init_le_client(config, auth, installer)
File “/opt/eff.org/certbot/venv/local/lib/python2.7/site-packages/certbot/main.py”, line 611, in _init_le_client
return client.Client(config, acc, authenticator, installer, acme=acme)
File “/opt/eff.org/certbot/venv/local/lib/python2.7/site-packages/certbot/client.py”, line 248, in __init__
acme = acme_from_config_key(config, self.account.key, self.account.regr)
File “/opt/eff.org/certbot/venv/local/lib/python2.7/site-packages/certbot/client.py”, line 51, in acme_from_config_key
return acme_client.BackwardsCompatibleClientV2(net, key, config.server)
File “/opt/eff.org/certbot/venv/local/lib/python2.7/site-packages/acme/client.py”, line 763, in __init__
directory = messages.Directory.from_json(net.get(server).json())
File “/opt/eff.org/certbot/venv/local/lib/python2.7/site-packages/acme/client.py”, line 1097, in get
self._send_request(‘GET’, url, **kwargs), content_type=content_type)
File “/opt/eff.org/certbot/venv/local/lib/python2.7/site-packages/acme/client.py”, line 1069, in _send_request
raise ValueError(“Requesting {0}{1}:{2}”.format(host, path, err_msg))
ValueError: Requesting acme-v02.api.letsencrypt.org/directory: Network is unreachable
2019-03-12 10:06:17,629:ERROR:certbot.renewal:All renewal attempts failed. The following certs could not be renewed:
2019-03-12 10:06:17,629:ERROR:certbot.renewal: /etc/letsencrypt/live/www.reports-uat.in/fullchain.pem (failure)
Leron Amin says
Hi Hyma,
One thing I notice is that your certificate directory shows the www-version of your domain – this is incorrect. It should be your naked domain/root domain.
Anyways, here’s a resource that discusses the issue you’re facing with renewal.
Another potential solution is to delete the certificate files and then reissue them.
Let me know if you have any questions,
Joe
André Luís says
I’m having the following error and I can not fix it if it’s not to be compromised please could you help me follow the error
[
Processing /etc/letsencrypt/renewal/grupoitaquere.com.conf
– – – – – – – – – – – – – – – – – – – – – – – – – – – – – – – – – – – – – – – –
Cert not due for renewal, but simulating renewal for dry run
Plugins selected: Authenticator webroot, Installer None
Renewing an existing certificate
Performing the following challenges:
http-01 challenge for http://www.grupoitaquere.com
http-01 challenge for grupoitaquere.com
Cleaning up challenges
Attempting to renew cert (grupoitaquere.com) from /etc/letsencrypt/renewal/grupoitaquere.com.conf produced an unexpected error
: Missing command line flag or config entry for this setting:
Input the webroot for http://www.grupoitaquere.com:. Skipping.
All renewal attempts failed. The following certs could not be renewed:
/etc/letsencrypt/live/grupoitaquere.com/fullchain.pem (failure)
– – – – – – – – – – – – – – – – – – – – – – – – – – – – – – – – – – – – – – – –
** DRY RUN: simulating ‘certbot renew’ close to cert expiry
** (The test certificates below have not been saved.)
All renewal attempts failed. The following certs could not be renewed:
/etc/letsencrypt/live/grupoitaquere.com/fullchain.pem (failure)
** DRY RUN: simulating ‘certbot renew’ close to cert expiry
** (The test certificates above have not been saved.)
– – – – – – – – – – – – – – – – – – – – – – – – – – – – – – – – – – – – – – – –
1 renew failure(s), 0 parse failure(s)
Leron Amin says
Hi André,
Please provide the renewal command that you entered, as well as the directory location of your certbot-auto package.
Talk to you soon,
Joe
Robert says
Hi! My ssl expired and my clients couldn’t access the website and to be honest I panicked a little bit! Haha! Then I found this tutorial and I forced the renewal and now everything works perfectly again, thank you for these tutorials they are expertly made and it really helped me before and even now , because I did sort of set up my google cloud usage of wordpress using solely your tutorials and everything works perfectly!
Thank you!
Keep up the great work!
Leron Amin says
Hi Robert,
I’m glad to hear you were able to get it working, and thanks for sharing your feedback!
Best regards,
Joe
atik says
Hi Robert, Can you tell me your process, I am trying but not work.
Robert SEM Tucson says
I followed your original guide for our site (https://agimon.com) and while it worked great right up to the dry run, I kept finding the SSL never got renewed. What i did was to manually renew using command found in the guide, so in itself that served it’s purpose.
I thought I had to repeat that whole manual renew process today so it was a breath of fresh air to see this updated guide. Thank you very much.
Rob
Leron Amin says
Thanks for the feedback Rob – I’m glad to hear the updated guide was helpful to you!
Arama Motoru says
Hi, that is really useful. But I wonder is Auto renewal possible for a website (for ex: https://www.alpulla.com) which has GoDaddy host. Using terminal or smt. like that. Have you ever experienced before?
thanks.
Leron Amin says
Hi Arama,
Managed hosting providers will typically offer the option to install auto-renewing SSL with the single click of a button – which is much easier than this process.
Let me know if you have any questions,
Joe
Johny Kurniawan says
Hi Leron Amin .. Thank you for this awesome tutorial, I used google cloud click to deploy.
Daniel says
You have no idea how much i love you, i missing the way for1month, finally got light here. Appriciated.
Leron Amin says
Glad to hear it – thanks for the great feedback!
Simon says
This is an excellent guide. Got me up and running and managed to setup everything. God bless you for the good job
Yiming Li says
Instead of `&&`, I need to use `;` to connect three commands. Because apache/nginx still needs to be started again although renew failed(i.e. certs are not due for renewal yet).
Umanath says
Hello LERON AMIN,
Thanks for your video was very useful. I renewed my ssl certificate yesterday. But i could not complete due to the following error. Please help me
Congratulations, all renewals succeeded. The following certs have been renewed:
/etc/letsencrypt/live/iosrdconferences.com/fullchain.pem (success)
** DRY RUN: simulating ‘certbot renew’ close to cert expiry
** (The test certificates above have not been saved.)
– – – – – – – – – – – – – – – – – – – – – – – – – – – – – – – – – – – – – – – –
AH00526: Syntax error on line 5 of /opt/bitnami/apache2/conf/bitnami/bitnami.conf:
Invalid command ‘ssl#’, perhaps misspelled or defined by a module not included in the server configuration
apache config test fails, aborting
/opt/bitnami/php/scripts/ctl.sh : php-fpm stopped
/opt/bitnami/mysql/scripts/ctl.sh : mysql stopped
/opt/bitnami/mysql/scripts/ctl.sh : mysql started at port 3306
/opt/bitnami/php/scripts/ctl.sh : php-fpm started
AH00526: Syntax error on line 5 of /opt/bitnami/apache2/conf/bitnami/bitnami.conf:
Invalid command ‘ssl#’, perhaps misspelled or defined by a module not included in the server configuration
apache config test fails, aborting
kindly fix this eror
With regards
Umanath
Leron Amin says
Hi Umanath,
You have a syntax error on line 5 in your bitnami.conf file. From the error message:
AH00526: Syntax error on line 5 of /opt/bitnami/apache2/conf/bitnami/bitnami.conf:
Invalid command ‘ssl#’, perhaps misspelled or defined by a module not included in the server configuration
You shouldn’t have any text with ‘ssl#’ on line 5 in your bitnami.conf file. Make sure your bitnami.conf file is configured correctly, as shown in step 6 of the Bitnami SSL tutorial.
Open the file:
Fix the syntax error on line 5, save the file, then restart Apache.
Let me know if you have questions,
Joe
Thomas says
This may be a stupid question but i’m new to all this, how do you save? i’ve added: 45 2 * * 6 cd /etc/letsencrypt/ && ./certbot-auto renew && /opt/bitnami/ctlscript.sh restart to my file but i don’t know how you got the stuff at the bottom to show up to save.
Leron Amin says
The command to save is CTRL + X, then Y, then Enter.
Benoy says
Hi Leron,
I have been following you for all of my google cloud. I however am having a difficulty and thought you may advise me what to do.
One of my certificate expired which I had installed following your tutorials. Somehow it didn’t auto renew. Could you advise me as to how to make this domain ssl certificate live again by renewing it or installing a new one. I am not so techno savvy. I did all things using your tutorial and thanks for your great effort.
Hoping that you could help me out.
Regards,
Benoy
Leron Amin says
Hi Benoy,
Provide me with the SSL tutorial that you used (Click-to-deploy or Bitnami) and I will provide you with instructions.
Talk to you soon,
Joe
Benoy says
Hi Leron,
I was going through the tutuorial and the comments and it made my day. Thanks. A simple certbot auto renew command did the job. Great help! As always, you are the savior.
Some request videos if you can and have the time (would be great help to me and guess others as well):
1) Installing external SSL certificates such as digicert etc. to WordPress bitnami vm
2) configuring google cloud cdn functionality for standalone wordpress bitnami sites as mine. I have read someplace else, but very confusing and as always, I believe that you will put it in the simplest form as you have been doing for all your videos.
Excellent work you are doing!
Thanks for all your help! My site is hosted and running on gcp via your tutorials!
Leron Amin says
Thanks for the feedback Benoy – I’m glad to hear you were able to get your website running on GCP!
I will look into publishing those requested tutorials.
Regards,
Joe
Yoel Antonio says
hello joe I have a question if certbot appears in green as in the image does it mean that the renewal is in automatic? https://ibb.co/byi57f
Thank you, good job
Leron Amin says
Hi Yoel,
The green color means that the file is recognized – it doesn’t affect the renewal process.
Let me know if you have any questions,
Joe
Vivek Kumar says
My website is not loading http://www.nagrajviv.com
Leron Amin says
Hi Vivek,
Please post your question in the WordPress Cloud Hosting Support group, as the comments section of this tutorial isn’t for general support.
Thanks and talk to you soon,
Joe
Data Scientist says
Am having a problem with configuring SSL on client’s domain. Can you plz check it out for https://cuevana.app secondly it’s also not running on “Chrome” with http://cuevana.app but “Microsoft Edge Browser” running it well with http.
Leron Amin says
Hi Data Scientist,
I’m getting a ERR_TOO_MANY_REDIRECTS when I load the https version of the page in chrome. I checked it on SSL Shopper and the certificate is loading fine, so I would check your Apache configuration [.conf] files (locations are in etc/apache2 for Click-to-deploy, and /opt/bitnami/apache2/ for Bitnami) and look for an extra redirect somewhere. There should only be single redirect to the preferred version of your domain, and it should be located in either your wordpress.conf or bitnami.conf file, depending on which version you are using. See step 6 of this tutorial for an example of what the redirect that I’m referring to looks like.
Let me know if you have any questions,
Joe
Moulaye Abderrahmane says
Check for a Rewrite rule that is redirecting back to your http domain in you example.com-le-ssl.conf
Google wordpress says
Can you plz define me through process in detail?
sandeep pal says
Hi,
I am unable to initiate auto renew process of my ssl certificate as when I checked my certbot-auto location it showed as below
apps certbot-auto
What should I do now
Leron Amin says
Hi Sandeep,
Please provide the commands that you executed when trying to renew certbot, including the outputs.
Talk to you soon,
Joe
Gregory says
Hi,
I successfully had did the tutorial installing the certificate thanks for that. Now i’m unable to renew the certificate. and i’m getting the following error.
Failed authorization procedure. riight.online (http-01): urn:ietf:params:acme:error:connection :: The server could not connect t
o the client to verify the domain :: Fetching https://www.riight.online.well-known/acme-challenge/zL1Our2UdDkXpTnD45vgV6lllIJCQc
dVHlVNLImFC64: Error getting validation data, http://www.riight.online (http-01): urn:ietf:params:acme:error:connection :: The server c
ould not connect to the client to verify the domain :: Fetching https://www.riight.online.well-known/acme-challenge/PJU3R42wHYJa
Bp_6vPMLgo9u3x8YtcGKXkZIMSSs7fg: Error getting validation data
IMPORTANT NOTES:
– The following errors were reported by the server:
Domain: riight.online
Type: connection
Detail: Fetching
https://www.riight.online.well-known/acme-challenge/zL1Our2UdDkXpTnD45vgV6lllIJCQcdVHlVNLImFC64:
Error getting validation data
Domain: http://www.riight.online
Type: connection
Detail: Fetching
https://www.riight.online.well-known/acme-challenge/PJU3R42wHYJaBp_6vPMLgo9u3x8YtcGKXkZIMSSs7fg:
Error getting validation data
To fix these errors, please make sure that your domain name was
entered correctly and the DNS A/AAAA record(s) for that domain
contain(s) the right IP address. Additionally, please check that
your computer has a publicly routable IP address and that no
firewalls are preventing the server from communicating with the
client. If you’re using the webroot plugin, you should also verify
that you are serving files from the webroot path you provided.
I looked at the DNS but everything is set correctly.
Any idea how to solve this problem?
Leron Amin says
Hi Gregory,
Are you using IPV6/AAAA records? If so – that could be a cause.
Are you using DNSSEC? That could be a cause. You would’ve had to opted into this setting by checking a box when you first created the DNS zone.
Did you try waiting a few hours and then attempting to reissue?
Still not working? I would try doing a Google search for “(http-01): urn:ietf:params:acme:error:connection :: The server could not connect to the client to verify the domain” and seeing what you find.
Let me know if you have any questions,
Joe
Ernest Akpos says
Hello Leron
Thank you for your SSL tutorial. I was able to get the Secure lock on my site. But the problem is i cant configure auto renewal. I get an error that the Is command is not found.
@wordpress-4-vm:~$ Is
-bash: Is: command not found
What do i do
Leron Amin says
Hi Ernest,
The command is lowercase “LS” not “IS”.
Hope this helps and let me know if you have any questions,
Joe
Federico Diaz says
Hola Leron, simplemente gracias por estos tutoriales llevo mucho tiempo intentando hacer todo esto con googlecloud y tus tutoriales fueron los únicos que lo hicieron posible. No dejes de seguir haciendo mas tutoriales y Felicitaciones por tu sabiduría.
Muchas Gracias!!!
familiadiazgalindo.com
Leron Amin says
Hola Federico,
Me alegra que los tutoriales te hayan ayudado.
¡Gracias por tus comentarios! 🙂
Joe
Jan says
Hello
I follow all about ssl bitnami wp,but i can’t figure how to fix error.SSL is valid only for non http://www.How to delete and reissue again.
I have red lock.All tutorials are great.Thanks
Leron Amin says
Hello Jan,
Thanks for the feedback!
You will have to reissue the certificates with the correct domain name, and then add the new file paths to your conf file.
Are you using WordPress Click-to-deploy or Bitnami?
Talk to you soon,
Joe
Syed Mohammed Rayyan says
Hey Amin,
Hope you are doing good.
Your tutorials helped me in installing wordpress and SSL with auto renewal without any hurdle.
But I did not find a video on enabling Google cloud cdn.
Also, I want to know how to setup SSL that we had bought from third parties.
Leron Amin says
Hey Syed,
I’m glad the tutorial helped you get SSL and auto-renewal working.
I don’t currently have any tutorials for Cloud CDN or 3rd-party SSL, however, I will be publishing a Cloudflare CDN tutorial soon.
Let me know if you have any questions,
Joe
Victor says
Not really sure what the difference is between the certbot-auto packages and the standard Unbuntu packages that I have used successfully — they appear to have the same functionality.
For anyone using Cloudflare as a CDN, you need to install the Cloudflare plugin for certbot so that authentication/challenge can take place via DNS (since cloudflare manages the DNS records). Doesn’t appear that the Cloudflare DNS plugin has the functionality to actually install it in the web server conf but that step can be done manually as per this doc. The nginx plugin (since I also use nginx) does it automatically which is nice although the install is just needed for the first time (not for renewal typically since the name is typically the same). For renewal, I used:
sudo certbot certonly –cert-name –dns-cloudflare –dns-cloudflare-credentials /etc/letsencrypt/cloudflareapi.cfg –server https://acme-v02.api.letsencrypt.org/directory -d ” -d
Notes:
– The cloudflare config file you create manually by placing your cloudflare api info and login and then secure the file to 600.
– To renew the cert I use the crontab entry in /etc/cron.d that checks twice daily and renews automatically within 30 days of expiration. I add this (you can also add to root’s crontab of course):
0 */12 * * * root certbot renew –noninteractive >> /var/log/crontab.log
– The certbot command will automatically update your letsencrypt conf file in /etc/letsencrypt/renewal to include the updated authenticator type. (dns in my case)
– If you are testing and using a staging server, you should probably point to the staging letsencrypt server at: https://acme-v02.api.letsencrypt.org/directory (since you can only update your cert 5 times a week and if you keep testing or creating new certs frequently for the same domain you will have to wait until the next week — just an fyi.
– Caution when using the weboot authentication. It does it over non-secure communications which may not be a huge for some people since it’s only validating some files it creates in the web server root but still, don’t like that idea for some reason.
– Lastly, if you want your web server to reload to pick up the new certs, certbot has a hook that can be used. You can add this hook in the /etc/letsencrypt/renewal conf file by adding the following (I am using nginx web server so I would add the following):
renew_hook = systemctl reload nginx (then I suppose you can remove the reload command from the actual crontab entry).
Hope that helps a bit for people using Cloudflare. 🙂
Ricardo says
Thank you for the information, I have made it work without problems, following this tutorial.
But, I see that http2 is not active, if I do an online test, it doesn’t work.
Is there an error in the initial configuration?
Leron Amin says
Hey Ricardo,
Please provide me with your domain name and I will look into the issue for you. If you don’t want to share your domain name publicly, you can send a private message using the contact form available here.
Looking forward to hearing from you soon,
Joe
Srinivas ramakrishna says
HTTP/2 is not working for me also, Please help. I have followed all the steps.
Domain is https://www.askmein.com/
Leron Amin says
Hi Srinivas,
Which steps did you take to try to enable HTTP2? Keep in mind that the module is only supported in Apache version 2.4.17 and later. You can check your OS and Apache versions by running the following command:
Let me know if you have any questions,
Joe
Benjamin Waller says
Hello Jo,
How are you?
The SSL Cert I set up with auto renewing 3 months ago didn’t renew.
How should I approach setting up it again?
I did the following to find the last Cert date:
sudo openssl x509 -noout -dates -in /etc/letsencrypt/live/hocvietngu.com/cert.pem
notBefore=Feb 24 01:45:18 2018 GMT
notAfter=May 25 01:45:18 2018 GMT
Then when I tried a dry-run I got the following failure:
Cert is due for renewal, auto-renewing…
Plugins selected: Authenticator webroot, Installer None
Renewing an existing certificate
Performing the following challenges:
http-01 challenge for hocvietngu.com
http-01 challenge for http://www.hocvietngu.com
Waiting for verification…
Cleaning up challenges
Attempting to renew cert (hocvietngu.com) from /etc/letsencrypt/renewal/hocvietngu.com.conf produced an unexpected
error: Failed authorization procedure. http://www.hocvietngu.com (http-01): urn:ietf:params:acme:error:dns :: DNS problem:
SERVFAIL looking up A for http://www.hocvietngu.com, hocvietngu.com (http-01): urn:ietf:params:acme:error:dns :: DNS prob
lem: SERVFAIL looking up A for hocvietngu.com. Skipping.
All renewal attempts failed. The following certs could not be renewed:
/etc/letsencrypt/live/hocvietngu.com/fullchain.pem (failure)
——————————————————————————-
** DRY RUN: simulating ‘certbot renew’ close to cert expiry
** (The test certificates below have not been saved.)
All renewal attempts failed. The following certs could not be renewed:
/etc/letsencrypt/live/hocvietngu.com/fullchain.pem (failure)
** DRY RUN: simulating ‘certbot renew’ close to cert expiry
** (The test certificates above have not been saved.)
——————————————————————————-
1 renew failure(s), 0 parse failure(s)
IMPORTANT NOTES:
– The following errors were reported by the server:
Domain: http://www.hocvietngu.com
Type: None
Detail: DNS problem: SERVFAIL looking up A for http://www.hocvietngu.com
Domain: hocvietngu.com
Type: None
Detail: DNS problem: SERVFAIL looking up A for hocvietngu.com
Any ideas to get it the Certificate renewed?
Cheers,
Ben
Leron Amin says
Hey Ben,
Hope you’re doing well!
That error doesn’t look good – but hopefully we can work through it.
Try executing the command to renew the certificate, not a dry run:
Then, if that works, execute the
lscommand in your home directory to make sure certbot-auto exists there. If it does, move certbot to the letsencrypt directory by executing the following command:Finally, execute the
cdcommand to return to your home directory, then proceed to step 3 to configure auto-renewal.Try this and let me know if it works.
Talk to you soon,
Joe
Just
Benjamin Waller says
Hi Jo,
Thanks for that.
I first ran renew command and got the following:
ben@moodle-1-vm:/etc/letsencrypt$ ./certbot-auto renew
Requesting to rerun ./certbot-auto with root privileges…
Upgrading certbot-auto 0.25.0 to 0.25.1…
Replacing certbot-auto…
Creating virtual environment…
Installing Python packages…
Installation succeeded.
Saving debug log to /var/log/letsencrypt/letsencrypt.log
It then proceeded to go through the renew process but failed with the following error:
——————————————————————————-
Processing /etc/letsencrypt/renewal/hocvietngu.com.conf
——————————————————————————-
Cert is due for renewal, auto-renewing…
Plugins selected: Authenticator webroot, Installer None
Renewing an existing certificate
Performing the following challenges:
http-01 challenge for hocvietngu.com
http-01 challenge for http://www.hocvietngu.com
Waiting for verification…
Cleaning up challenges
Attempting to renew cert (hocvietngu.com) from /etc/letsencrypt/renewal/hocvietngu.com.conf produced an unexpected
error: Failed authorization procedure. hocvietngu.com (http-01): urn:acme:error:dns :: DNS problem: SERVFAIL lookin
g up A for hocvietngu.com, http://www.hocvietngu.com (http-01): urn:acme:error:dns :: DNS problem: SERVFAIL looking up A f
or http://www.hocvietngu.com. Skipping.
All renewal attempts failed. The following certs could not be renewed:
/etc/letsencrypt/live/hocvietngu.com/fullchain.pem (failure)
——————————————————————————-
All renewal attempts failed. The following certs could not be renewed:
/etc/letsencrypt/live/hocvietngu.com/fullchain.pem (failure)
——————————————————————————-
1 renew failure(s), 0 parse failure(s)
IMPORTANT NOTES:
– The following errors were reported by the server:
Domain: hocvietngu.com
Type: None
Detail: DNS problem: SERVFAIL looking up A for hocvietngu.com
Domain: http://www.hocvietngu.com
Type: None
Detail: DNS problem: SERVFAIL looking up A for http://www.hocvietngu.com
I checked that certbot-auto is in this directory /etc/letsencrypt/ so I can’t move on to step 3. Hope that means it isn’t diabolic!
Cheers,
Ben
Leron Amin says
Hi Ben,
There is an issue with your DNS. If you’re using Cloud DNS, I would make sure your A record for hocvietngu.com is pointing to the correct IP address of the VM that is running your website. Then you should have a separate CNAME record with www as the DNS name and hocvietngu.com as the canonical name.
If you’d rather, feel free to send me an email with a picture of your DNS settings and I will take a look.
Talk to you soon,
Joe
Jay says
Hi @Leron Amin
I am having issues I wounder if you can kindly through some light.
Saving debug log to /var/log/letsencrypt/letsencrypt.log
– – – – – – – – – – – – – – – – – – – – – – – – – – – – – – – – – – – – – – – –
Processing /etc/letsencrypt/renewal/www.guildfordad.co.uk.conf
– – – – – – – – – – – – – – – – – – – – – – – – – – – – – – – – – – – – – – – –
Cert not due for renewal, but simulating renewal for dry run
Could not choose appropriate plugin: The manual plugin is not working; there may be problems with your existing configuration.
The error was: PluginError(‘An authentication script must be provided with –manual-auth-hook when using the manual plugin non-interactively.’,)
Attempting to renew cert (www.guildfordad.co.uk) from /etc/letsencrypt/renewal/www.guildfordad.co.uk.conf produced an unexpected error: The manual plugin is not working; there may be problems with your existing configuration.
The error was: PluginError(‘An authentication script must be provided with –manual-auth-hook when using the manual plugin non-interactively.’,). Skipping.
– – – – – – – – – – – – – – – – – – – – – – – – – – – – – – – – – – – – – – – –
Processing /etc/letsencrypt/renewal/www.uflip.co.uk.conf
– – – – – – – – – – – – – – – – – – – – – – – – – – – – – – – – – – – – – – – –
Cert not due for renewal, but simulating renewal for dry run
Could not choose appropriate plugin: The manual plugin is not working; there may be problems with your existing configuration.
The error was: PluginError(‘An authentication script must be provided with –manual-auth-hook when using the manual plugin non-interactively.’,)
Attempting to renew cert (www.uflip.co.uk) from /etc/letsencrypt/renewal/www.uflip.co.uk.conf produced an unexpected error: The manual plugin is not working; there may be problems with your existing configuration.
The error was: PluginError(‘An authentication script must be provided with –manual-auth-hook when using the manual plugin non-interactively.’,). Skipping.
– – – – – – – – – – – – – – – – – – – – – – – – – – – – – – – – – – – – – – – –
Processing /etc/letsencrypt/renewal/www.universaldesignz.co.uk.conf
– – – – – – – – – – – – – – – – – – – – – – – – – – – – – – – – – – – – – – – –
Cert not due for renewal, but simulating renewal for dry run
Could not choose appropriate plugin: The manual plugin is not working; there may be problems with your existing configuration.
The error was: PluginError(‘An authentication script must be provided with –manual-auth-hook when using the manual plugin non-interactively.’,)
Attempting to renew cert (www.universaldesignz.co.uk) from /etc/letsencrypt/renewal/www.universaldesignz.co.uk.conf produced an unexpected error: The manual plugin is not working; there may be problems with your existing configuration.
The error was: PluginError(‘An authentication script must be provided with –manual-auth-hook when using the manual plugin non-interactively.’,). Skipping.
– – – – – – – – – – – – – – – – – – – – – – – – – – – – – – – – – – – – – – – –
Processing /etc/letsencrypt/renewal/www.universaldesignz.com.conf
– – – – – – – – – – – – – – – – – – – – – – – – – – – – – – – – – – – – – – – –
Cert not due for renewal, but simulating renewal for dry run
Could not choose appropriate plugin: The manual plugin is not working; there may be problems with your existing configuration.
The error was: PluginError(‘An authentication script must be provided with –manual-auth-hook when using the manual plugin non-interactively.’,)
Attempting to renew cert (www.universaldesignz.com) from /etc/letsencrypt/renewal/www.universaldesignz.com.conf produced an unexpected error: The manual plugin is not working; there may be problems with your existing configuration.
The error was: PluginError(‘An authentication script must be provided with –manual-auth-hook when using the manual plugin non-interactively.’,). Skipping.
All renewal attempts failed. The following certs could not be renewed:
/etc/letsencrypt/live/www.guildfordad.co.uk/fullchain.pem (failure)
/etc/letsencrypt/live/www.uflip.co.uk/fullchain.pem (failure)
/etc/letsencrypt/live/www.universaldesignz.co.uk/fullchain.pem (failure)
/etc/letsencrypt/live/www.universaldesignz.com/fullchain.pem (failure)
– – – – – – – – – – – – – – – – – – – – – – – – – – – – – – – – – – – – – – – –
** DRY RUN: simulating ‘certbot renew’ close to cert expiry
** (The test certificates below have not been saved.)
All renewal attempts failed. The following certs could not be renewed:
/etc/letsencrypt/live/www.guildfordad.co.uk/fullchain.pem (failure)
/etc/letsencrypt/live/www.uflip.co.uk/fullchain.pem (failure)
/etc/letsencrypt/live/www.universaldesignz.co.uk/fullchain.pem (failure)
/etc/letsencrypt/live/www.universaldesignz.com/fullchain.pem (failure)
** DRY RUN: simulating ‘certbot renew’ close to cert expiry
** (The test certificates above have not been saved.)
– – – – – – – – – – – – – – – – – – – – – – – – – – – – – – – – – – – – – – – –
4 renew failure(s), 0 parse failure(s)
root@DESKTOP-ECIVOI5:/etc/letsencrypt#
Leron Amin says
Hi Jay,
I’m not sure what the issue is, but there could be many potential causes. Also what’s confusing me is “root@DESKTOP-ECIVOI5” – is DESKTOP-ECIVOI5 your local machine or a remote VM? The domains have to be ‘validated’ as part of the renewal process, so it won’t work to renew the certs from a machine (eg. a local machine) that doesn’t have permission to serve content under the listed domains.
I did a Google search for “PluginError(‘An authentication script must be provided with –manual-auth-hook when using the manual plugin non-interactively.’,)” and found lots of resources in the LetsEncrypt community thread. I would recommend doing this search and seeing if you’re able to find a solution.
Talk to you soon and let me know if you have any questions,
Joe
Sarkhan Latifov says
Hi,
I am using your tutorials to deploy my website on google cloud. Thank you for that.
I followed all the steps in this tutorial but I couldn’t fix my unsecured alert on browser.
When I came to the end of this tutorial,
“root@raportagency-vm:~# 45 2 * * 6 cd /etc/letsencrypt/ && ./certbot-auto renew && /etc/init.d/apache2 restart
-bash: 45: command not found”
appears at the end of the editor.
My website is this: https://www.raportagency.com/
When I inspect my webpage, I had six “mix content errors” and two “Failed to load resource” errors.
I used “SSL Insecure Content Fixer” plugin to fix the problem. Six mix content error fixed when I activated hereby plugin, but the two “failed to load resource” error still continue. Instead of secure HTTPS red Not Secure https appears on my browser.
Can you please check my website and inform me about possible solutions?
Best regards,
Sarkhan
Leron Amin says
Hi Sarkhan,
The
45 2 * * 6 cd /etc/letsencrypt/ && ./certbot-auto renew && /etc/init.d/apache2 restartscript is meant to be added to your crontab file, and is not meant to be executed manually in the SSH terminal; that’s why you’re seeing the error.Also, it appears that there are many problems with your SSL configuration, and the server isn’t recognizing any of your certificates. My recommendation is to go through the tutorial again and to make sure that you didn’t make any mistakes.
Also, the ‘mixed content’ errors can be solved by following the instructions in step 1 of this tutorial.
Hope this information helps,
Joe
John says
Hi,
Great tutorial. Thank you for it.
I had only ne major issue, the dry run failed. Here the error mesage:
** DRY RUN: simulating ‘certbot renew’ close to cert expiry
** (The test certificates below have not been saved.)
All renewal attempts failed. The following certs could not be renewed:
/etc/letsencrypt/live/mydomain.com/fullchain.pem (failure)
** DRY RUN: simulating ‘certbot renew’ close to cert expiry
** (The test certificates above have not been saved.)
——————————————————————————-
1 renew failure(s), 0 parse failure(s)
IMPORTANT NOTES:
– The following errors were reported by the server:
Domain: mydomain.com
Type: connection
Detail: Fetching
https://www.mydomain.com.well-known/acme-challenge/kZ65q8hnqjjmdTNvON0A5SzYZJlSd4K2whxPBfI9j_Y:
Error getting validation data
Domain: http://www.mydomain.com
Type: connection
Detail: Fetching
https://www.mydomain.com.well-known/acme-challenge/Zic0uISUK0gDNlPIoPBWu0Sqn47zV8HaMmTLu4ZheKM:
Error getting validation data
To fix these errors, please make sure that your domain name was
entered correctly and the DNS A/AAAA record(s) for that domain
contain(s) the right IP address. Additionally, please check that
your computer has a publicly routable IP address and that no
firewalls are preventing the server from communicating with the
client. If you’re using the webroot plugin, you should also verify
that you are serving files from the webroot path you provided.
Any suggestion how to get this Dry Run renewel work properly?
Leron Amin says
Hi John,
This error goes beyond configuring auto-renewal, and indicates that there is an issue with certbot/letsencrypt accessing your website through the domain name that you’ve configured. To fix this problem, I’d recommend going over your CloudDNS and making sure that all of your records are correct. This problem also occurs if you haven’t waited enough time (usually around 10 minutes after configuring SSL) for your DNS to resolve.
Therefor, my first suggestion to you is simply to try again. Also, I’m assuming you substituted your actual domain name with ‘mydomain’ – is that correct? Otherwise that would explain the problem right there.
Let me know if you have any questions,
Joe
John says
Dear Joe,
Yes, “mydomain.com” is indeed replaced by the real domain name.
I also noticed that some urls where missing the slash after the domainname. I found out that I forgot to add the / after the domainname in the bitnami.conf file. I changed that and tried again the Dry Run. And this time it worked. No idea if it is due to the change in the bitnami.conf file or due to the fact I did the dry run test 24 hours after the installation of the certificate.
Just wondering, in the cronjob, you check every Saturday if the certificate is still up and running. My certificate will end on a Tuesday. Does it mean that between the Tuesday of expiration and the following Saturday my certificate will be expired resulting in a broken website? If yes, is it not better to set the day in the cronjob to the expiration day of the certificate?
Leron Amin says
Hi John,
I’m glad that you were able to get the script to work.
Also, the certificates become ‘due for renewal’ 28 days before they are set to expire. For this reason, it doesn’t matter which day of the week you choose to run the command, as it will run 4 times during the period in which the certificates are due for renewal.
As a best practice, you should set the cronjob to execute on the day/time when your website typically experiences the least amount of traffic.
I hope this information helps,
Joe
Carol Wong says
Hi there,
I am a non-IT person and I don’t know any codes.
However, I have tried to configure according to [https://onepagezen.com/free-ssl-certificate-wordpress-google-cloud-bitnami/] and this page.
Everything seems to be alright, but when I tried to go to my page after configuration, it is still not secured.
Could you please help me have a look, please?
Leron Amin says
Hi Carol,
Please provide additional details such as what error messages your’re seeing.
Also, what is the website that you’re trying to configure SSL for?
Talk to you soon,
Joe
carol Wong says
Hi there,
I have replied with screen shots via e-mail.
Grateful if u can help me because it is really a headache after trying to handle it for a week but not yet fixed.
Leron Amin says
Hi Carol,
I didn’t receive any emails from you. Please upload the photos on a site such as Imgur or Google and share the link – I will take a look at your configuration.
Talk to you soon,
Joe
Carol Wong says
Dear Joe,
I have uploaded the ppt with photos of the screen.
https://drive.google.com/file/d/1OLevQgTQqmRrlZ-f2s5YZxcZ5fj3MOO1/view?usp=sharing
Grateful if you could help me look at it.
Thanks!
Leron Amin says
Hi Carol,
In step 6 you need to comment out the existing certificates by putting a # sign next to them – it didn’t look like you had done that based on the image that you provided. Look at the third image from step 6 here for an example of what it should look like.
Next, change the permission level of the letsencrypt directory by running the following command:
If 755 doesn’t work, try again with 777 instead to test if it is a permissions-related problem. You will have to try to restart Apache after making these changes.
And your auto-renew configuration looks fine.
Good luck and let me know if you have any questions,
Joe
Carol Wong says
Hi Joe,
Thanks for looking into the config for me.
However, seems that it is still not working.
I have updated the screen on the ppt and saved on google drive:
https://drive.google.com/file/d/1cO8y_Zeh_YnCJ2RY3e0Tsh-K_Ty6JnSv/view?usp=sharing
Slide 7= adding the # for step 6
slide 12= sudo chmod -R 755 /etc/letsencrypt/live/
slide 14= sudo chmod -R 777 /etc/letsencrypt/live/
Just wonder if anything going wrong here.
Grateful if you can give me your professional advice, thanks!
Have a nice day!
Leron Amin says
Hi Carol,
Your file path is wrong in step 6: it should be ‘aqualityme.com’ not just ‘aqualityme’ in the file path to your chain certificate. This is what is causing the error.
Hope this helps!
Joe
Carol Wong says
Hi Joe,
Thanks for your help.
I corrected it, and now the security status of the website has changed.
From (Not secure or Dangerous) -> (View site or Not secure).
However, the desired (Secured) green lock is still not popping up yet.
Is there anything else that I can do to make it happen?
Thanks!
Leron Amin says
Hi Carol,
You are serving an image on your site with an HTTP filepath instead of an HTTPS filepath – this is causing a ‘insecure content’ error.
Check out step 1 of this tutorial for information on how to fix ‘insecure content’ errors.
Hope this helps,
Joe
charles durfee says
Great tutorial, but Im running into one issue:
after running cd /etc/letsencrypt/ && ./certbot-auto renew –dry-run && /etc/init.d/apache2 restart
I get the following error:
Attempting to renew cert (mywebsite.com) from /etc/letsencrypt/renewal/mywebsite.com.conf produced an unexpected er
ror: HTTPSConnectionPool(host=’acme-staging-v02.api.letsencrypt.org’, port=443): Read timed out. (read timeout=45).
Skipping.
All renewal attempts failed. The following certs could not be renewed:
/etc/letsencrypt/live/mywebsite.com/fullchain.pem (failure)
What am I doing wrong here?
Leron Amin says
Hi Charles,
The Let’s Encrypt API is currently offline undergoing schedule maintenance, but should be back up later tonight.
Let me know if you have any other questions,
Joe
Damien says
Hello, thanks for the tuto.
I tried following it but at teh moment where I had to test renewing of the certificates, I have an error which is :
Cert not due for renewal, but simulating renewal for dry run
Plugins selected: Authenticator webroot, Installer None
Attempting to renew cert (doumer.me) from /etc/letsencrypt/renewal/doumer.me.conf produced an unexpect
ed error: HTTPSConnectionPool(host=’acme-staging-v02.api.letsencrypt.org’, port=443): Read timed out.
(read timeout=45). Skipping.
All renewal attempts failed. The following certs could not be renewed:
/etc/letsencrypt/live/doumer.me/fullchain.pem (failure)
Leron Amin says
Hi Damien,
This seems to be a temporary system failure with the Let’s Encrypt API.
I would recommend trying again after a few hours and seeing if you get different results.
Let me know if you have any questions,
Joe
Damien says
Thanks again, I did it now and it worked.
Leron Amin says
Great – glad to hear you got it working! 🙂
Makoto says
Hello Leron,
Thank you very much for your instructions!
Finally, I was able to run SSL on my site.
However, there are two things I would like to get your advice.
(Please be noted that I am using Bitnami WP Multi site)
1. When I looked at Permalink Settings, the common settings are still shown as “http”.
2. When I try to access my admin site from Deployments menu on GCP, via “admin URL” or Log into admin panel”, I cannot access. The following error was shown, ” DNS_PROBE_FINISHED_NXDOMAIN”. I can access from “site URL” in Deployment menu.
Is it possible for me to get your help?
Thank you!
Leron Amin says
Hi Makoto,
You will have to change your permalink settings in your wp-config.php file to the https:// version of your website.
Also, you should access your site admin from your Compute Engine > VM Instances, and not from Deployment Manager. This is because Deployment Manager only shows your initial deployment settings, which often change over time.
I hope you find this information helpful,
Joe
João P Ferreira says
For nginx you should first test that the config is OK
cd /etc/letsencrypt/ && sudo ./certbot-auto renew && sudo nginx -t && sudo service nginx restart
Leron Amin says
Thanks for the tip João!
Ante Kordic says
Hi Leron,
You making here really great work!
Could you make a video / or answer me how to upgrade an existing instance and what that means for the static IP adress and things we did till now trough your videos?
Many Thanks,
Ante
Leron Amin says
Hi Ante,
Thanks for your feedback! 🙂
And what exactly are you trying to upgrade?
Are you talking software upgrades (eg. PHP5 to PHP7) or specifically performance upgrades?
Talk to you soon,
Joe
Ante Kordic says
Thanks for the quick answer Leron,
I mean upgrading the f1-micro (1 vCPU, 0.6 GB memory) that we made.
When is that required? How do we know that the time comes? And maybe explain that in a video along with other things, how to choose a zone and so on? For the beginners out there. That would be amazing! SO that we don’t have to blindly follow 😀
Thanks much,
Ante
Leron Amin says
Thanks for the feedback Ante!
The reason I didn’t include that information is because 99% of the users using the tutorials on this site are running small WordPress sites, for which the f1-micro machine is a perfect fit. However, I really like your idea, and I will look into putting together a tutorial(s) on best practices for resizing, scaling, and improving performance for WordPress websites running on Google Cloud.
Thanks for the recommendation and I’ll talk to you soon,
Joe
Ante Kordic says
Thanks, Joe!
I know that building a huge following on youtube is time-consuming and hard, but just keep going on, you are making amazing videos, you really have the potential to make it big in this niche!
All the Best!
Ante
Leron Amin says
Hi Ante,
Thanks for the encouragement! 🙂
Making the tutorials so detailed and ‘simple’ does indeed take a lot of time, but it’s no doubt why people have been so receptive to them.
Best regards,
Joe
Ante Kordic says
And the upgrade to php7 would be also nice to know!
Leron Amin says
Sounds good Ante!
The new Bitnami stacks run on PHP7, and unfortunately the simplest way to upgrade (that I’ve found), is to simply deploy a new Bitnami WordPress VM, and then migrate the WordPress database and htdocs to the new PHP7 instance. This guide is a very helpful resource.
Let me know if you have any questions,
Joe
Daniel says
You’re really amazing. I hope you are enjoying yourself and having a cool life. Your Google Cloud tutorials have helped me a lot! And they are lucid and thorough – superb work!
Leron Amin says
Thanks for the feedback, Daniel!
I am glad you’ve enjoyed the tutorials. 🙂
Amit Kachere says
My ssl certificate is expired
Leron Amin says
Hey Amit,
You will have to re-run the certificate issuing command, which I show you how to do in this tutorial.
When prompted to overwrite the existing certificates, choose ‘yes’.
Please let me know if you have any questions,
Joe
Satish says
Hello Leron
Help me, please!
Step 2. Install Certbot Client by using the command
wget https://dl.eff.org/certbot-auto && chmod a+x certbot-auto
ls command showing
apps certbot-auto certbot-auto.1 htdocs stack are there may because I ran it twice
unable to move file showing error
mv: cannot move ‘certbot-auto’ to ‘/etc/letsencrypt/’: Not a directory
There are 3-4 tutorial for the same SSL installation, which one to follow, I am all confused struggling to get it since last 4-5 months.
Help me Please
Leron Amin says
Hi Satish,
Before starting this tutorial, you need to complete the SSL tutorial for either the Bitnami or Click-to-deploy version of WordPress on Google Cloud.
When you generate the certificates (as shown in the tutorial), certbot creates a directory in which to store the certificates which is when the /etc/letsencypt/ directory is generated. In both of the SSL tutorials, the certbot client is downloaded to the home directory, so we run the mv certbot /etc/letsencrypt command in order to move certbot into the letsencrypt directory.
Based on your question, you need to make sure you have a /letsencrypt/ directory located within the /etc/ directory. Given your error message, it appears that this directory doesn’t exist, and therefor it is likely that your certificates have not yet been generated.
So, to fix the problem, go through the SSL tutorial and create the certificates, then once you’ve done that, return to the auto-renew tutorial to configure auto-renewal for your certificates.
Good luck!
Joe
Satish says
Hi Leron,
WordPress Bitnami is deployed and domains are pointed already
I have also reserved the static IP under VPC network
There is no folder created in etc with the name letsencrypte.
I personally checked it via navigating to the etc folder through sftp using FileZilla
moreover I am getting permission denied error
mv: cannot move ‘certbot-auto’ to ‘/etc/letsencrypt’: Permission denied
I am enclosing the screenshot, please have a look at it
https://imgur.com/a/3D64B
Leron Amin says
Hi Satish,
The /letsencrypt directory is created when you run the command to generate your SSL certificates.
Based on the image, your certificates aren’t generating or renewing, and there seems to be an issue with your certbot installation.
First, remove the three certbot files by running the command:
Next, reinstall certbot-auto by running the following command:
Then try running the certificate issuing command again and let me know how it goes.
Talk to you soon,
Joe
Antal says
Hi Leron,
I followed your previous tutorial ( https://onepagezen.com/free-ssl-certificate-wordpress-google-cloud-click-to-deploy/ )successfully, and my website was running perfect for the last few months. This afternoon however, the ssl certificate for my website has expired.
Only than I realized that that there was another part of that tutorial ( https://onepagezen.com/letsencrypt-auto-renew-certbot-apache/ ). I followed all the steps, and I believe it also worked fine.
Running the basic auto-renew test gave me this result:
root@instance-3:~# cd /etc/letsencrypt/ && ./certbot-auto renew –dry-run && /etc/init.d/apache2 restart
Saving debug log to /var/log/letsencrypt/letsencrypt.log
——————————————————————————-
Processing /etc/letsencrypt/renewal/bbtlodge.com.conf
——————————————————————————-
Cert is due for renewal, auto-renewing…
Plugins selected: Authenticator webroot, Installer None
Renewing an existing certificate
Performing the following challenges:
http-01 challenge for bbtlodge.com
http-01 challenge for http://www.bbtlodge.com
Waiting for verification…
Cleaning up challenges
——————————————————————————-
new certificate deployed without reload, fullchain is
/etc/letsencrypt/live/bbtlodge.com/fullchain.pem
——————————————————————————-
——————————————————————————-
** DRY RUN: simulating ‘certbot renew’ close to cert expiry
** (The test certificates below have not been saved.)
Congratulations, all renewals succeeded. The following certs have been renewed:
/etc/letsencrypt/live/bbtlodge.com/fullchain.pem (success)
** DRY RUN: simulating ‘certbot renew’ close to cert expiry
** (The test certificates above have not been saved.)
——————————————————————————-
[ ok ] Restarting apache2 (via systemctl): apache2.service.
root@instance-3:/etc/letsencrypt#
But when I run the other test (in from the advanced mode), I got this result:
root@instance-3:/etc/letsencrypt# openssl x509 -noout -dates -in /etc/letsencrypt/live/bbtlodge.com/cert.pem
notBefore=Jan 6 13:15:24 2018 GMT
notAfter=Apr 6 13:15:24 2018 GMT
Could you please help me with this. I really have no clue what to do from here. I would really appreciate your help, and look forward to your reply
Leron Amin says
Hi Antal,
The “Advanced Testing” portion of the tutorial is completely optional and is meant only to verify your configuration.
That being said, the command that you executed in your terminal (/etc/letsencrypt/ && ./certbot-auto renew –dry-run && /etc/init.d/apache2 restart) will not renew your certificate. This is because the ‘–dry-run’ flag is simply a way of telling the console to “run the command but don’t actually renew the certificate – just verify that it works”. We do this because Let’s Encrypt limits the amount of times that people can renew their certificates, so we use the –dry-run flag to simple simulate the renewal process.
To renew the certificate, you need to run the following command:
This is also the command that you should add to your cron.
Let me know if you have any questions,
Joe
Shweta says
Hi Leron
I have been using your tutorials and moving a few of my sites painstakingly (I am a designer) from other hosts to google… they have been really helpful… but one particular one is giving me a headache… my system had restarted in the middle of this doing it once and since then when I reach the dry run, I get :
Congratulations, all renewals succeeded. The following certs have been renewed:
/etc/letsencrypt/live/bucketindia.com/fullchain.pem (success)
** DRY RUN: simulating ‘certbot renew’ close to cert expiry
** (The test certificates above have not been saved.)
but then this:
AH00526: Syntax error on line 48 of /opt/bitnami/apache2/conf/bitnami/bitnami.conf:
SSLCertificateFile: file ‘/etc/letsencrypt/live/eborchids.com/cert.pem’ does not exist or is empty
apache config test fails, aborting
/opt/bitnami/php/scripts/ctl.sh : php-fpm stopped
/opt/bitnami/mysql/scripts/ctl.sh : mysql stopped
/opt/bitnami/mysql/scripts/ctl.sh : mysql started at port 3306
/opt/bitnami/php/scripts/ctl.sh : php-fpm started
AH00526: Syntax error on line 48 of /opt/bitnami/apache2/conf/bitnami/bitnami.conf:
SSLCertificateFile: file ‘/etc/letsencrypt/live/eborchids.com/cert.pem’ does not exist or is empty
apache config test fails, aborting
and then when I shift to https it doesnt work!
What can I do to fix it?
Thanks a ton in advance.
Warm Regards
Leron Amin says
Hi Shweta,
Make sure there are no ‘spaces’ after the certificate file paths on line 48 in your Bitnami.conf file. If there are, remove them, then restart your server using the command as shown in the tutorial.
If the problem persists, try editing the permission level of the file and see if that helps. Follow this tutorial. First, find out the default permission level that is assigned to the file so that you can change it back (if needed), then change the permission level to 755 and restart your Apache server.
If these solutions don’t work, or if you have any questions regarding how to implement them, let me know.
Talk to you soon,
Joe
David Enns says
Hey Leron,
I followed the directions from https://onepagezen.com/free-ssl-certificate-wordpress-google-cloud-click-to-deploy/ several months ago including step 5 where I setup the auto-renew. I recently found that you are saying that the auto renew is no longer valid from that tutorial and to use the steps from this new entry. Do I have to roll back anything because I have already completed the auto renew or just do this new method and not worry about what I had previously done?
thanks again,
David
Leron Amin says
Hi David,
You don’t need to roll back anything – just follow all of the steps in the tutorial.
Let me know if you have any questions,
Joe
Travelevil says
Hello Leron,
I already installed the SSL Certificate (thanks to your tutorial) but when testing on the step 6.1 “Check current expiry date” I get the error message below after pasting the code:
CODE:
openssl x509 -noout -dates -in /etc/letsencrypt/live/travelevil.com/cert.pem
ERROR:
Error opening Certificate /etc/letsencrypt/live/travelevil.com/cert.pem
140579272509072:error:0200100D:system library:fopen:Permission denied:bss_file.c:406:fopen(‘/etc/letsencrypt/live/t
ravelevil.com/cert.pem’,’r’)
140579272509072:error:20074002:BIO routines:FILE_CTRL:system lib:bss_file.c:408:
unable to load certificate
INFORMATION:
Using Bitnami, Already installed and executed the SSL Certificate
Thanks for your help.
Travelevil.
Leron Amin says
Hi Travel,
You have to run the command as root user.
So before running the command, enter
Let me know if you have any questions,
Joe
Travelevil says
Thank you Leron, it’s working, I’m adding some personalized codes for testing a new feature, if I get good results I’ll update you 🙂
Leron Amin says
Awesome – I’m looking forward to hearing about it! 😀
Joe
Ajit Kumar Singh says
Hi Sir,
I did followed the guidelines to install ssl (bitnami) for my website https://www.emiratesrepairs.ae/
However, It is not working.
screenshots attached for your reference.
https://www.dropbox.com/s/m7e6udtqsmzj9vo/Screenshot%202018-03-20%2014.41.04.png?dl=0
https://www.dropbox.com/s/jis6hofuewx25jn/Screenshot%202018-03-20%2014.41.50.png?dl=0
Leron Amin says
Hi Ajit,
The error message says there is a syntax error on line 13 in your Bitnami.conf file. This could be a spelling issue, extra spacing, or a number of other things.
What I would recommend doing is going back through the Bitnami SSL tutorial and make sure that your Bitnami.conf file is configured according to the settings as shown in the tutorial.
Hope this helps,
Joe
Rafal says
Hello,
Thank you for all the tutorials!
You had mentioned at the end that
“Because the script will renew the certificates one month prior to expiration, you can use a SSL Checker to verify whether the certificates have renewed successfully.”
I tried this link (SSL Shopper) and got these messages:
“www.website.com” resolves to “12.345.67.89” IP address
No SSL certificates were found on “www.website.com.” Make sure that the name resolves to the correct server and that the SSL port (default is 443) is open on your server’s firewall.
Questions:
1) Is this normal or should something be changed on my end?
2) Can we use the SSL Checker in place of the optional advanced testing?
Thank you
Leron Amin says
Hi Rafal,
When you run SSL checker, it should show the certificate files – including whether or not they are configured properly.
In your case the error message implies that the certificates aren’t being found on your server. I would go back to your server configuration file and make sure that the file paths are listed therein.
Let me know if you have any questions about this troubleshooting process,
Joe
Rafal says
Thank you, resolved 🙂
Ankit Patil says
At the end of Step 5 I get this message, which says I think auto renewal was simulated but some issue with bitnami config file. It does not like the word permanent (which was I guess added for some reason as I read in previous guide.). So what do i do now? Copying my output below.
——————————————————————————-
** DRY RUN: simulating ‘certbot renew’ close to cert expiry
** (The test certificates below have not been saved.)
Congratulations, all renewals succeeded. The following certs have been renewed:
/etc/letsencrypt/live/patil.capital/fullchain.pem (success)
** DRY RUN: simulating ‘certbot renew’ close to cert expiry
** (The test certificates above have not been saved.)
——————————————————————————-
AH00526: Syntax error on line 13 of /opt/bitnami/apache2/conf/bitnami/bitnami.conf:
Invalid command ‘permanent’, perhaps misspelled or defined by a module not included in the server
configuration
apache config test fails, aborting
/opt/bitnami/php/scripts/ctl.sh : php-fpm stopped
/opt/bitnami/mysql/scripts/ctl.sh : mysql stopped
/opt/bitnami/mysql/scripts/ctl.sh : mysql started at port 3306
/opt/bitnami/php/scripts/ctl.sh : php-fpm started
AH00526: Syntax error on line 13 of /opt/bitnami/apache2/conf/bitnami/bitnami.conf:
Invalid command ‘permanent’, perhaps misspelled or defined by a module not included in the server
configuration
apache config test fails, aborting
Leron Amin says
Hi Ankit,
Does your VirtualHost settings look like the settings below? (in your bitnami.conf file)
Remember to replace ‘yourdomain’ with your own domain name.
You can try removing ‘permanent’ from the redirect rule but this will cause the redirect to be treated as a 302 instead of 301.
Please get back to me as I may have to adjust the tutorial.
Thanks,
Joe
Ankit Patil says
Ok I found the mistake, I had Redirect at the end of second line and not at the start of third line, That fixed it.
Leron Amin says
Thanks for letting me know! I’m glad you were able to get it working! 😀
Jonathan says
Hi,
As previously mentioned, this is a great tutorial! Quick question, If I add a subdomain, will it still have the SSL certificates?
Leron Amin says
Hi Jonathan,
You can secure all of your subdomains by adding them in your certificate issuing command. For example, the Click-to-Deploy issuing command would look like:
Let me know if you have any questions,
Joe
Jonathan says
Awesome good to know! Could you possibly help me out with a command for Bitnami? I am still new to all of this 🙂
Leron Amin says
Hi Jonathan,
Were you able to find a solution? Which command are you struggling with?
Let me know and I will see how I can help,
Joe
Jonathan says
Hi Joe,
I tried running the following command which I think is correct:
./certbot-auto certonly –webroot -w /opt/bitnami/apps/wordpress/htdocs/ -d savingenergy.org.za -d app.savingenergy.org.za
But it says the directory doesn’t exist. I initially set up SSL for http://www.savingenergy.org.za using your Bitnami guide, and then I followed this guide (on this page) to configure the auto renew.
Leron Amin says
Hi Jonathan,
Where is the “directory doesn’t exist” message showing?
Jonathan says
Hi Joe, I couldn’t reply to your latest response for some reason. As soon as I connect via SSH I try run that command and I get “directory doesn’t exist”. I also tried running “./etc/letsencrypt/certbot-auto certonly –webroot -w /opt/bitnami/apps/wordpress/htdocs/…….” and I get “-bash: ./etc/letsencrypt/certbot-auto: No such file or directory”
Another quick question regarding the command: Must I include my domain that already has SSL certificates (www.savingenergy.org.za) with the subdomain, or only include the subdomain (app.savingenergy.org.za). For example:
…/opt/bitnami/apps/wordpress/htdocs/ -d savingenergy.org.za -d http://www.savingenergy.org.za -d app.savingenergy.org.za
or
…/opt/bitnami/apps/wordpress/htdocs/ -d savingenergy.org.za -d app.savingenergy.org.za
Thanks
Leron Amin says
Hi Jonathan,
The Certbot directory probably doesn’t exist. Try reinstalling:
From your home directory (enter cd from any location to return to home directory), run the following script to install Certbot:
Then, run the following script to issue the certificate:
Then, move Certbot into the Let’s Encrypt directory by running the following command:
Lastly, add this script as a cron job to automate the renewal process:
Hope this helps!
Joe
Jonathan says
Hi Joe, when running the script to issue the certificates I get the following:
“IMPORTANT NOTES:
– The following errors were reported by the server:
Domain: savingenergy.org.za
Type: unauthorized
Detail: Invalid response from
http://savingenergy.org.za/.well-known/acme-challenge/9T9FUGJuTFosBubQrAzOd92DavpRjhXEVXGRrV58Cq0:
”
<html id="
Domain: http://www.savingenergy.org.za
Type: unauthorized
Detail: Invalid response from
http://www.savingenergy.org.za/.well-known/acme-challenge/mvHGthgLEEf1KpRLH1ZSc8BOHUNzWyLqsDDBgYky-8Y:
"
<html id="
To fix these errors, please make sure that your domain name was
entered correctly and the DNS A/AAAA record(s) for that domain
contain(s) the right IP address."
Quick question – should I be running these scripts on the instance of my main site where I originally issued the SSL certificates (www.savingenergy.org.za), or on the new WordPress instance of my subdomain?
Sorry to be such a pain! I feel terrible.
Leron Amin says
Hi Jonathan,
The error indicates that either your domain nameservers haven’t resolved yet, or else there’s an issue with your DNS.
If you try again after an hour or so and the problem persists, then there is probably a DNS issue.
If you have a the subdomain in a separate VM instance, you may have to execute these scripts separately on each instance.
Also – having a subdomain as a separate WordPress instance would involve additional Cloud DNS and Apache server configuration to get everything working properly – so I honestly wouldn’t be surprised if the DNS error that you posted about is related to this.
Hope this helps and let me know if you have any questions!
Thanks,
Joe
Isaac says
Thanks so much for these awesome tutorials. They saved my life a few times.
The past few websites I’ve made, I will add certification and it looks good but then the website will stop and start every couple hours / minutes. When they don’t work, they give me a DNS_PROBE_FINISHED_NXDOMAIN error. When they do, everything with the encryption is fine. Does this have to do with the SSL process?
Leron Amin says
Hi Isaac,
Thanks for the feedback! 😀
The problem you described is usually related to DNS propagation and typically resolves itself after a couple hours of pointing your domain to Google’s nameservers.
If the problem is persisting, and is reoccurring on a specific domain, it may indicate a greater issue.
Talk to you soon,
Joe
Tito Lara says
Hi Leeron,
So I was just following your tutorials and I think i messed up something. I was doing exactly what it was saying on the tutorial but it didn’t work at the final step. It said no renewals were attempted and after that I went to my website and it went down. Please I can’t find any solutions. HELP
Leron Amin says
Hi Tito,
I will need more information from you about the problem, including which command caused the error and what your browser shows when you try to access the website.
Talk to you soon,
Joe
Gagandeep Singh says
Hello Leron,
I don,t have any issue with this tutorial. Actually, my issue is little out of the box. I was using Hostgator Hosting before moving to Google Cloud Network. A Big Thanks to you for the best tutorials on Cloud Networks. As I was with Hostgator Hosting, so there was free Comodo SSL with my hosting. I tried to Install Comodo Certificates with the help of their documentation “How to create Public and Private key” and “Installing certificates in apache server”. At first, it seems that my certificates were properly installed. As there was green padlock sign on most browsers. But after some time I start experiencing some issues because of this. First Facebook and Instagram mobile apps were blocking my website through links by a cautious sign that website is not secure. And also Wp-Rocket Plugin was not preloading my website pages. Because of error: cURL error 60: SSL certificate problem: unable to get local issuer certificate
And for a temporary solution, I have installed Lets Encrypt Certificate with this tutorial. And Both of my issues are solved for now. As you know Hostgator will not help me in this as now my domain is not pointing to their servers.
I had added these certificate file address in bitnami.conf file
“`
#SSLCertificateFile “/opt/bitnami/apache2/conf/lookholic_com.crt”
#SSLCertificateKeyFile “/opt/bitnami/apache2/conf/lookholic.key”
#SSLCertificateChainFile “/opt/bitnami/apache2/conf/AddTrustExternalCARoot.crt”
“`
It will be so nice of you if you can help me in this.
A Huge Thanks in Advance,
Gagandeep Singh
Leron Amin says
Hi Gagandeep,
I’m glad you found the tutorial helpful.
That being said, you will need to un-comment the certificate files that you posted above – meaning you need to remove the # sign from in front of them.
That should fix the problem. If not, make sure those are the correct certificates paths that you’re pointing to, and that you’re using them in the correct location.
Let me know if you have any questions,
Joe
mike says
My current server time says 03:30 UTC, and i do the force test for 35 03 * * etc. It worked. But 03:30 is actually 930 pm where I am.
So would 45 2 ** etc actually be 8:45pm for my auto renew script? should I change the hour in cron to something other than 2?
Leron Amin says
Hey Mike,
The idea behind 2:45am is just to designate a time when your website typically sees low levels of traffic.
Depending on where the majority of your traffic is coming from, that could be either 2:45am or 2:45pm.
I will leave it to you to decide the best time for your specific website, but you are very correct about what you say in your message.
Let me know if you have any questions,
Joe
Anu says
Thanks. ! Works Great.
Leron Amin says
Great! I’m glad it worked! 😀
Ay says
Hello friend
i do the frist steps but when reach that command found another things
$ sudo crontab -e
no crontab for root – using an empty one
Select an editor. To change later, run ‘select-editor’.
1. /bin/nano <—- easiest
2. /usr/bin/vim.basic
3. /usr/bin/vim.tiny
Leron Amin says
Hi Ay,
Choose option 1
Ay says
Hi Leron
I get this error from google webmaster tools “Self signed SSL/TLS certificate”
Google has detected that the SSL/TLS certificate used on https://00 is self-signed, which means that it was issued by your server rather than by a Certificate Authority. Because only Certificate Authorities are considered trusted sources for SSL/TLS certificates, your certificate cannot be trusted by most of the browsers. In addition, a self-signed certificate means that your content is not authenticated, it can be modified, and your user’s data or browsing behavior can be intercepted by a third-party. As a result, many web browsers will block users by displaying a security warning message when your site is accessed. This is done to protect users’ browsing behavior from being intercepted by a third party, which can happen on sites that are not secure.
Leron Amin says
Hi Ay,
This means that your server isn’t using the new SSL certificates, it is still using the old ‘unsigned’ certificates.
I would go back to the tutorial, check your conf file where you have all three certificate files listed, and make sure the old certificate files are commented-out with a # sign.
Take a look and let me know what you find. Also, send your URL if you want me to take a look.
Thanks,
Joe
Ay says
thanks my friend Leron
this is my site knoozi. com
Steve says
Hi Joe,
Thank you so much for your help. I have just re-issue the SSL certification by following your 1st tutorial. After I have done, the SSL increase 89 days since today.
However, I got stuck when following the Auto-renew tutorial. Everything was fine until I moved the Certbot package into the Letsencrypt directory.
But after I execute the command: sudo crontab -e
It appears the following commands at the end of file:
# m h dom mon dow command
0 0 * * * ./certbot-auto renew –quiet –no-self-upgrade
0 12 * * * ./certbot-auto renew –quiet –no-self-upgrade
According to you tutorial, It should not have the two commands below:
0 0 * * * ./certbot-auto renew –quiet –no-self-upgrade
0 12 * * * ./certbot-auto renew –quiet –no-self-upgrade
Is there anything goes wrong? I tried to delete these two commands and replace by BITNAMI command
45 2 * * 6 cd /etc/letsencrypt/ && ./certbot-auto renew && /opt/bitnami/ctlscript.sh restart
Then I press Ctr+O but it seems not work.
Can you give me some advice, please?
Thank you so much
Steve
http://www.hienthaoshop.com
Leron Amin says
Hi Steve,
Delete the two lines of code that are there, and replace them with:
Then, to save and exit, type CTRL + X then y then Enter
If this doesn’t work, make sure you’re using the Nano text editor in your console. To verify, run the following command to open your crontab file:
Let me know if you have any questions,
Joe
Steve says
Hi Joe,
Thank you so much. I did it. I think it works well now.
I am very appreciated your kind support!
Best Regards
Steve
Leron Amin says
Great Steve,
I am glad I was able to help! 😀
Joe
Marina Ficcio says
Hi Joe,
I just started and after the first step “ls”, for me showed up “apps htdocs stack” instead showing anything or certbot-auto.
what does that mean? should I continue anyway?
Regards,
Marina
Leron Amin says
Hi Marina,
If you don’t see certbot when you run the ls command, it means that you need to run the download command:
Hope this helps,
Joe
Marina Ficcio says
Hi again, I did it.
Now I have a problem on the step 3
“…-vm:~$ sudo crontab -e
no crontab for root – using an empty one
Select an editor. To change later, run ‘select-editor’.
1. /bin/nano <—- easiest
2. /usr/bin/emacs24
3. /usr/bin/vim.basic
4. /usr/bin/vim.tiny
Choose 1-4 [1]:"
what should I do?
thank you again,
regards,
marina.
Leron Amin says
Hi Marina,
Choose option 1 – Nano is the easiest text editor to use.
Let me know if you have any questions,
Joe
Marina Ficcio says
Hi Joe, again.
It seems that worked fine, but I noticed two differences showed (bellow) on my last step (5) , the first line is different from yours, and the Syntax didn’t show up on your tutorial.
So, I also checked on the SSL checker and it is still “The certificate will expire in 18 days.” and step 6.2 and 6.3 is failure for me as well.
“Cert is due for renewal, auto-renewing…
Plugins selected: Authenticator webroot, Installer None
Renewing an existing certificate
Performing the following challenges:
http-01 challenge for marinaficcio.com
http-01 challenge for http://www.marinaficcio.com
Waiting for verification…
Cleaning up challenges
——————————————————————————-
new certificate deployed without reload, fullchain is
/etc/letsencrypt/live/marinaficcio.com/fullchain.pem
——————————————————————————-
——————————————————————————-
** DRY RUN: simulating ‘certbot renew’ close to cert expiry
** (The test certificates below have not been saved.)
Congratulations, all renewals succeeded. The following certs have been renewed:
/etc/letsencrypt/live/marinaficcio.com/fullchain.pem (success)
** DRY RUN: simulating ‘certbot renew’ close to cert expiry
** (The test certificates above have not been saved.)
——————————————————————————-
Syntax OK
/opt/bitnami/apache2/scripts/ctl.sh : httpd stopped
/opt/bitnami/php/scripts/ctl.sh : php-fpm stopped
/opt/bitnami/mysql/scripts/ctl.sh : mysql stopped
/opt/bitnami/mysql/scripts/ctl.sh : mysql started at port 3306
/opt/bitnami/php/scripts/ctl.sh : php-fpm started
Syntax OK
/opt/bitnami/apache2/scripts/ctl.sh : httpd started at port 80
Leron Amin says
Hi Marina,
SSL Checker will show a cached version of the domain’s certificate. You have to refresh the page – there should be a link under the bar where you enter the domain. Click it to refresh.
If that doesn’t work, then make sure that you moved your certbot package to the etc/letsencrypt/ directory AND that you checked your system log (cd var/log/ && cat syslog) to make sure that the auto-renew crontab executed properly.
Jay Bro says
My renewal settings didn’t work and is now expired. I didn’t find article on how to renew cretificate here.. can you please refer me if there is already tutorial for this?
Thanks
Leron Amin says
Hi Jay,
Run the renewal command from step 3 of the SSL tutorials (Bitnami or Click-to-Deploy) and choose to overwrite your existing certificate.
After you’ve done that, follow this tutorial to configure auto-renewal.
Let me know if you have any questions!
Benjamin Waller says
Hello Joe,
I’ve just got a question about the lines of code that were already in my cron tab. as below.
0 0 * * * ./certbot-auto renew –quiet –no-self-upgrade
0 12 * * * ./certbot-auto renew –quiet –no-self-upgrade
*/1 * * * * sudo su daemon -s /bin/sh -c “/opt/bitnami/php/bin/php /opt/bitnami/apps/moodle/htdocs/admin/cli/cron.php > /dev/null”
Do I need to just add the following line right below the last line listed above?
45 2 * * 6 cd /etc/letsencrypt/ && ./certbot-auto renew && /opt/bitnami/ctlscript.sh restart
I noticed in your tutorial you didn’t have any of these lines saved so I am a bit confused.
Thanks for the tutorial again Joe.
Cheers,
Ben
Benjamin Waller says
Hi Joe,
I just took the chance and added that auto renewal to the cron tab. That seemed to work fine but when I went through the ‘dry run’ process I got the following error:
——————————————————————————
Processing /etc/letsencrypt/renewal/hocvietngu.com.conf
——————————————————————————-
Cert not due for renewal, but simulating renewal for dry run
Plugins selected: Authenticator webroot, Installer None
Renewing an existing certificate
Performing the following challenges:
http-01 challenge for hocvietngu.com
http-01 challenge for http://www.hocvietngu.com
Waiting for verification…
Cleaning up challenges
Attempting to renew cert (hocvietngu.com) from /etc/letsencrypt/renewal/hocvietngu.com.conf produced an unexpected error: Failed authoriza
tion procedure. hocvietngu.com (http-01): urn:acme:error:connection :: The server could not connect to the client to verify the domain ::
Fetching https://www.hocvietngu.com.well-known/acme-challenge/kczzfDC-zxKmvrEo1SH86ncA76Fiv5xXhDYgat6TLik: Error getting validation data,
http://www.hocvietngu.com (http-01): urn:acme:error:connection :: The server could not connect to the client to verify the domain :: Fetching htt
ps://www.hocvietngu.com.well-known/acme-challenge/4Ffnj3B7iirlrk-hhkbije1X8gvdTJfPtv32wFK5sZE: Error getting validation data. Skipping.
All renewal attempts failed. The following certs could not be renewed:
/etc/letsencrypt/live/hocvietngu.com/fullchain.pem (failure)
——————————————————————————-
** DRY RUN: simulating ‘certbot renew’ close to cert expiry
** (The test certificates below have not been saved.)
All renewal attempts failed. The following certs could not be renewed:
/etc/letsencrypt/live/hocvietngu.com/fullchain.pem (failure)
** DRY RUN: simulating ‘certbot renew’ close to cert expiry
** (The test certificates above have not been saved.)
——————————————————————————-
1 renew failure(s), 0 parse failure(s)
IMPORTANT NOTES:
– The following errors were reported by the server:
Domain: hocvietngu.com
Type: connection
Detail: Fetching
https://www.hocvietngu.com.well-known/acme-challenge/kczzfDC-zxKmvrEo1SH86ncA76Fiv5xXhDYgat6TLik:
Error getting validation data
Domain: http://www.hocvietngu.com
Type: connection
Detail: Fetching
https://www.hocvietngu.com.well-known/acme-challenge/4Ffnj3B7iirlrk-hhkbije1X8gvdTJfPtv32wFK5sZE:
Error getting validation data
To fix these errors, please make sure that your domain name was
entered correctly and the DNS A/AAAA record(s) for that domain
contain(s) the right IP address. Additionally, please check that
your computer has a publicly routable IP address and that no
firewalls are preventing the server from communicating with the
client. If you’re using the webroot plugin, you should also verify
that you are serving files from the webroot path you provided.
Do you have any ideas of the reason for this error? I looks like a connect error but don’t know what to do to troubleshoot.
Pls let me know if you know how solve this one.
Best regards,
Ben
Leron Amin says
Hey Ben,
The first thing I would check is that the IP address listed in the A record for your domain (in Cloud DNS), matches the IP address of your VM instance.
Did you do any DNS changes recently? Like within the last 5 days or so?
Also, on your VM instances page, click the “settings” icon at the top of the page, and under the firewall section, make sure you instance is set to to allow HTTP and HTTPS traffic.
Also – are you using Click-to-Deploy or Bitnami?
Talk to you soon,
Joe
Benjamin Waller says
Hello Joe,
Thanks for your response.
I have checked all of your suggested things to look at and they all seem ok.
1. The IP address matches an A record with the same IP
2. I haven’t made any DNS changes recently.
3. The firewall is set to allow both HTTP and HTTPS traffic.
4. I am using the Bitnami instance.
I will keep looking for a solution.
Best regards,
Ben
Leron Amin says
Hi Ben,
Thanks for the update. Were you able to get the issue resolved?
I looked on Let’s Encrypt’s forums and found users who have encountered a similar situation when trying to use any of the renew commands:
Resource 1
Resource 2
From what I understand from reading up on the issue, it’s possibly a redirect issue. So you may want to check the HTTP to HTTPS redirect that you configured in your server’s conf file when setting up SSL. I don’t know exactly how your conf file is configured, but there are many ways to configure HTTPS to HTTPs redirects, so I would play around with them and figure out which works with Let’s Encrypt.
The two redirect configurations mentioned in the SSL tutorials are:
Please note that the first redirect is only compatible with the later versions of Apache.
Hope this information helps and let me know if you find the solution to the problem.
Thanks,
Joe
Benjamin Waller says
Hey Joe,
I am still investigating this dry-run error and will post to Let’s Encript’s community to see if I can get any future help with it and will keep you posted.
Best regards,
Ben
Leron Amin says
Hey Ben,
Thanks for the update! I wish I could be of more assistance, but unfortunately I don’t understand the inner-workings of Let’s Encrypt like the developers do.
I’m looking forward to the update on how you fixed the problem!
Talk to you soon,
Joe
Benjamin says
Hello Joe,
I got a fix for this issue, see link below.
https://community.letsencrypt.org/t/certbot-auto-renewal-dry-run-failure/52935/4
but here is a summary:
The web server was sending an incorrect redirect – it’s missing a “/” between the domain and path.
My Apache configuration file had “Redirect / https://www.hocvietngu.com” and I needed to add a “/” after the domain like “Redirect / https://www.hocvietngu.com/”
I got a “Congratulations, all renewals succeeded” message after running the dry-run script so we are all good!
Thanks again Joe. I am so grateful for your tutorials.
Best regards,
Ben
Leron Amin says
Hey Ben,
I am glad you were able to get the issue resolved!
I wouldn’t have caught that error so I’m glad the Let’s Encrypt developers were able to spot the problem.
No doubt I will be bookmarking this solution, because from what I remember, you’re not the first person to have posted this error. Though I’m not sure if the causes or solutions are the same, it’s one thing to check off of the list when troubleshooting.
Thanks again for sharing the solution!
Talk to you soon,
Joe
Leron Amin says
Hi Ben,
You would remove all of the lines that are already there, and replace them with:
45 2 * * 6 cd /etc/letsencrypt/ && ./certbot-auto renew && /opt/bitnami/ctlscript.sh restart
Talk to you soon,
Joe
Benjamin Waller says
Hi Joe,
Thanks for your reply.
I remember now that I added the other cron job which is specific for Moodle to run properly so I don’t think I will delete that one. See this page. https://docs.moodle.org/33/en/Cron
*/1 * * * * sudo su daemon -s /bin/sh -c “/opt/bitnami/php/bin/php /opt/bitnami/apps/moodle/htdocs/admin/cli/cron.php > /dev/null”
Cheers,
Ben
Leron Amin says
Hi Ben,
Definitely don’t remove that script. I didn’t realize that it was necessary in order for Moodle to run properly!
Jonathan says
Hi, great tutorial! When exactly does the auto-renewal happen? I am getting emails that my certificate is going to expire in 10 days.
Leron Amin says
Hi Jonathan,
Auto-renewal take place 30 days before the certificates are due to expire. If your certificate is due to expire in 10 days and hasn’t renewed, then the auto-renewal command isn’t working.
Also – remember – in this tutorial, the renewal command is set to run a 2:45am every Saturday. So if you just recently followed this tutorial, you will have to wait until Saturday for the command to run again.
If I were you, I would go through the test section of the tutorial to test the settings and make sure everything is working properly.
Let me know if you have any questions! 🙂
Jonathan says
Hi Leron,
I am trying to configure the auto-renew script and I am getting the following error:
crontab: installing new crontab
“/tmp/crontab.Mib5dv/crontab”:0: bad minute
errors in crontab file, can’t install.
Do you want to retry the same edit? (y/n)
Jonathan says
Please ignore my previous post, I realised that by mistake I had removed the “#” from the first line of the file. Whoops!
Quick question though. My SSL certificates are going to expire in 2 days according to a SSL checker. So When setting up the auto-renewal script, I changed the testing time to:
45 2 * * 2
So will my certificates be renewed at 2:45 this afternoon (it is currently Tuesday 10:20am).
I will let you know what happens 🙂
Leron Amin says
Hi Jonathan,
Linux uses 24-hour time, so the certificates will renew NEXT Tuesday at 2:45am (because by 10:20am, 2:45am had already passed).
For 2:45pm on Tuesday you would use 45 14 * * 2
To renew the certificate manually, run the following 2 commands:
sudo -i
cd /etc/letsencrypt/ && ./certbot-auto renew && /etc/init.d/apache2 restart
Notice how the second command is broken down into 3-parts separated by &&. If you are using a Bitnami stack, the restart command (part 3) needs to be replaced with /opt/bitnami/ctlscript.sh restart.
Hope this helps and let me know if you run into any issues! 😀
Jonathan says
Thanks Leron, the commands worked perfectly and my certificate has been renewed! I really appreciate how helpful you are.
Leron Amin says
Great Jonathan! I am glad to hear it worked for you! 😀
Leron Amin says
Hi Jonathan,
Auto-renewal take place 30 days before the certificates are due to expire. If your certificate is due to expire in 10 days and hasn’t renewed, then the auto-renewal command isn’t working.
Also – remember – in this tutorial, the renewal command is set to run a 2:45am every Saturday. So if you just recently followed this tutorial, you will have to wait until Saturday for the command to run again.
If I were you, I would go through the test section of the tutorial to test the settings and make sure everything is working properly.
Let me know if you have any questions! 🙂
Dustin says
This is pretty fantastic Leron!
Do you have any plans to update this tutorial for wp mulitsite’s? The configuration is a bit different and the Bitnami instructions are a little unclear.
Thanks for the good work.
Leron Amin says
Hi Dustin,
Thanks for the feedback!
I will be a series on multisite configuration so stay tuned!
Talk to you soon,
Joe
kent says
I am looking forward to a WordPress multisite guide to SSL too! I haven’t been able to figure it out. Thank you!
Leron Amin says
Sounds good Kent,
You can expect an SSL tutorial with the WP Multisite tutorials.
Leron Amin says
What did you think of this tutorial?
Please share your questions and comments below!
lee says
This (and all) of your tutorials are life changing. THANK YOU!
I have a question.. I went through all the steps here and I think everything was successful.
How long does it take for the cert to show up? I am visiting my site and still not seeing that glorious “SECURE” text by my domain haha.
Thanks Leron!
Leron Amin says
Hey Lee,
Thanks for the feedback! 😀
You installed your certificate correctly, based on SSL Checker.
The reason your website isn’t being served via HTTPS is because of insecure content errors. You can learn more about insecure content errors and how to fix them by checking out this tutorial here.
Please reach out to me if you have any questions.